Drone Wiring Guide: Understanding Wire Sizes, Types, and Best Practices

After building dozens of drones over the years, I've learned that proper wiring is one of the most underappreciated aspects of drone building. This guide distills my experience into practical advice on selecting the right wires, connectors, and wiring techniques for your FPV drone builds.
Introduction to Drone Wiring
Proper wiring is critical for several reasons:
- Current handling: Ensures wires can safely carry the required current without overheating
- Weight optimization: Minimizes unnecessary weight while maintaining safety
- Interference reduction: Proper layout and shielding reduces noise in sensitive systems
- Reliability: Prevents failures due to vibration, crashes, or environmental factors
- Maintenance: Makes troubleshooting and repairs easier
Poor wiring choices can lead to voltage sag, overheating, signal interference, and in worst cases, electrical shorts that can damage components or cause fires.
Wire Sizes and Current Ratings
AWG (American Wire Gauge) Explained
Wire size is typically specified using the AWG (American Wire Gauge) system, where lower numbers indicate thicker wires. For drone applications, common sizes range from 8 AWG (very thick) to 30 AWG (very thin).
Current Capacity by Wire Size
| AWG Size | Max Continuous Current* | Typical Drone Applications | Considerations |
|---|---|---|---|
| 8 AWG | 50-70A | Main battery leads for large drones (7"+) | Heavy, but minimal voltage sag |
| 10 AWG | 30-40A | Battery leads for medium drones (5-7") | Good balance for 5" freestyle |
| 12 AWG | 20-30A | ESC power distribution, battery leads for smaller builds | Standard for many 5" builds |
| 14 AWG | 15-20A | Motor wires for high-power setups | Often pre-installed on larger motors |
| 16 AWG | 10-15A | Motor wires, power distribution for medium current | Good balance of weight and current capacity |
| 18 AWG | 7-10A | Low-current power distribution, LED power | Flexible, easy to work with |
| 20 AWG | 5-7A | VTX power, accessory power | Common for internal PDB connections |
| 22-24 AWG | 2-4A | Low-current accessories, signal with power | Often used for camera power |
| 26-30 AWG | 0.5-1.5A | Signal wires, UART connections, I2C | Used for data only, not power delivery |
Note: Current ratings are approximate and depend on wire length, insulation type, airflow, and ambient temperature. For drone applications where wires are exposed to airflow, slightly higher currents may be acceptable for short durations.
I've found that many builders tend to oversize power wires out of caution, which adds unnecessary weight. For my 5" freestyle builds, I typically use:
- 12 AWG for battery leads (10 AWG for long-range builds with larger batteries)
- 16 AWG for motor wires (14 AWG only for very high-power setups)
- 20-22 AWG for VTX and camera power
- 26-30 AWG for signal connections
Wire Types and Insulation
Silicone vs. PVC Insulation
| Property | Silicone Wire | PVC Wire |
|---|---|---|
| Flexibility | Excellent - Remains flexible in cold | Good - Can become stiff in cold |
| Temperature Rating | High (typically -60°C to +180°C) | Moderate (typically -20°C to +80°C) |
| Weight | Lighter | Heavier |
| Durability | More resistant to vibration fatigue | Less resistant to repeated flexing |
| Cost | Higher | Lower |
| Best For | All drone applications | Budget builds, fixed installations |
For FPV drones, silicone-insulated wire is strongly preferred due to its flexibility, temperature resistance, and durability in high-vibration environments. The extra cost is justified by the reliability benefits and weight savings.
Stranded vs. Solid Core
Drones should almost exclusively use stranded wire rather than solid core:
- Stranded wire can flex repeatedly without breaking
- Better vibration resistance
- More flexible for tight installations
- Distributes current across multiple strands
The only exception might be very small builds where weight is absolutely critical, but even then, the reliability tradeoff rarely justifies using solid core wire.
Power Distribution Wiring
Main Battery Leads
The connection between your battery and power distribution system is critical:
- Use appropriate gauge wire based on maximum current draw (typically 10-12 AWG for 5" quads)
- Keep leads as short as practical while allowing for battery mounting
- Use high-quality silicone wire with many fine strands for flexibility
- Ensure proper polarity with clear color coding (red for positive, black for negative)
- Use quality connectors rated for the maximum current (XT60/XT30)
ESC and Motor Wiring
For connecting ESCs to motors:
- Match or exceed the wire gauge that came with your motors
- Typical sizes: 16 AWG for 5" freestyle, 14 AWG for high-power setups
- Keep motor wires as short as possible to reduce EMI
- Consider using shielded wire for long motor leads (rare in typical builds)
- Twist motor wires to reduce electromagnetic interference
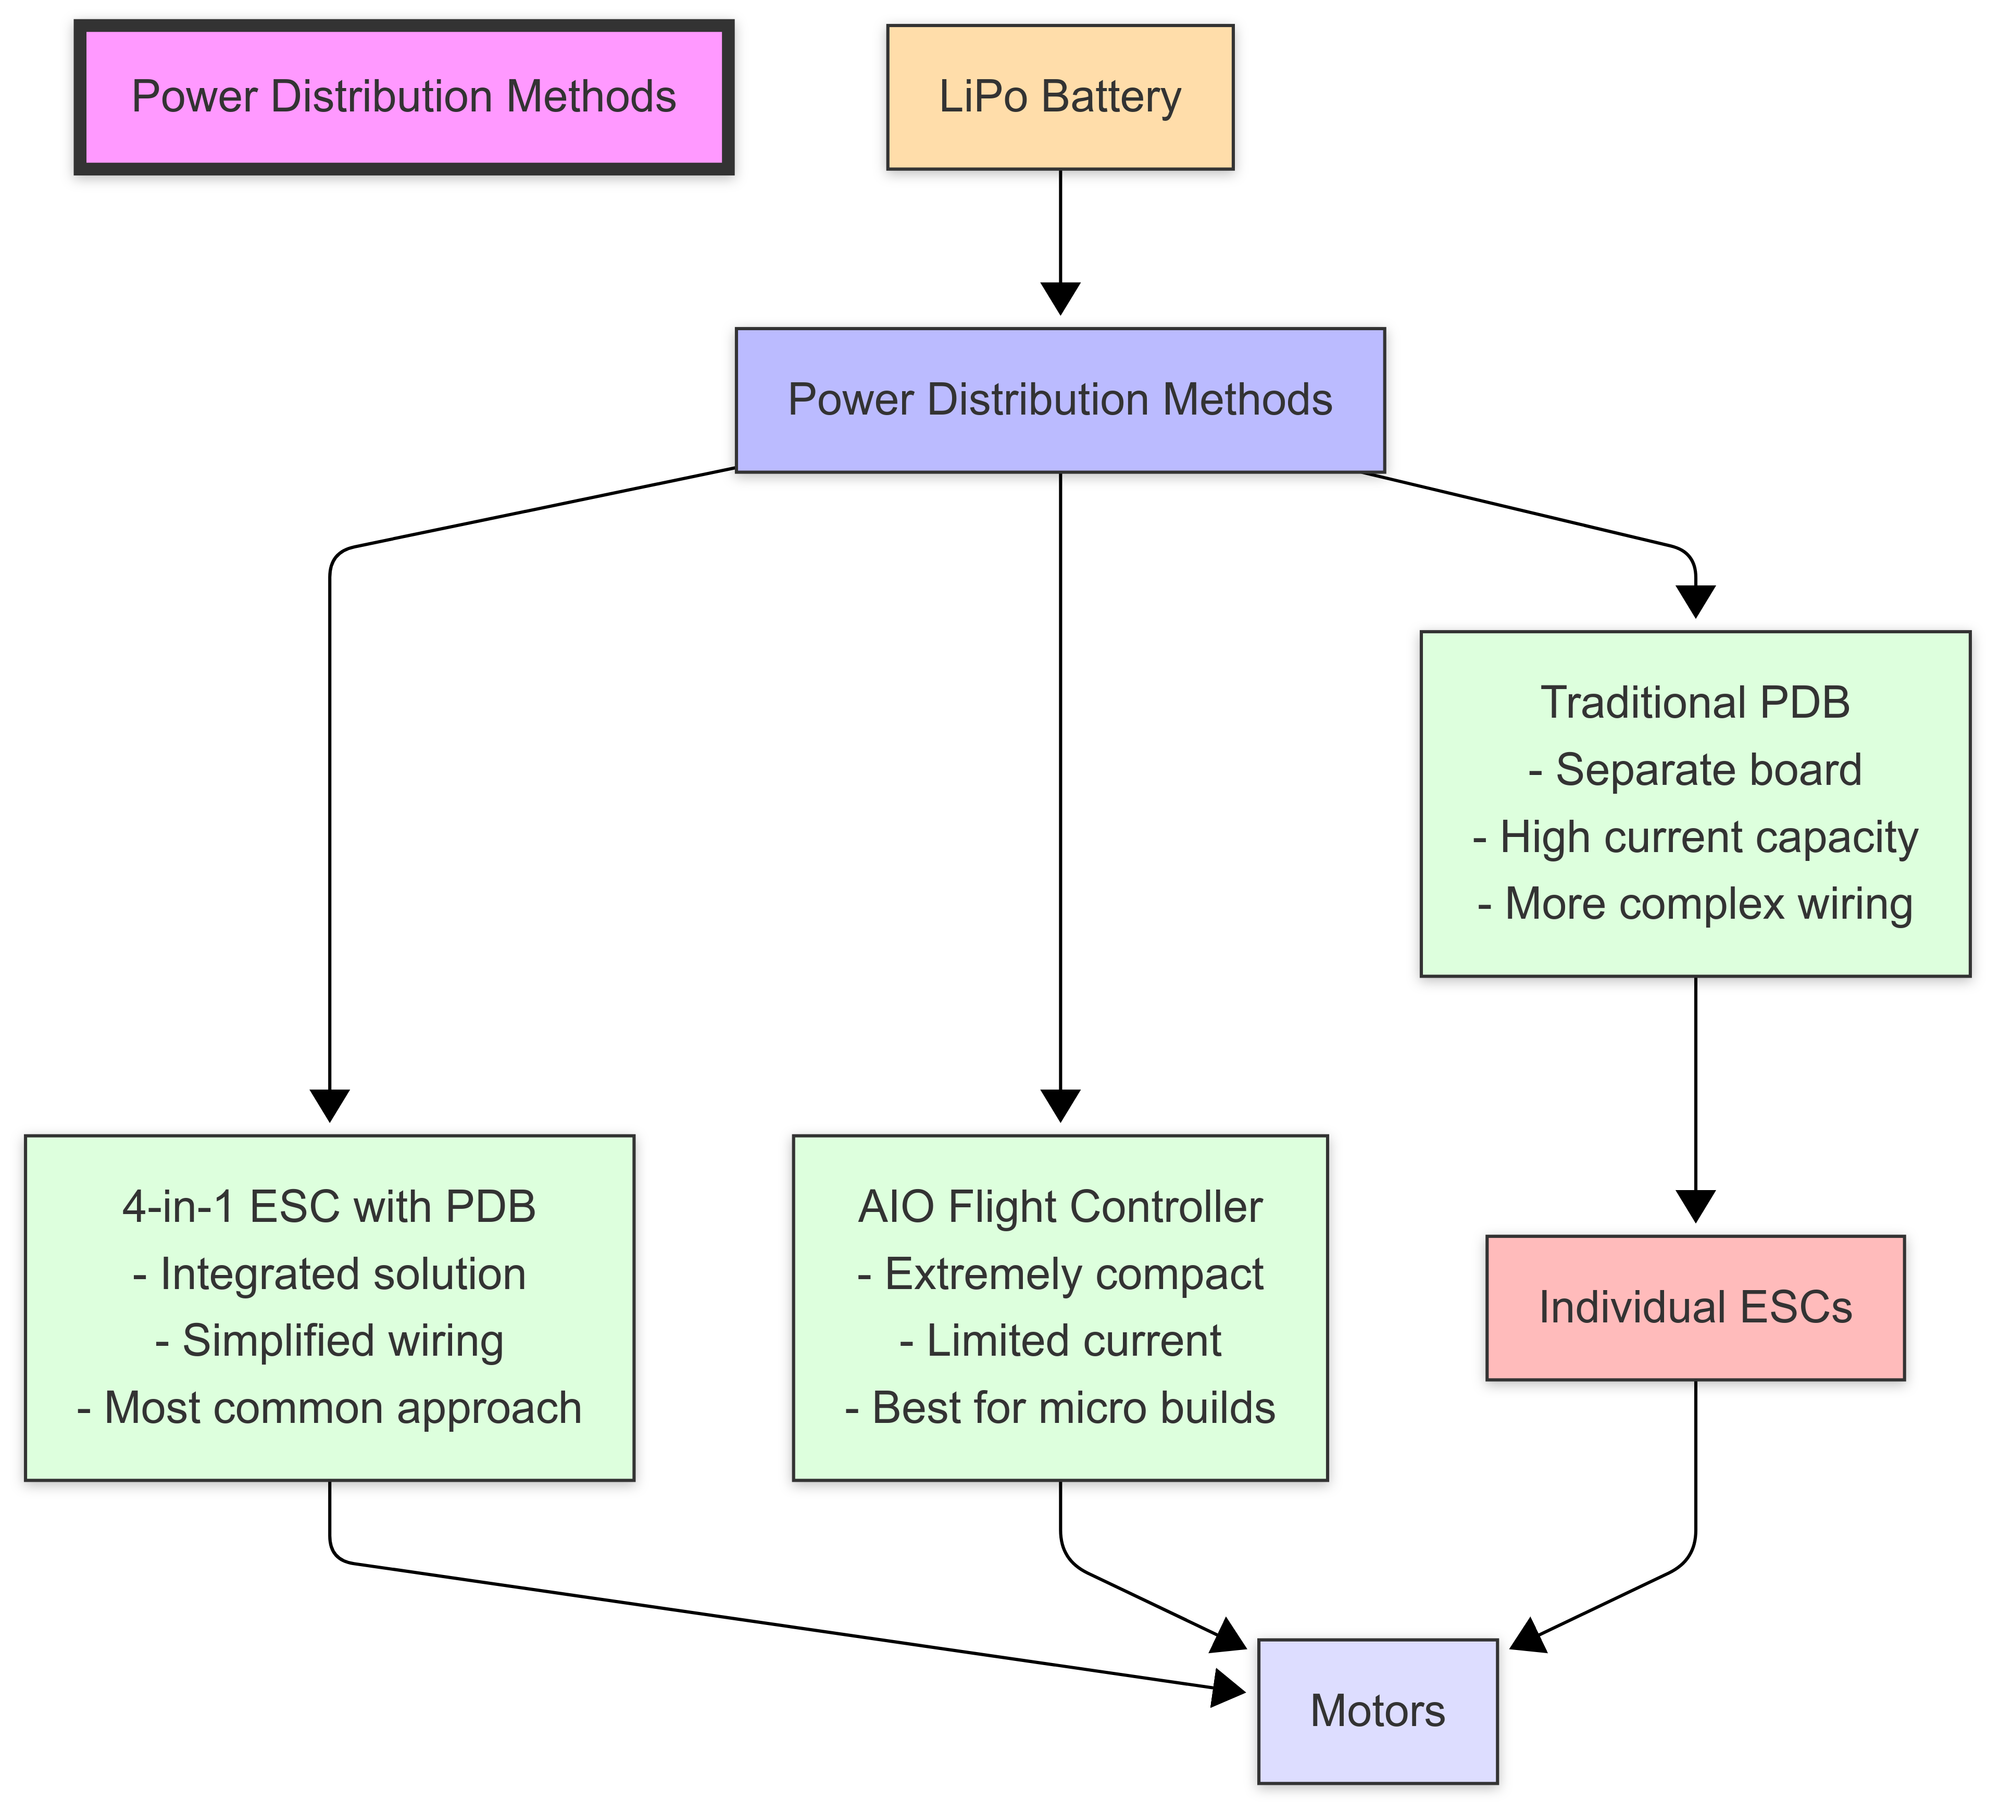
Power Distribution Methods
There are several approaches to power distribution in modern drones:
- Traditional PDB (Power Distribution Board)
- Separate board with thick copper traces
- Often includes filtering capacitors and voltage regulators
- Becoming less common in modern builds
- 4-in-1 ESC with integrated PDB
- Most common in modern builds
- Simplifies wiring significantly
- Usually includes filtered outputs for VTX, camera, etc.
- Direct soldering to flight controller
- Some AIO (All-In-One) flight controllers have ESCs built in
- Simplest wiring but limited current handling
- Best for micro builds or lightweight setups
- Wire harnesses and connectors
- Pre-made wire sets with appropriate connectors
- Convenient but adds weight and potential points of failure
- Useful for builds that require frequent disassembly
Signal Wiring
UART and Signal Wire Considerations
Signal wires carry low-current data rather than power:
- Typically 26-30 AWG silicone wire
- Keep signal wires away from power wires and ESCs when possible
- Use twisted pairs for differential signals (e.g., ELRS receivers)
- Consider shielded wire for sensitive applications or long runs
- Color-coding helps with troubleshooting (e.g., white for signal, black for ground)
Common Signal Connections
| Connection Type | Wire Size | Shielding Needed? | Notes |
|---|---|---|---|
| Receiver to FC | 26-30 AWG | Sometimes | SBUS, CRSF, ELRS - consider twisted pair |
| Camera to FC | 26-28 AWG | Sometimes | Video signal benefits from shielding |
| VTX Control | 28-30 AWG | No | SmartAudio, Tramp Telemetry |
| GPS | 26-28 AWG | Yes | Longer wires, susceptible to interference |
| I2C Devices | 28-30 AWG | Sometimes | Magnetometer, barometer, etc. |
| LED Control | 26-28 AWG | No | Data line for addressable LEDs |
Wiring Best Practices
Soldering Techniques
Proper soldering is critical for reliable connections:
- Preparation
- Tin both the wire and the pad separately before joining
- Use appropriate temperature (typically 350-380°C for lead solder)
- Use quality solder with rosin core (63/37 or 60/40 lead/tin for easiest work)
- Clean pads with isopropyl alcohol before soldering
- Execution
- Heat the pad, not the solder
- Apply solder to the junction of iron and pad
- Create a small fillet that fully wets both wire and pad
- Avoid cold solder joints (dull, grainy appearance)
- Avoid excessive solder (potential shorts)
- Finishing
- Inspect for proper flow and wetting
- Clean flux residue with isopropyl alcohol
- Check for unintended bridges or shorts
- Consider conformal coating for environmental protection
Wire Management
Proper wire routing and management improves reliability and maintenance:
- Routing Considerations
- Keep wires away from props and moving parts
- Route signal wires away from power wires and ESCs
- Provide strain relief at connection points
- Allow for component access and replacement
- Consider crash forces and protect vulnerable connections
- Securing Methods
- Zip ties (smallest appropriate size)
- Soft silicone wire ties (reusable and gentle)
- Cable sleeving for wire bundles
- Double-sided foam tape for securing wires to frame
- Heat shrink tubing for strain relief and protection
- Length Management
- Cut wires to appropriate length with small service loop
- Avoid excessive wire length that adds weight
- Coil and secure any necessary extra length
- Consider future maintenance when trimming wires
Spending extra time on wire management pays dividends in reliability and ease of maintenance. A clean build is typically more reliable and easier to troubleshoot.
Connectors and Terminations
Common Connector Types
| Connector | Current Rating | Best Use | Pros | Cons |
|---|---|---|---|---|
| XT60 | 60A | Main battery (5" and larger) | Secure connection, widely available | Bulky, heavier |
| XT30 | 30A | Main battery (smaller builds), ESC connections | Compact, good current handling | Can be difficult to unplug |
| JST-RCY | 3-5A | Low-power connections | Secure locking mechanism | Limited current |
| JST-PH 2.0 | 2A | Receiver, GPS, other accessories | Small, lightweight | Fragile, limited current |
| JST-GH 1.25 | 1-2A | Flight controller peripherals | Very small, secure | Very fragile, difficult to crimp |
| BT2.0 | 15-20A | Micro build main battery | Compact, good current for size | Less common |
| Molex Picoblade | 1A | Tiny electronics, microbuilds | Extremely small | Extremely fragile |
When to Use Connectors vs. Direct Soldering
Connectors add convenience but also weight and potential points of failure:
Use connectors for:
- Components that need frequent removal (VTX, camera, etc.)
- Modular builds where you swap components
- Connections that might need service or replacement
- Battery connections (almost always)
Direct solder for:
- Critical power connections where reliability is paramount
- Weight-critical applications
- High-current paths where connectors might add resistance
- Permanent installations that won't need disconnection
In my builds, I typically use connectors for:
- Battery connection (XT60/XT30)
- Camera and VTX (JST or similar)
- Receiver if it might be swapped
- GPS module
I direct solder:
- ESC power connections
- Motor connections
- On-board accessories that won't be removed
Special Considerations for Different Build Types
Micro Builds (<3")
- Extreme weight sensitivity requires minimalist wiring
- Often use 20-24 AWG for power, 26-30 AWG for signal
- Consider ribbon cables for multiple signals
- BT2.0 or similar compact connectors for battery
- Direct soldering preferred where possible
- AIO flight controllers with integrated ESCs simplify wiring
Freestyle/Racing (5")
- Balance of weight and current handling
- 12 AWG battery leads, 16 AWG motor wires typical
- 4-in-1 ESC with integrated PDB most common
- Protect wires from crash damage
- Consider soft-mounting components to reduce vibration stress on wires
- Secure wiring to prevent prop strikes during crashes
Long Range (7"+)
- Higher capacity batteries require heavier gauge wire (10 AWG or larger)
- More accessories (GPS, telemetry, etc.) increase wiring complexity
- Careful signal wire routing to minimize interference
- Consider redundant power paths for critical systems
- Shielded wires for sensitive navigation equipment
- Weatherproofing for extended outdoor exposure
Cinematic Builds
- Clean wire management crucial for vibration isolation
- Separate power systems for propulsion and camera gear
- Shielded wires for video signals
- Consider quick-disconnect systems for field maintenance
- Noise isolation between power and video systems
- Redundancy for critical systems
Troubleshooting Common Wiring Issues
Voltage Sag
Symptoms:
- Performance drops during high throttle
- VTX or video issues during punch-outs
- Brownouts or reboots during aggressive maneuvers
Potential Causes:
- Undersized power wires
- Poor solder joints adding resistance
- Low-quality connectors
- Insufficient capacitance on PDB
Solutions:
- Upgrade to thicker gauge wire
- Improve solder connections
- Add or upgrade capacitors
- Shorten battery leads
Interference and Noise
Symptoms:
- Video static or horizontal lines
- Control link glitches
- GPS position jumps or inaccuracy
- Sensor errors or instability
Potential Causes:
- Signal wires too close to power wires or ESCs
- Unshielded wires in sensitive areas
- Ground loops
- Inadequate filtering
Solutions:
- Reroute signal wires away from noise sources
- Add ferrite rings to problematic wires
- Use shielded wire for sensitive signals
- Ensure proper grounding techniques
- Add filtering capacitors
Physical Failures
Symptoms:
- Intermittent connections
- Failures after crashes
- Progressive degradation over time
Potential Causes:
- Inadequate strain relief
- Vibration fatigue
- Prop strikes or crash damage
- Environmental exposure (moisture, heat)
Solutions:
- Improve wire routing and protection
- Add strain relief at connection points
- Secure wires to frame to prevent movement
- Use appropriate wire type (silicone, stranded)
- Apply conformal coating for environmental protection
Pro Tips from Experience
After building dozens of drones, here are some of my hard-earned insights:
- Invest in quality wire and connectors - The small additional cost is worth the reliability.
- Color-coding is invaluable - Establish a personal standard and stick with it across builds.
- Document your wiring - Take photos or make diagrams before closing up complex builds.
- Leave service loops - A small amount of extra wire at connections makes future repairs much easier.
- Test before finalizing - Verify all connections before zip-tying and securing wires permanently.
- Carry spare wire and connectors - Field repairs are much easier with the right materials on hand.
- Consider current, not just voltage - Many builders focus on voltage ratings but underestimate current requirements.
- Heat shrink is your friend - Use it liberally for strain relief, insulation, and organization.
- Stagger solder joints - When multiple wires run parallel, stagger the joints to prevent bulges and potential shorts.
- Think about vibration - Drones vibrate significantly; secure wires to prevent fatigue failures.
FAQ: Common Questions About Wiring
What's the minimum wire size I can use for battery leads on a 5" freestyle quad?
For a typical 5" freestyle quad pulling 80-100A maximum current, 12 AWG silicone wire is generally sufficient. You could use 10 AWG for even less voltage sag, but the weight penalty may not be worth it. I wouldn't recommend going smaller than 12 AWG for the main battery connection on a standard 5" build.
Do I need to twist motor wires?
Twisting motor wires can help reduce electromagnetic interference (EMI) by cancelling out some of the magnetic fields generated by the current flow. It's not absolutely necessary, but it's a good practice, especially if you're experiencing interference issues with video or control signals. I twist all my motor wires as a standard practice.
Should I use a capacitor, and where should I connect it?
Yes, a low-ESR capacitor (typically 470-1000μF, 35V or higher for 6S builds) is highly recommended to reduce voltage spikes and noise. Connect it as close as possible to the power input on your PDB or 4-in-1 ESC, with short, thick leads. Ensure correct polarity! This helps protect your electronics and can improve video quality.
What's the best way to connect a VTX to minimize noise in the video?
For the cleanest video:
- Use shielded wire for the video signal if possible
- Keep video wires away from ESCs and power wires
- Connect the VTX power directly to a filtered pad on the PDB/FC
- Add a small filtering capacitor (47-220μF) near the VTX power input
- Ensure good, clean ground connections
How do I prevent wires from getting damaged in crashes?
To protect wiring in crashes:
- Route wires through the center of the frame when possible
- Use soft silicone wire that can flex rather than break
- Add strain relief at connection points using heat shrink
- Secure wires to the frame using zip ties or soft mounts
- Leave small service loops rather than pulling wires tight
- Consider protective sleeving for exposed wires
Conclusion
Proper wiring is the foundation of a reliable, high-performance drone. While it's tempting to focus on the latest components and features, neglecting wiring fundamentals can undermine even the most expensive build. By selecting the right wire sizes, using appropriate connectors, and following best practices for routing and securing wires, you'll create builds that perform better, last longer, and cause fewer headaches in the field.
Remember that wiring is a balance between current capacity, weight, flexibility, and durability. What works for one type of build may not be optimal for another. Consider your specific requirements, flying style, and priorities when making wiring decisions.
References and Further Reading
Internal References
- Overview of Battery Charging Connectors
- Overview of RF Connector Types
- Drone ESCs: Principles and Operation
- Drone Flight Controllers: Principles and Operation
- Overview of Drone Battery Types and Chemistry
External Resources
- Wire Gauge Calculator - Calculate appropriate wire size based on current and length
- Solder Tutorial by Joshua Bardwell - Excellent guide to proper soldering technique
- American Wire Gauge (AWG) Standards - Detailed specifications for different wire gauges


Comments ()