Drone Lighting Options and Applications
After years of building and flying drones with various lighting setups, I've come to appreciate how LED systems can transform both the functionality and personality of an FPV drone. What started as simple orientation lights on my first builds has evolved into sophisticated lighting systems that communicate vital information while adding a distinctive flair to my aircraft. This comprehensive guide shares my experiences with different types of LED systems, practical installation approaches, and creative applications that can enhance your drone flying experience.
Introduction to Drone LED Systems
LED (Light Emitting Diode) systems on drones serve multiple purposes beyond simple illumination. When I first started in the hobby, I underestimated how important good lighting would be—not just for looking cool, but for practical flying benefits that have saved my drones from crashes numerous times.
Primary Functions of Drone LEDs
Through years of flying in various conditions, I've found LED systems serve several critical functions:
Orientation Indication
Nothing is more disorienting than losing track of which way your drone is facing when it's 100 meters away. I learned this lesson the hard way during my early flying days when I crashed a drone into a tree because I couldn't tell which way it was pointing.
I now use a consistent color scheme across all my builds inspired by aviation standards: left is red, green is right. This simple approach has become second nature, allowing me to instantly recognize orientation even in challenging lighting conditions. During sunset flights, when silhouettes make orientation particularly difficult, these distinctive colors have saved me countless times.
For night flying, I've found that adding a white front indicator provides even better spatial awareness.
Visibility and Safety
"If they can't see you, they can't avoid you." This aviation principle applies equally to drones, and proper lighting has proven essential for safe operation, especially in group flying scenarios.
I once had a close call at a drone meetup when another pilot couldn't see my dark carbon fiber quad against the treeline. After that incident, I upgraded to high-brightness strobe light that makes my drones visible from considerable distances. Now when I fly with others, there's never any confusion about where my drone is in the airspace.
For twilight sessions, I've found that a combination of steady orientation lights and a subtle strobe effect provides optimal visibility without being distracting in my FPV feed. This setup has extended my flying sessions well into dusk, adding an hour or more of usable flight time during winter months when daylight is limited.
Status Indication
One of the most valuable upgrades I've made to my drones is configuring LEDs to communicate system status. This feature has evolved from a "nice-to-have" to an essential part of my builds.
One of my current setups changes color based on battery voltage—starting green, shifting to blue around 3.7V per cell, then yellow, and finally flashing red when it's critically low. This visual feedback complements the OSD information and has saved me from unexpected battery depletion numerous times, especially when flying in bright conditions where the OSD can be difficult to read.
I've also configured specific patterns for different flight modes. A subtle breathing effect indicates angle mode, while a more rapid pulse shows when I'm in acro. This immediate visual confirmation has been particularly useful when testing new builds or troubleshooting mode switch issues.
Aesthetic Customization
While functionality comes first, I can't deny the satisfaction of having a drone that stands out visually. Each of my builds has a distinctive lighting signature that reflects its purpose and personality.
My freestyle quad features a dynamic rainbow pattern that pulses with throttle input—subtle enough not to be distracting but distinctive enough to track during group flights. My long-range explorer has a more subdued blue scheme that matches its methodical flying style, while my racing drone uses aggressive high-visibility patterns optimized for spectator viewing.
These aesthetic choices aren't just about looks—they create an emotional connection with each aircraft and make them instantly recognizable when reviewing flight videos. I've found this personalization adds another dimension of enjoyment to the hobby.
Types of LED Systems for Drones
Over the years, I've experimented with virtually every type of LED system available for drones. Each has its place depending on your priorities and build requirements.
Individual LEDs
I started with basic individual LEDs, and still use them for specific applications:
When I built my first sub-250g toothpick quad, weight was at an absolute premium. I used four tiny 3mm LEDs—two white in front, two red in back—soldered directly to the frame with appropriate resistors. The entire lighting system weighed less than 2 grams but provided essential orientation information.
The simplicity of individual LEDs makes them remarkably reliable. I have a five-year-old micro quad with original LEDs that have survived countless crashes. Their durability comes from having no complex controllers or connections to fail—just simple components doing one job perfectly.
For ultra-lightweight builds where every gram matters, individual LEDs still have their place. I've found that four well-placed LEDs add negligible weight while providing crucial orientation information. The key is selecting high-brightness variants and positioning them for maximum visibility.
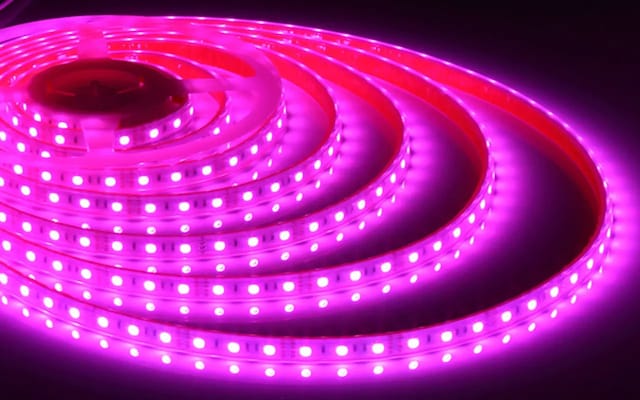
LED Strips
LED strips revolutionized drone lighting, offering more coverage and capabilities:
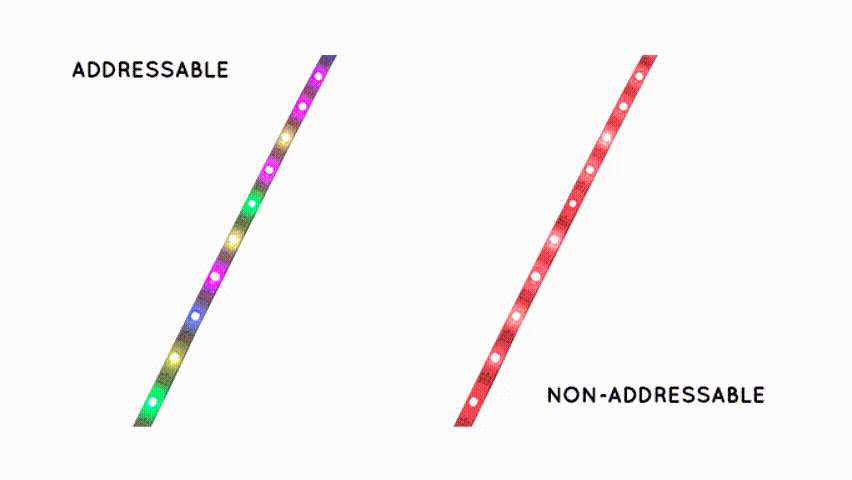
Non-Addressable LED Strips
My first upgrade from individual LEDs was a simple non-addressable RGB strip. I remember the excitement of having a lighting system I could change colors on, even if it meant all LEDs changed together.
For budget builds, I still occasionally use these basic strips. They're incredibly cost-effective—I recently picked up a 1-meter strip for under $5 that provided enough LEDs for two complete builds. The simplicity makes installation straightforward, with just power, ground, and optional control wires.
One trick I've learned with non-addressable strips is to create the illusion of different zones by physically separating the strip into sections. On one build, I installed red LEDs in the rear and white in the front by cutting a single strip and wiring the sections in parallel. This provided orientation benefits while maintaining the simplicity of a basic system.
Addressable LED Strips
The WS2812B (often called Neopixel) addressable LED strip was a game-changer for my drone builds. The ability to control each LED individually opened up possibilities I hadn't even considered before.
I remember my first installation—I struggled with the data signal direction (these strips only work in one direction) and accidentally installed it backward. After troubleshooting and correcting the issue, seeing those first programmable patterns come to life was a magical moment that transformed how I thought about drone lighting.
The power consumption surprised me initially. A 16-LED strip at full white brightness drew nearly 1A at 5V, which was significant for my 4-inch build. I quickly learned to limit brightness to 50% or less, which still provided excellent visibility while keeping current draw reasonable. This adjustment extended flight times while maintaining the benefits of the addressable system.
One hard-learned lesson: these strips are sensitive to electrical noise. On an early build, I ran the data wire alongside motor power leads, resulting in erratic behavior. Now I always route data wires away from noise sources and use a small capacitor (100-330μF) near the strip's power input to smooth voltage fluctuations.
LED Boards and Modules
Purpose-built LED assemblies designed specifically for drones offer unique advantages:
Dedicated LED Modules
After damaging several LED strips in crashes, I invested in purpose-built drone LED modules with protective covers. The difference in durability was immediately apparent.
I installed a set of arm-end LED modules on my freestyle quad, and they've survived dozens of crashes that would have destroyed standard strips. The integrated mounting options made installation cleaner, and the purpose-designed diffusers provided better light dispersion for improved visibility.
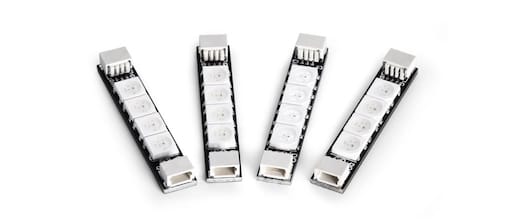
While more expensive than generic options, these purpose-built modules have proven to be more cost-effective in the long run due to their durability. I've replaced damaged strips multiple times on some builds, while the protected modules continue functioning flawlessly despite hard impacts.
Programmable LED Boards
For my most advanced build, I use a dedicated LED controller board that interfaces with my flight controller while providing independent processing for complex lighting effects.
The setup process was more involved than simple strips, requiring configuration of both the flight controller and the LED board. However, the capabilities justified the additional complexity. The system monitors battery voltage, GPS status, and flight modes, adjusting lighting patterns automatically to provide status information at a glance.
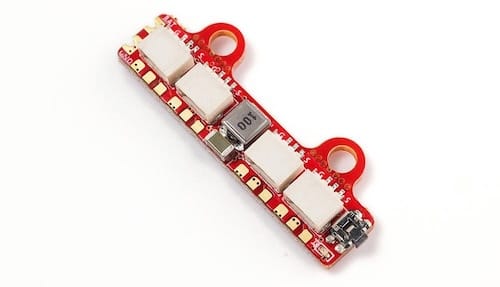
One particularly useful feature of such boards is the low-voltage warning system. As battery voltage drops below configurable thresholds, the lighting pattern can change progressively from subtle to impossible-to-ignore.
Specialized Lighting Systems
For specific applications, specialized lighting systems offer capabilities beyond standard LEDs:
Anti-Collision Lighting
For my long-range exploration drone that often flies at higher altitudes, I installed a dedicated anti-collision strobe light. The high-intensity flashing light makes the drone visible from remarkable distances, enhancing safety when sharing airspace.
During a group mountain flying session, other pilots commented that they could track my drone clearly even when it was just a tiny speck in the distance. This awareness is invaluable for safety when multiple aircraft share the same airspace.
Navigation Lighting
On most of my drones I implement aviation-style navigation lighting with the standard red/green/white configuration. Beyond looking professional, this standardized color scheme is instantly recognizable to anyone familiar with aircraft lighting.
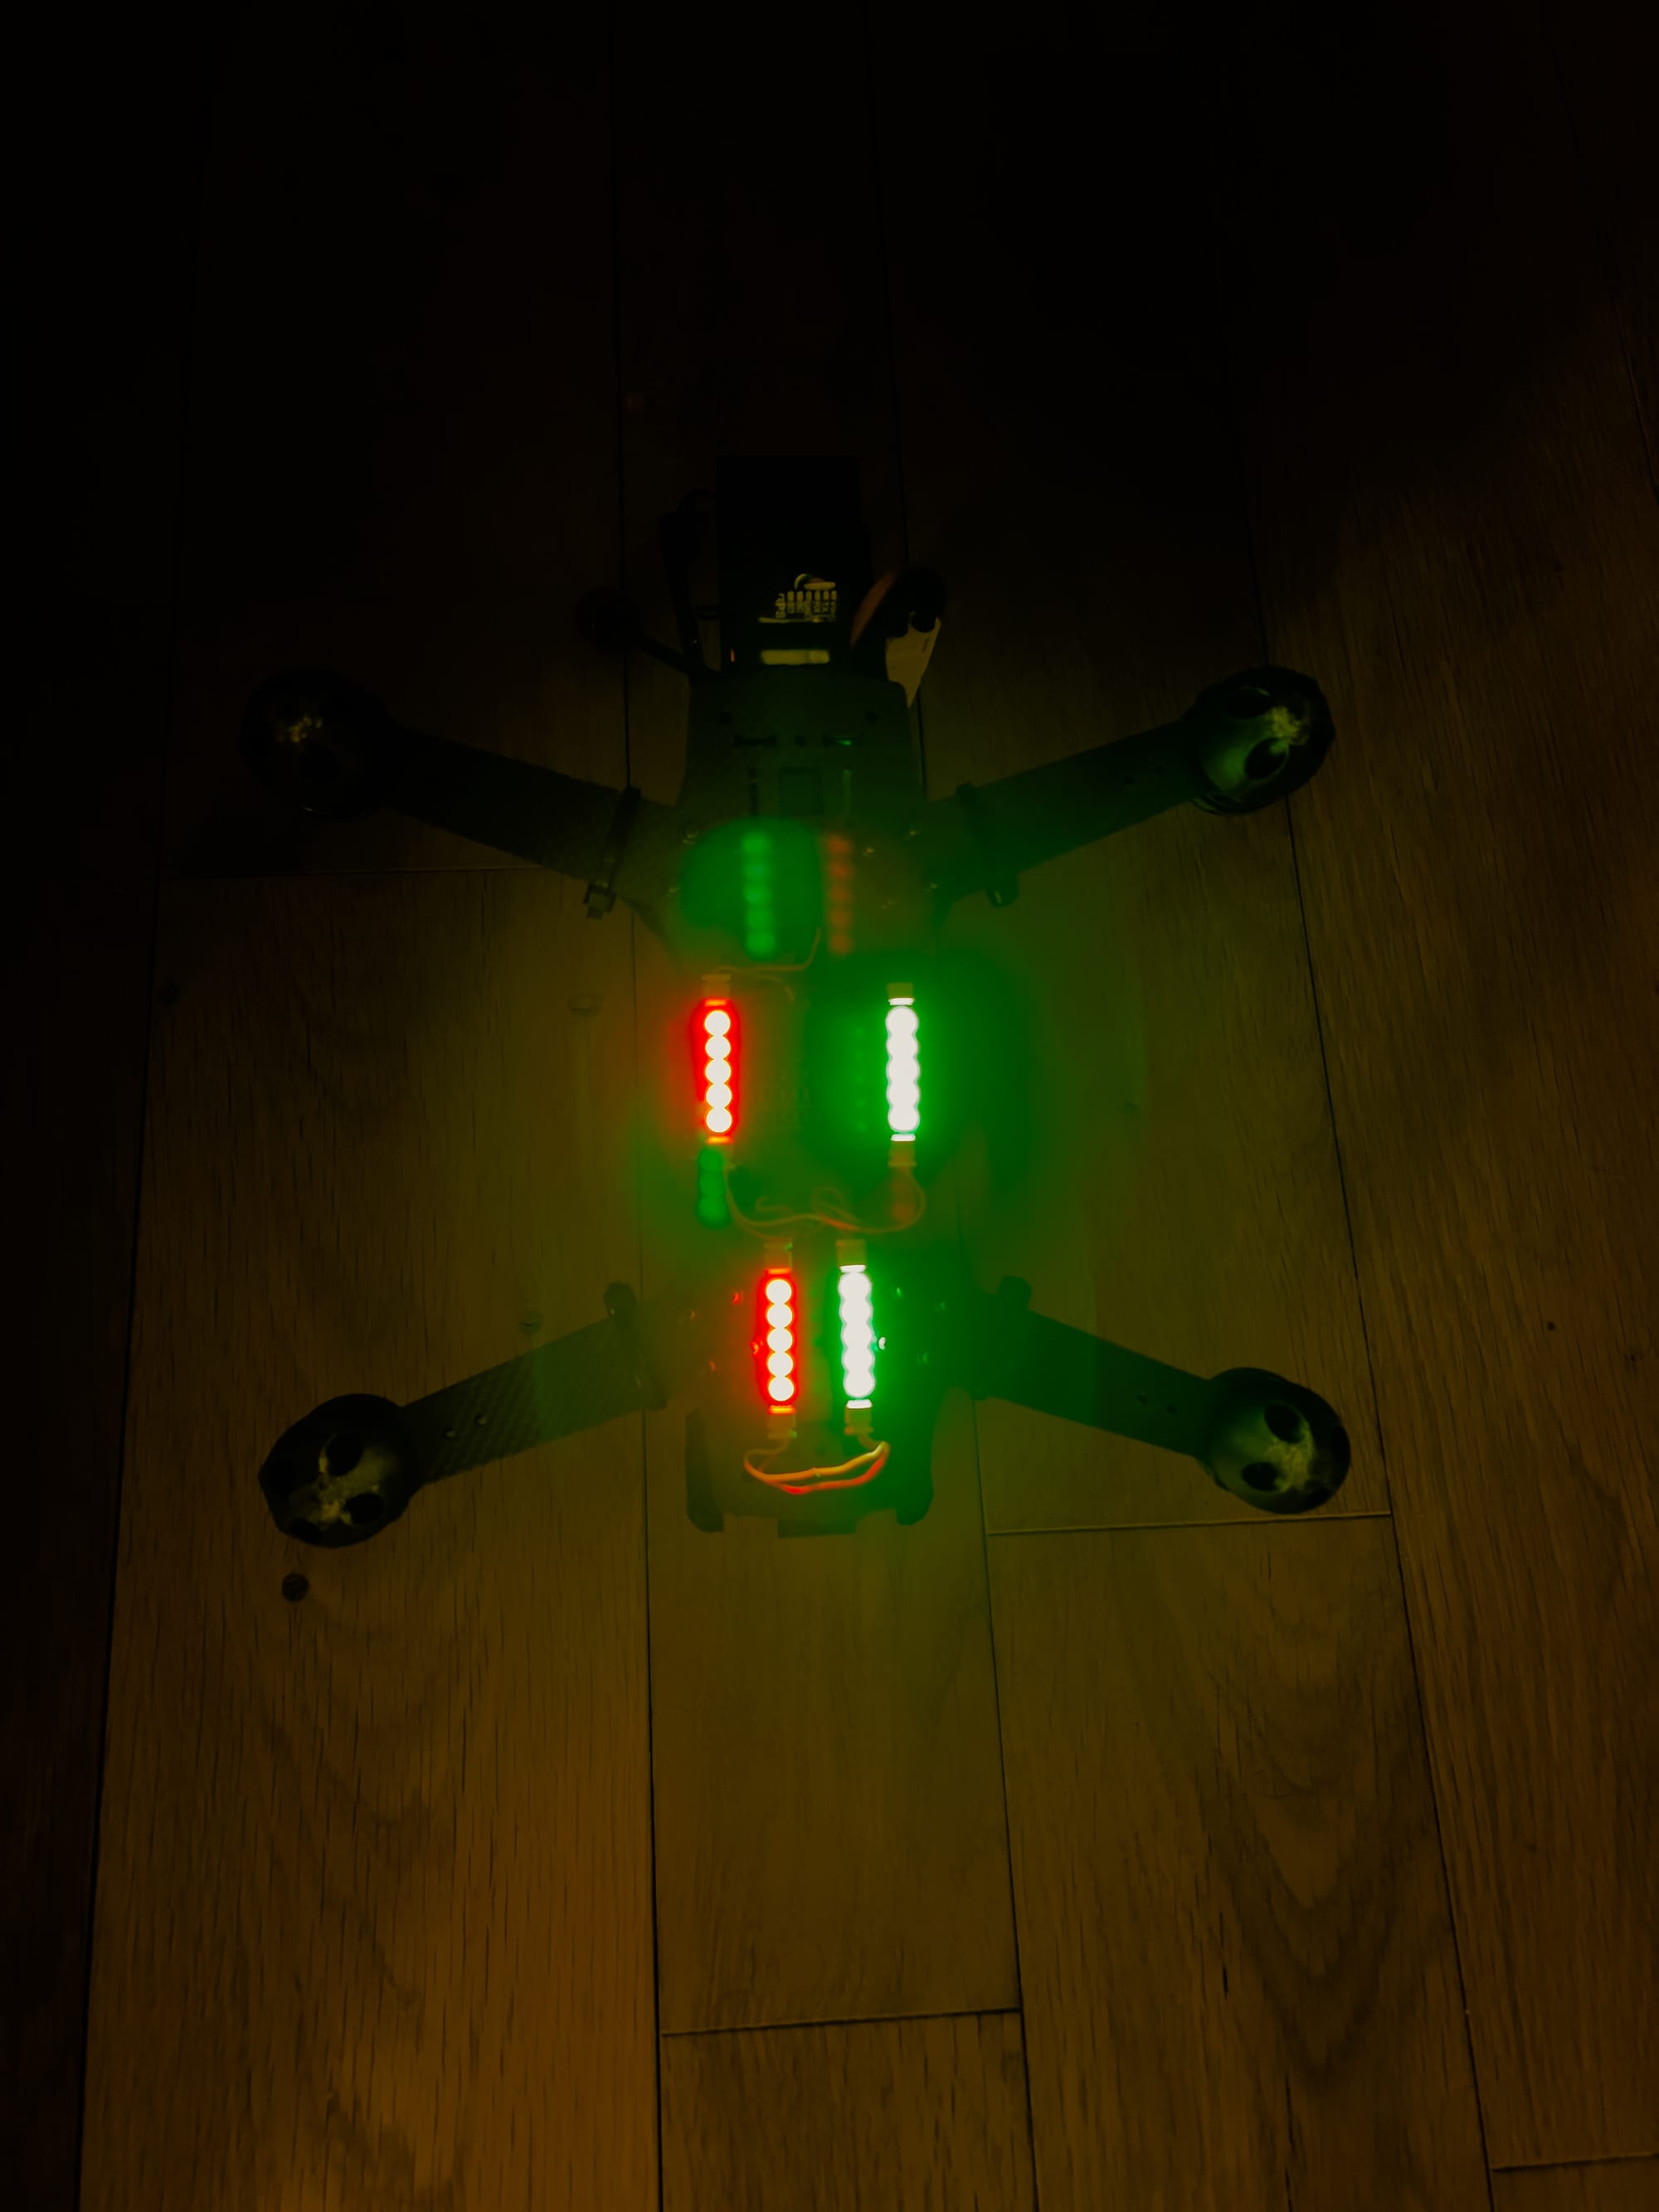
I've found this lighting particularly valuable when flying in areas frequented by full-size aircraft pilots, as they immediately recognize and understand the orientation information provided by the standard color scheme.
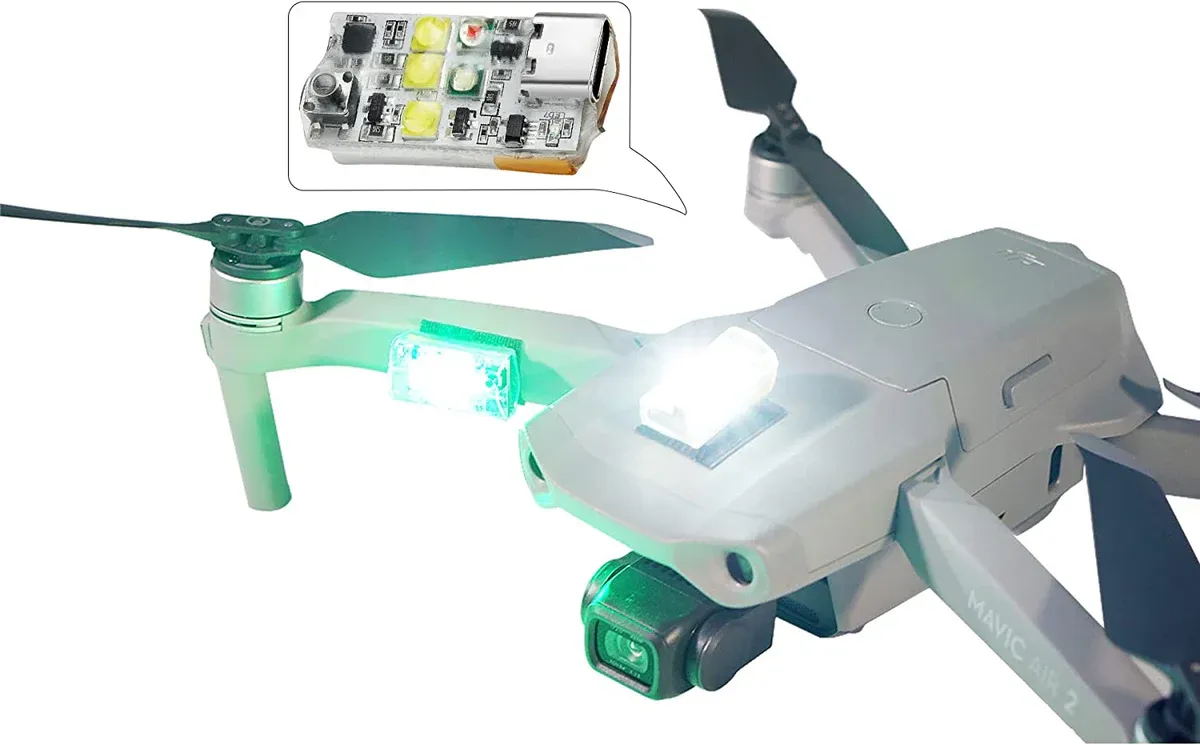
Headlights and Spotlights
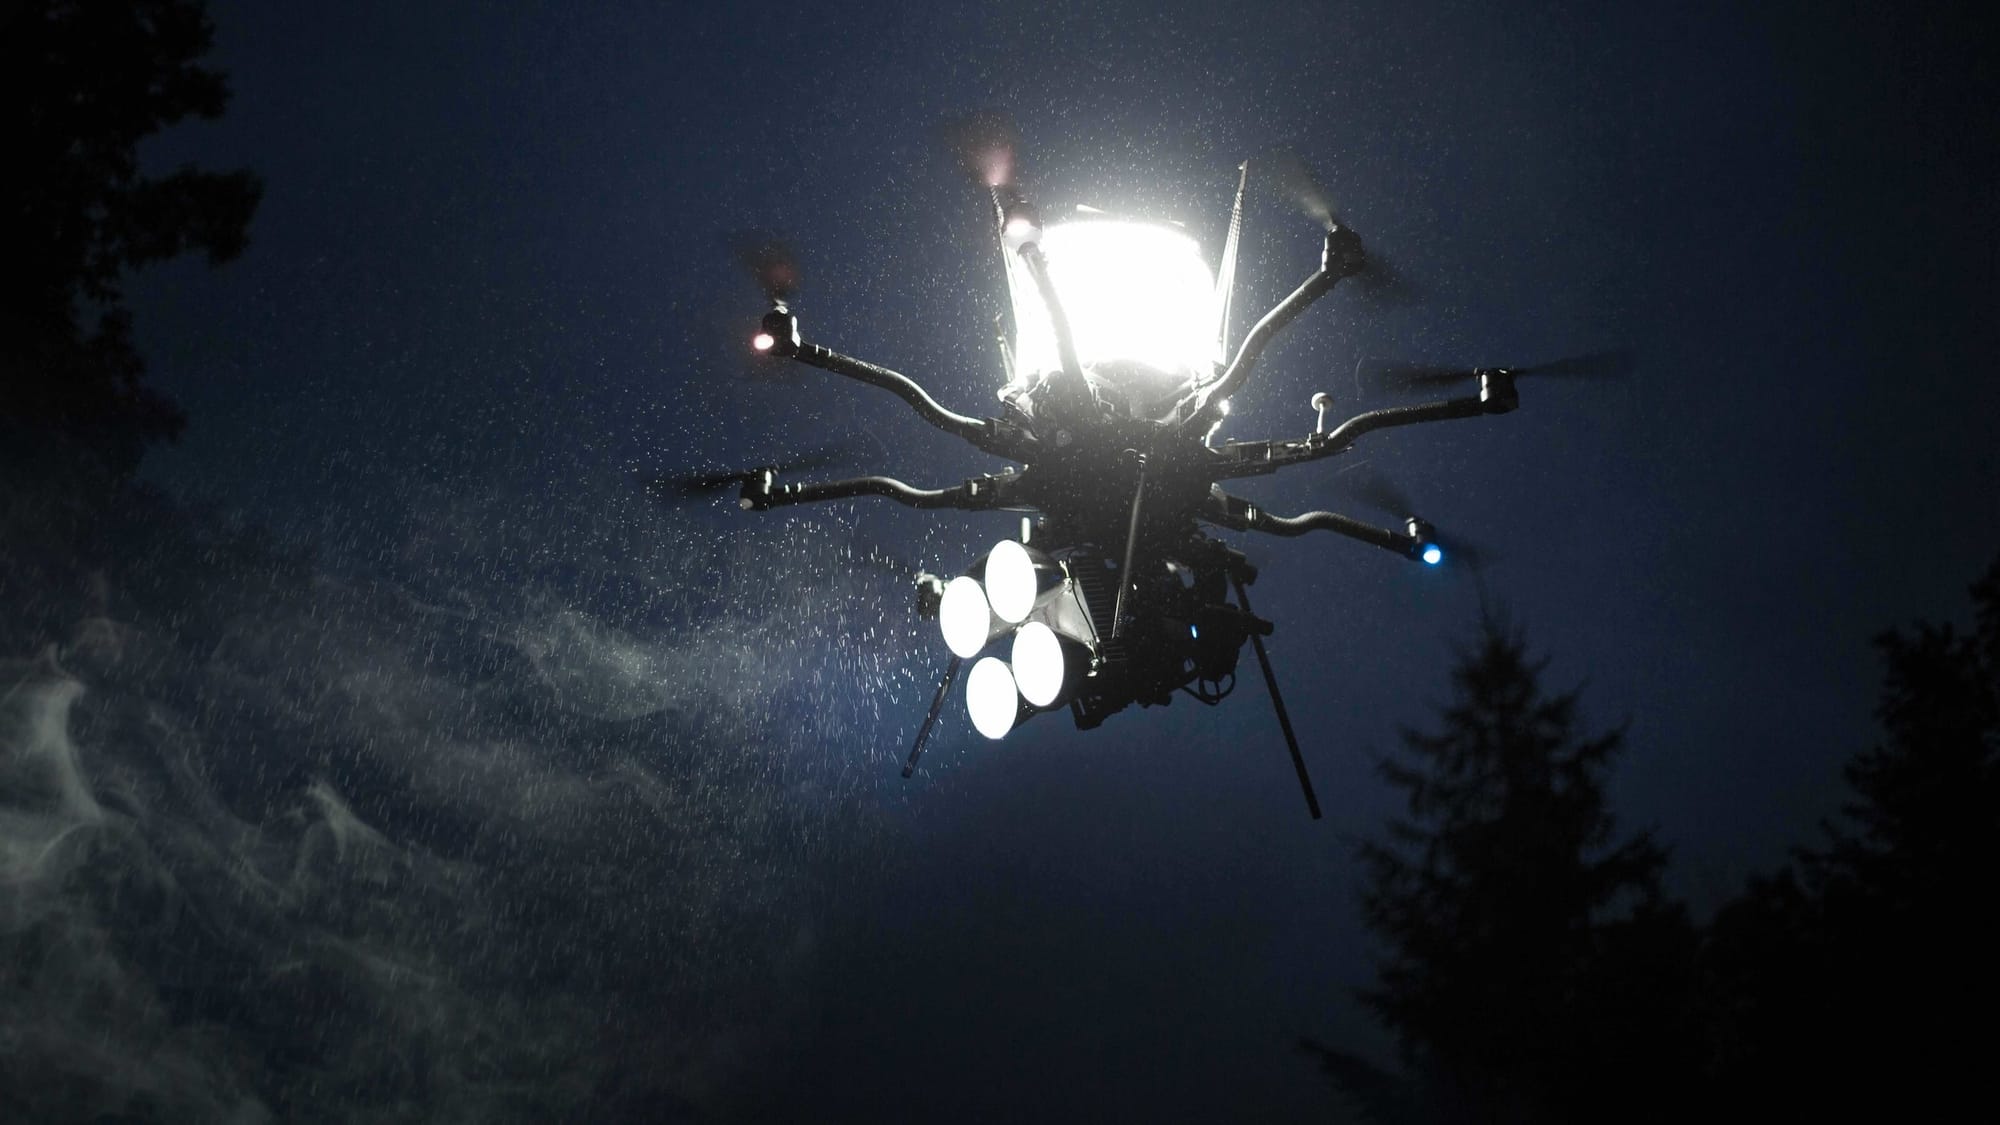
After a few nerve-wracking experiences trying to land as darkness fell, I added a 5W forward-facing spotlight to my photography drone. The difference was dramatic—not just for landing but for overall situational awareness in low light.
The power requirements are substantial, so I connected it to a separate switch channel for on-demand use. When activated, it illuminates obstacles up to 30 meters ahead, providing crucial visual information for avoiding hazards during twilight operations.

An unexpected benefit was the creative lighting possibilities for photography. The powerful directional light creates dramatic shadows and highlights that add dimension to aerial photos, particularly during golden hour when natural light is already creating interesting effects.
LED Control Systems
The way you control your LEDs significantly impacts their functionality and user experience. I've used various control methods across my builds, each with distinct advantages.
Basic Control Methods
Simple approaches to controlling drone LEDs:
Direct Power Control
My first builds used the simplest approach possible—LEDs connected directly to the battery through a voltage regulator. They turned on with the drone and off when powered down.
While basic, this approach is remarkably reliable. I still have a micro quad with directly powered LEDs that has never had a lighting failure in hundreds of flights. The simplicity means there's virtually nothing to go wrong.
The obvious limitation is the lack of control—the lights are either on or off with the main power. For orientation-only lighting on simple builds, this can be perfectly adequate, but I quickly wanted more control as my flying skills advanced.
Switch Control
Adding a simple physical switch to my LED power line was my first control upgrade. This allowed me to turn lights on or off independently of the main power.
I found this particularly useful for daytime flying when LEDs weren't necessary for orientation but consumed power nonetheless. The ability to switch them off extended flight times by a small but noticeable margin.
The downside was needing physical access to the drone to control the lights. After landing in a difficult-to-reach spot once with the LEDs off, making it hard to locate the drone, I began looking for remote control options for future builds.
Voltage-Based Control
One of my favorite simple LED controllers is a voltage-sensing module that changes color based on battery level. The plug-and-play simplicity combined with useful battery status information made this a standard addition to several builds.
I've configured mine with green above 3.8V per cell, blue between 3.5-3.8V, yellow between 3.3-3.5V, and flashing red below 3.3V. This visual battery gauge has become second nature to interpret at a glance.
The limitation is that it only responds to voltage, with no other control options. However, for pilots who want battery status indication without the complexity of flight controller integration, these simple modules offer an excellent balance of functionality and simplicity.
Flight Controller Integration
Modern flight controllers offer sophisticated LED control capabilities:
Direct GPIO Control
On a minimalist build where I needed to save weight but wanted controllable LEDs, I connected individual LEDs directly to spare GPIO pins on my flight controller.
This approach required some CLI configuration in Betaflight but allowed me to control the LEDs via an aux channel on my transmitter. The direct connection eliminated the need for additional controllers while providing remote control capability.
The limitation was the basic on/off control with no advanced patterns or color changes. However, for simple remote-controlled lighting on lightweight builds, this approach is hard to beat for efficiency.
LED Strip Protocols
The integration of addressable LED strip support directly in flight controller firmware revolutionized my approach to drone lighting. When I discovered I could control complex LED patterns through Betaflight without additional hardware, it opened up new possibilities for status indication and customization.
The ability to assign multiple functions to each LED has proven incredibly useful. My current configuration shows orientation (white front, red rear), battery status (color changes with voltage), RSSI strength (brightness varies with signal strength), and flight mode (different patterns). All this information is available at a glance without needing to check the OSD.
LED Configuration in Firmware
Each flight controller firmware offers different LED capabilities:
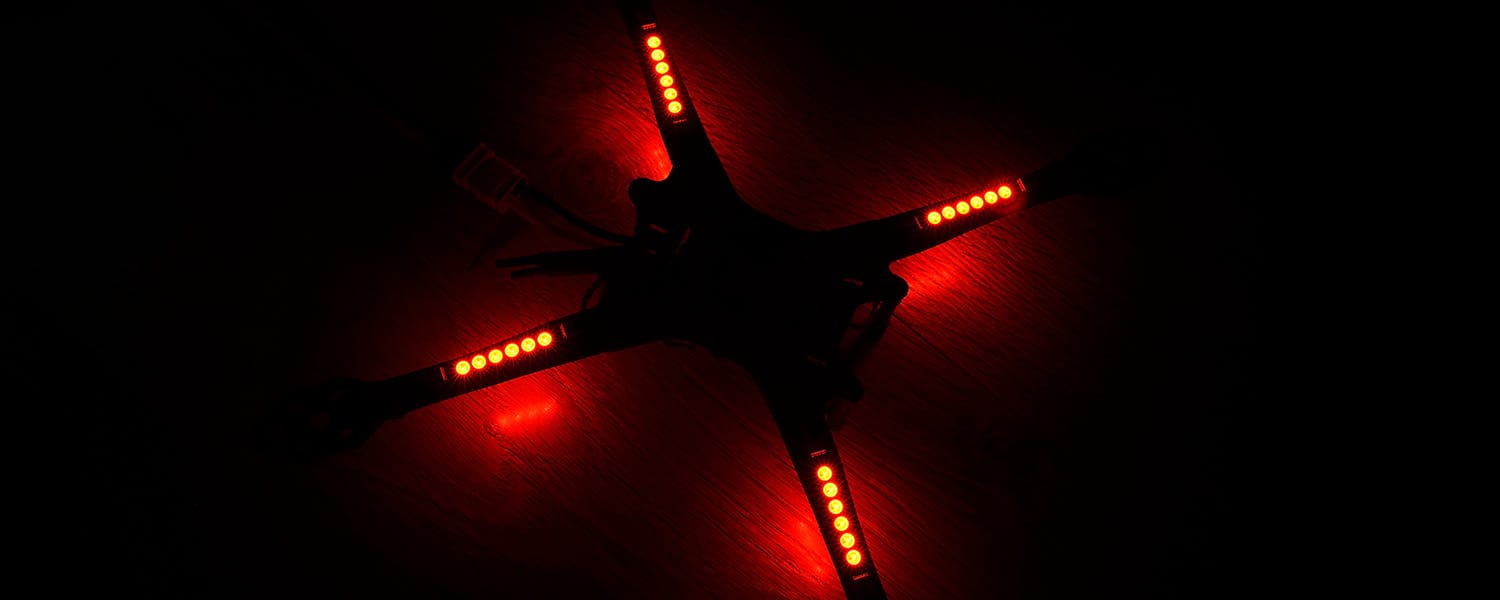
• Betaflight LED Setup: My go-to for freestyle and racing builds. I particularly appreciate the Larson Scanner effect (like Knight Rider's KITT car) for rear LEDs, which provides excellent orientation while looking distinctive.
• INAV LED Options: For my navigation-focused builds, INAV's GPS status indications are invaluable. The system shows satellite count through color changes and indicates GPS lock status with pattern variations. When flying beyond visual range, this immediate feedback on GPS health provides crucial confidence.
Standalone LED Controllers
For more advanced lighting needs, dedicated controllers offer capabilities beyond what flight controllers provide:
Basic LED Controllers
For one build where I wanted lighting effects independent of the flight controller, I added a small off-the-shelf RGB controller with an IR remote.
The installation was straightforward—power, ground, and connections to the LED strip. The included remote allowed me to select from dozens of pre-programmed patterns and adjust colors, speed, and brightness.
While not integrated with flight data, the system provided excellent aesthetic customization. I found it particularly useful for ground testing and setup, where the bright, distinctive patterns made the drone easy to spot in my workshop.
Advanced Programmable Controllers
My most sophisticated lighting setup uses a programmable controller based on an ESP32 microcontroller running WLED firmware. This system offers thousands of pattern options and smartphone control via Wi-Fi.
Programming the controller required some technical knowledge, but the flexibility was worth the effort. I created custom patterns for different flying scenarios and even synchronized multiple drones for formation flying displays.
The Wi-Fi control capability allows me to reconfigure lighting on the field without needing a computer. This has been particularly valuable when adjusting patterns for different environments or lighting conditions.
Specialized Drone LED Systems
After experimenting with generic controllers, I eventually invested in a purpose-built drone LED controller that integrates with flight systems while offering advanced pattern capabilities.
The controller receives telemetry data from the flight controller and adjusts lighting patterns accordingly. Battery voltage, GPS status, flight mode, and even artificial horizon information can be represented through light patterns.
While more expensive than generic options, the drone-specific features have proven their value repeatedly. The system's awareness of flight status means the lighting always provides relevant information rather than just aesthetic patterns.
Remote Control Options
Controlling LEDs during flight adds another dimension to their utility:
Auxiliary Channel Control
Connecting my LED system to an aux channel on my receiver was a game-changer for practical flying. A simple three-position switch on my transmitter allows me to select between off, low brightness, and full brightness modes.
This control has been particularly useful for conserving power during daylight flying while having the option to activate lights when needed for orientation or visibility. The middle position (low brightness) provides adequate orientation information with minimal power consumption—my go-to setting for most flying.
For night sessions, I've configured a momentary switch to activate a high-intensity strobe pattern. This "attention mode" makes the drone highly visible when needed without being distracting during normal flight.
Telemetry-Based Systems
My advanced builds use telemetry data to automatically adjust lighting based on flight conditions. This "set and forget" approach ensures the lighting always provides relevant information without requiring pilot input.
The system dims LEDs during aggressive maneuvers to reduce power consumption when maximum performance is needed. Conversely, it brightens automatically when the drone is hovering or in position hold modes, enhancing visibility during precision flying.
One particularly useful feature is the automatic activation of high-visibility mode when the drone exceeds a certain distance from the home point. This ensures maximum visibility when the drone is far away, without requiring manual activation.
App-Controlled Systems
For my photography drone, I use a Bluetooth-connected LED controller that allows adjustment via a smartphone app. This has proven invaluable for fine-tuning lighting to match specific shooting conditions.
The ability to select colors and patterns that complement the subject or environment adds a creative dimension to aerial photography. For a sunset shoot, I used warm amber lighting that enhanced the golden hour atmosphere, while a night city shoot benefited from cool blue tones that matched the urban lighting.
The limitation is that configuration must be done before flight, as Bluetooth range is limited. However, for planned creative shoots, this pre-flight customization capability is perfect.
Installation and Setup
Proper installation is crucial for reliable LED performance. Through trial and error, I've developed approaches that maximize durability and functionality.
Power Considerations
Managing power for LED systems properly ensures reliability and prevents issues:
Power Requirements
Understanding LED power consumption has been crucial for my builds. I learned early on to calculate requirements properly:
For my typical 5-inch freestyle quad with 16 RGB LEDs, each LED can draw up to 60mA at full brightness. That's potentially 960mA total—nearly 1A at 5V, or about 5W of power. In practice, I rarely run them at full brightness, and patterns typically don't have all LEDs at maximum simultaneously.
I've found that a good rule of thumb is to budget 30-40mA per RGB LED for typical usage. This conservative estimate ensures your power system can handle peaks without issues.
For one build, I underestimated power requirements and experienced voltage sags that affected flight controller performance during intense maneuvers. Adding a larger capacity capacitor (470μF) to the LED power input solved the issue by smoothing out current demands.
Power Distribution Options
I've used various approaches to power LEDs across my builds:
• Direct Battery Connection: On my 3S builds, I've successfully used 12V LED strips connected directly to the battery (with appropriate inline fuse). The simplicity is appealing, though brightness varies with battery voltage.
• BEC/Voltage Regulator: Most of my builds use a dedicated 5V BEC for LED power. After burning out a cheap BEC that couldn't handle the current spikes, I now use quality regulators with at least 2A capacity for LED systems. The stable voltage ensures consistent brightness regardless of battery level.
• Flight Controller Power: For minimal LED setups (4-8 LEDs), I've powered them directly from the flight controller's 5V output. This works well for basic orientation lighting but isn't suitable for larger arrays that could exceed the FC's current capacity.
• Dedicated LED Power System: My light show drone uses a separate small LiPo dedicated to the LED system. This isolation ensures lighting performance doesn't affect flight performance and allows for extended ground operation for setup and testing.
Current Limiting
Early in my LED experiments, I learned the hard way about current limiting when I connected LEDs directly to a power source without appropriate resistors. The resulting "pop" and magic smoke taught me a valuable lesson!
For individual LEDs, I now carefully calculate resistor values. For a typical 3.3V LED running from 5V, a 100Ω resistor works well (R = (5V - 3.3V) / 0.02A = 85Ω, rounded up to the common 100Ω value).
For addressable strips like WS2812B, I've found that software brightness limiting is more efficient than hardware current limiting. Setting maximum brightness to 60-70% in the controller provides excellent visibility while significantly reducing power consumption.
Mounting and Installation
Physical integration of LED systems requires careful planning:
Mounting Locations
Through years of experimentation, I've identified optimal mounting positions for different purposes:
• Arm Mounting: My freestyle quads typically have LEDs mounted along the bottom of the arms. This position provides excellent 360° visibility while keeping the LEDs protected during crashes. I've found that placing them on the bottom rather than top of the arms reduces prop shadow effects that can create strobing patterns in the FPV feed.
• Underglow: For my photography drone, I use underglow mounting that creates a distinctive light pool on the ground. Beyond looking impressive, this provides useful visual feedback on altitude and movement, particularly when flying in low light. The ground effect dramatically increases visibility compared to direct-view LEDs of the same brightness.
• Top Mounting: My long-range explorer has a top-mounted strobe light to maximize visibility from above. This configuration is particularly important when flying at altitude, where the drone is most often viewed from above by both the pilot and other aircraft.
• Frame Integration: My custom-designed racing drone has LED channels built into the frame itself. This integrated approach provides maximum protection while creating a distinctive lighting signature. The slight additional design complexity was well worth the clean, durable result.
Mounting Methods
Secure mounting is essential for reliability, especially on drones that experience vibration and impacts:
• Adhesive Mounting: I started with simple double-sided tape, but after losing LED strips during crashes, I upgraded to VHB (Very High Bond) tape for critical applications. The difference in retention during crashes was dramatic—standard tape failed regularly, while properly applied VHB has never failed me.
• Zip Tie Mounting: For quick installations and testing, I still use zip ties combined with heat shrink tubing. This method allows for easy repositioning during the setup phase. One trick I've learned is to use two small zip ties rather than one long one, creating more secure attachment points.
• 3D Printed Mounts: For my serious builds, I design and print custom LED mounts tailored to the specific frame and LED type. These often include channels for wire routing and diffusers to improve light distribution. The perfect fit provides excellent protection and clean aesthetics.
• Recessed Installation: My latest custom frame design includes recessed channels specifically for LED strips. This approach completely protects the LEDs while providing clean wire routing. The slight additional weight is a worthwhile trade-off for the durability and professional appearance.
Cable Management
Proper wire management is crucial for both reliability and clean aesthetics:
• Routing Considerations: I learned through experience to keep LED data wires away from noise sources like ESC signal wires and motor power leads. On one build, proximity to motor wires caused erratic LED behavior during throttle changes. Rerouting the data wire solved the issue completely.
• Securing Methods: I use a combination of heat shrink tubing and soft silicone wire ties to secure LED wiring. The soft ties prevent vibration damage to wire insulation that I experienced with hard plastic ties. For critical connections, I add a small dab of hot glue or silicone conformal coating for strain relief.
• Connector Options: After losing an LED strip due to a solder joint failure during a crash, I now use JST connectors for all my LED installations. The quick-disconnect capability makes maintenance easier, and the positive locking mechanism prevents vibration-induced disconnections.
Programming and Configuration
Setting up LED control systems properly unlocks their full potential:
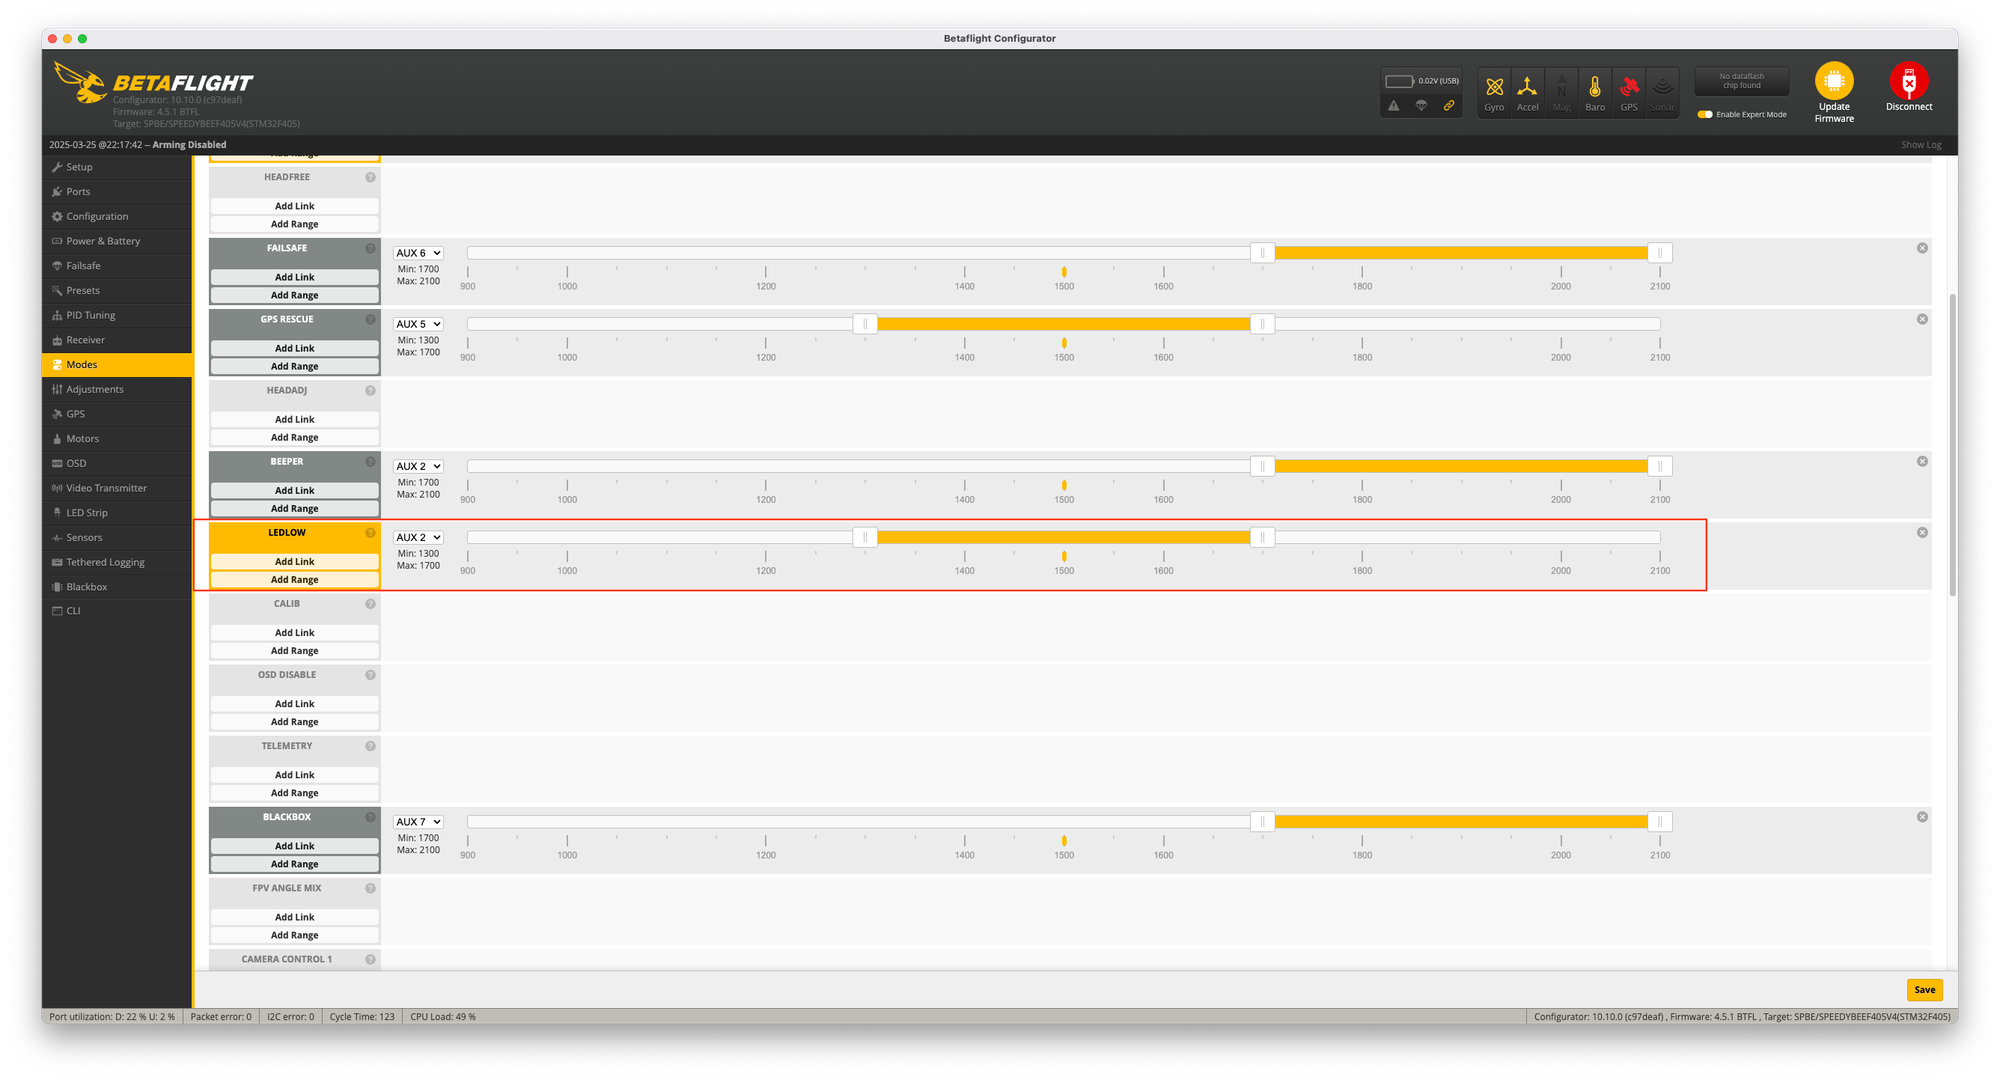
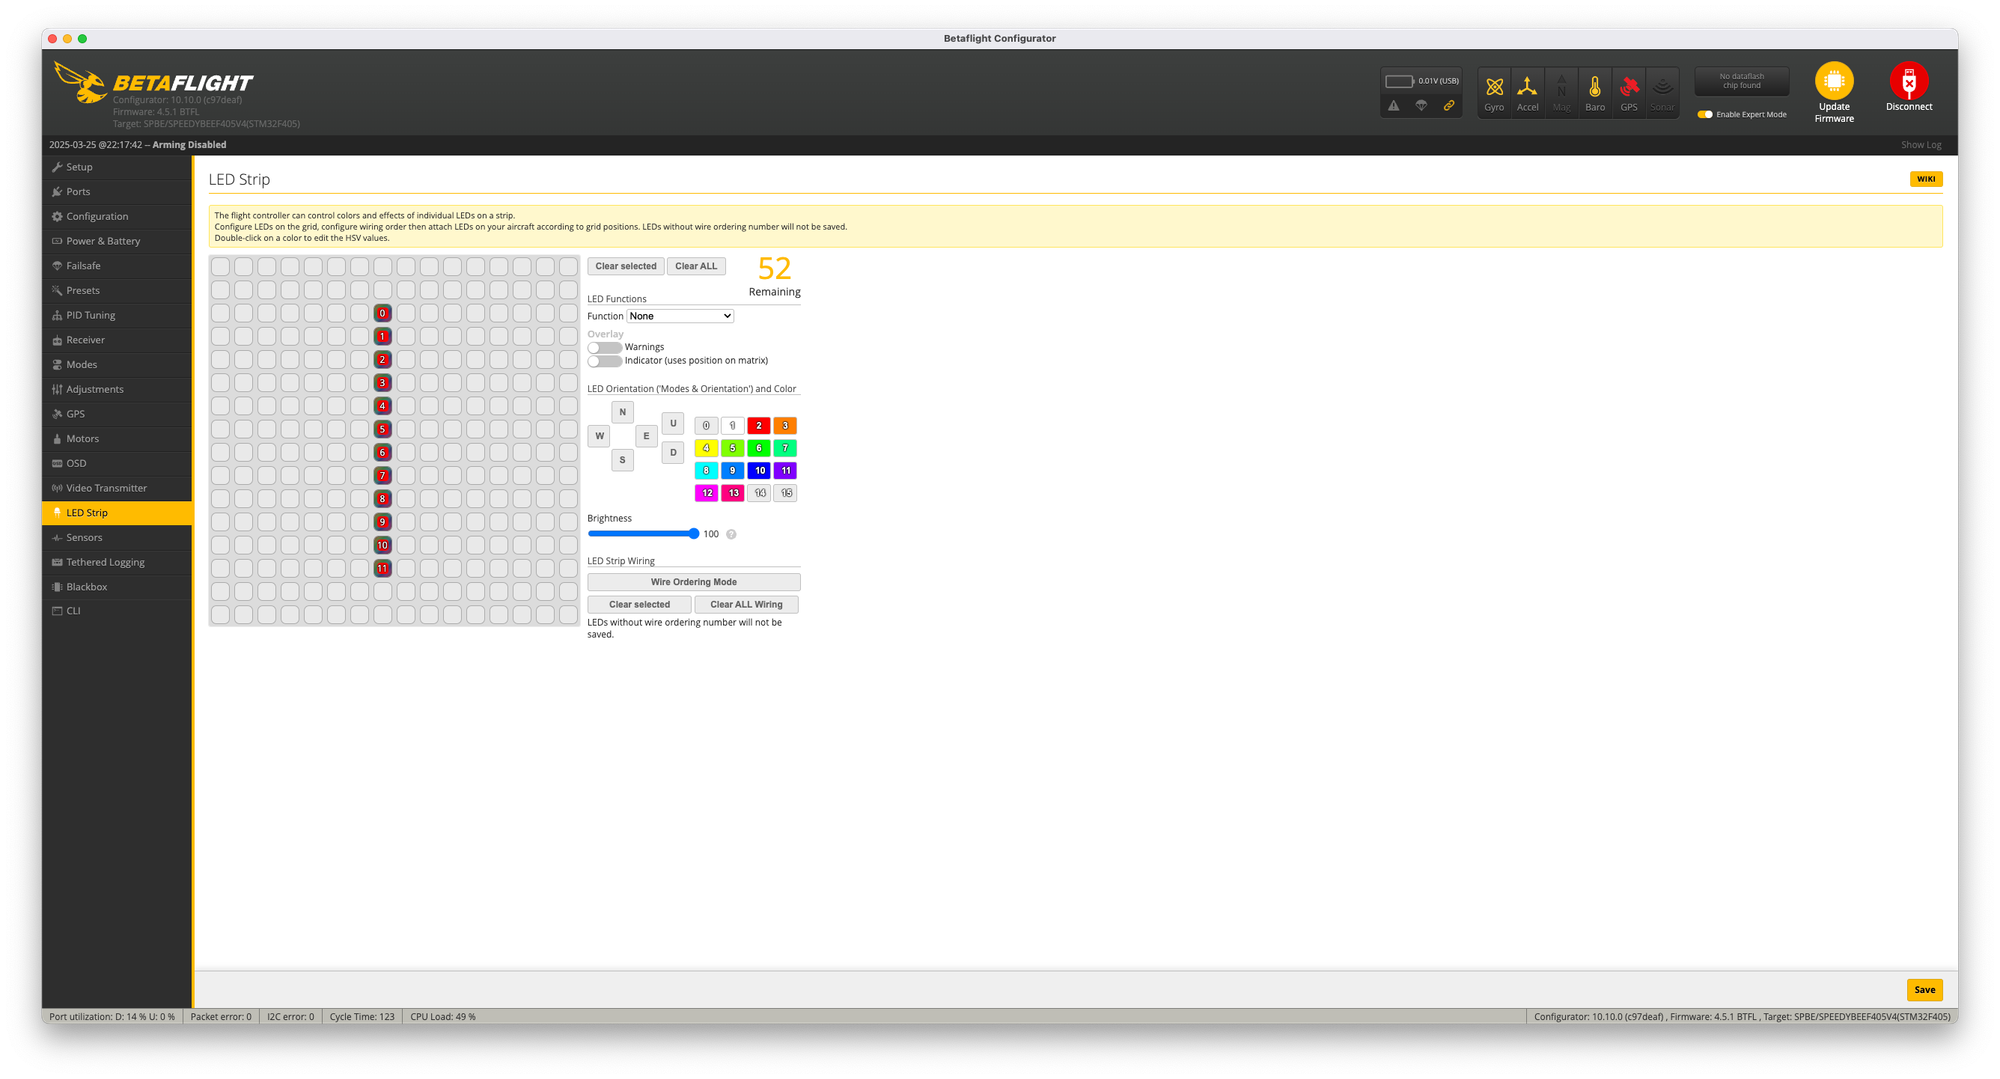
Betaflight LED Configuration
Most of my freestyle and racing builds run Betaflight, and I've developed a systematic approach to LED configuration:
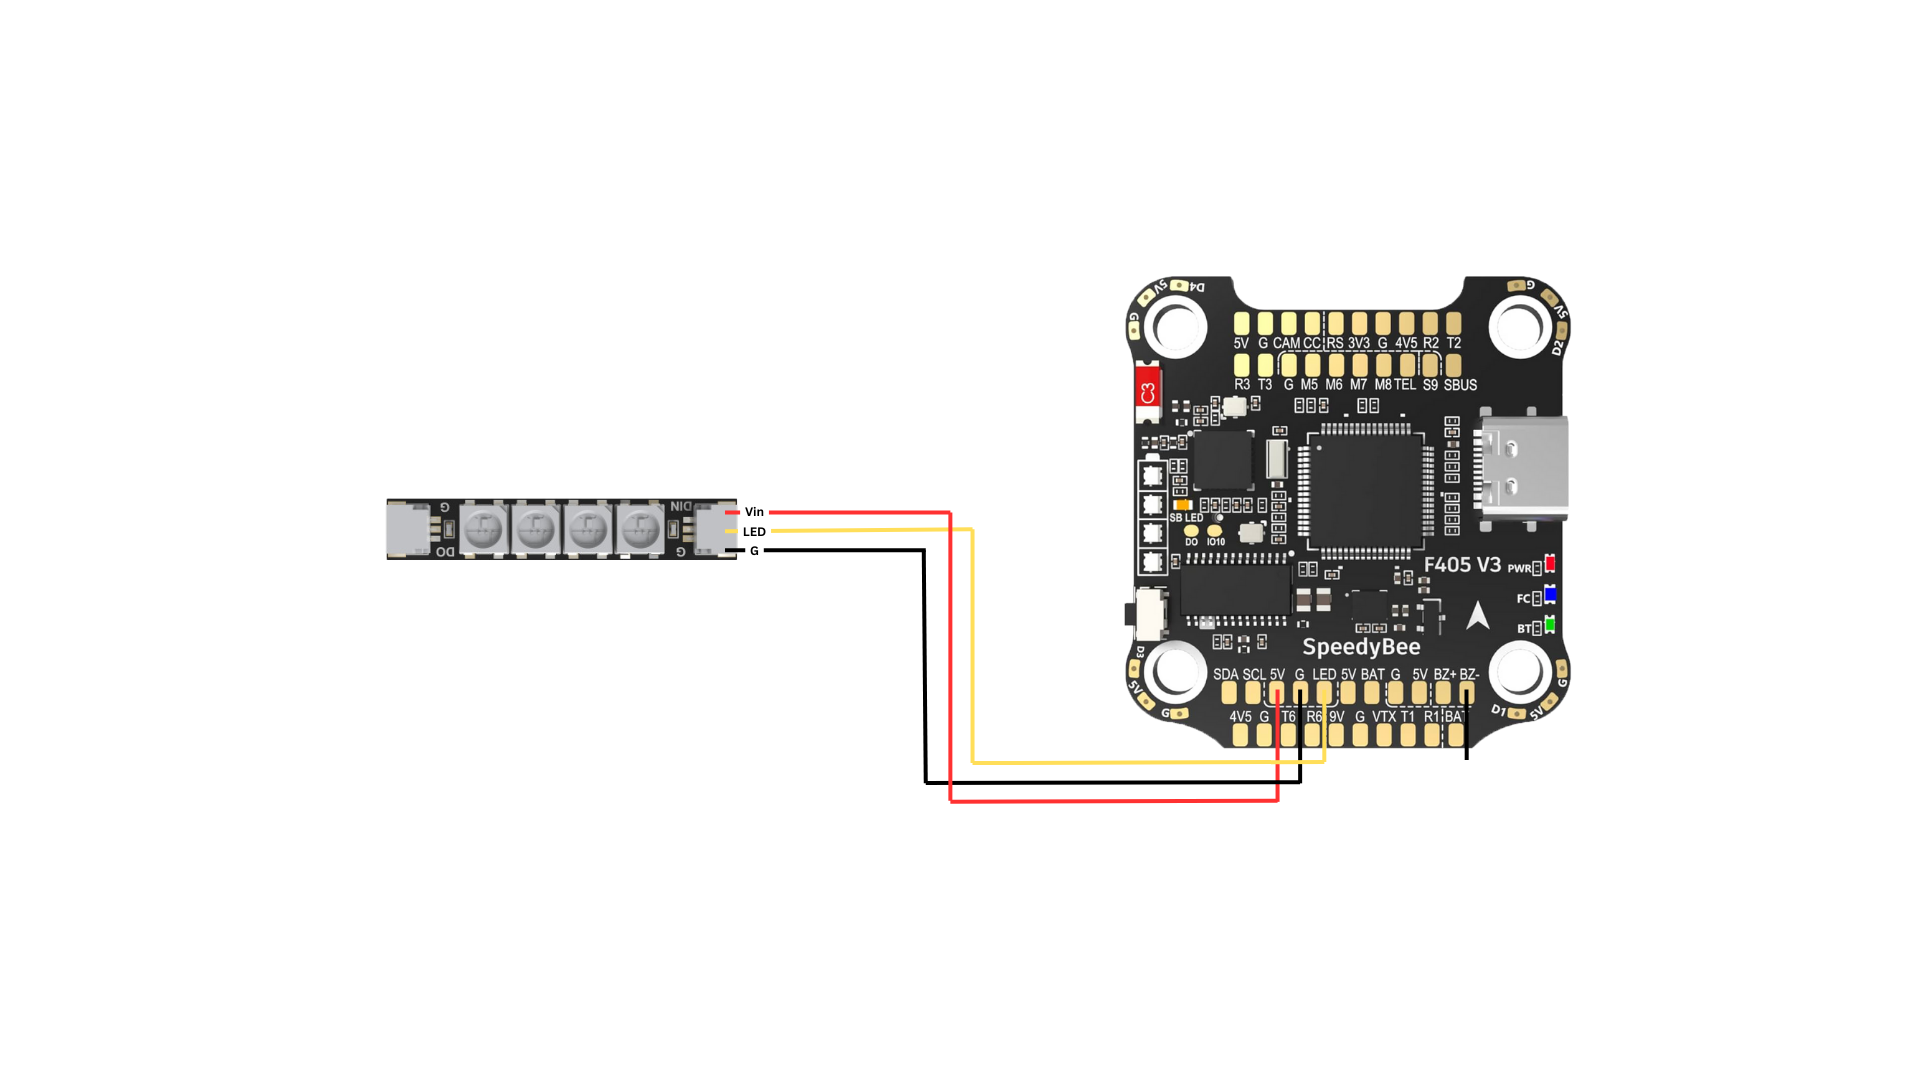
• Hardware Setup: I connect the LED data wire to a dedicated LED pad when available, or remap a spare UART TX pad using the resource command when needed. For power, I typically use a dedicated 5V regulator for larger installations or the FC's 5V output for smaller ones.
• LED Configuration: The LED tab in Configurator initially confused me with its grid representation. I've found it helpful to sketch my physical LED layout first, numbering each LED, then transfer this to the grid.
• CLI Commands: For more precise control, I use CLI commands to fine-tune behavior. For example, to create a custom color not available in the GUI:
color 6 0,255,100
This defines color index 6 as a custom green shade that I use for GPS lock indication.
INAV LED Setup
My navigation-focused builds run INAV, which offers excellent GPS-related LED functions:
I configure the LEDs to indicate GPS status through color changes: red for no fix, yellow for 2D fix, and green for 3D fix. The immediate visual confirmation of GPS status has proven invaluable during the critical takeoff phase of autonomous missions.
For long-range flights, I've set up a home direction indicator that uses a moving pattern to point toward the home position. This backup orientation system has provided additional confidence during beyond visual range operations.
Standalone Controller Programming
My light show drone uses a custom controller programmed with specific patterns:
• Basic Controllers: I started with a simple IR-controlled RGB controller that offered preset patterns. While limited in customization, the 44-button remote provided access to dozens of effects and color combinations that were perfectly adequate for basic aesthetic lighting.
• Advanced Controllers: I later upgraded to an ESP32-based controller running WLED firmware. Programming this system required connecting to its web interface via Wi-Fi and creating custom patterns. The learning curve was steeper, but the capabilities far exceeded the basic controller, allowing for complex animations and sensor-driven effects.
• App-Based Setup: My current setup uses a smartphone app for configuration, offering a user-friendly interface for pattern creation and color selection. The ability to save and recall multiple configurations has been particularly useful for different flying scenarios.
Applications and Use Cases
LED systems serve diverse purposes across different types of drone operations:
Practical Applications
Beyond looking cool, LED systems serve critical functional roles:
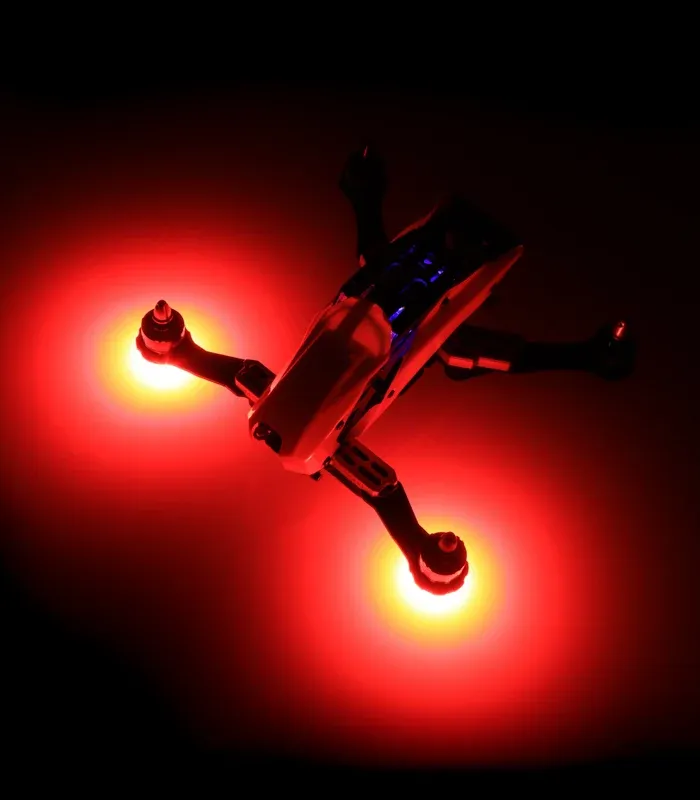
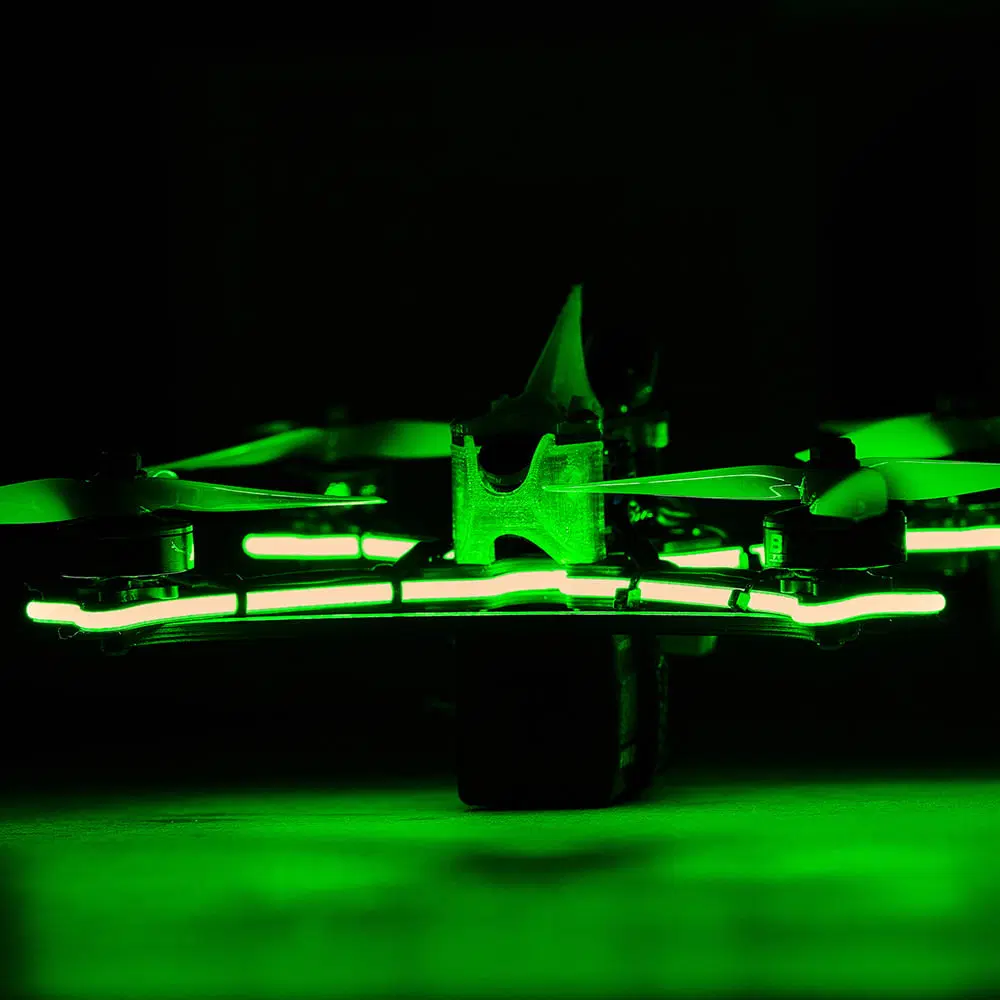
Night Flying Visibility
Night flying opened up a new dimension to my drone experience, but required rethinking visibility:
My first night flying attempt with standard LEDs was a nerve-wracking experience—the lights that seemed bright in my workshop were barely visible against the night sky at distance. This taught me that night flying requires a different approach to lighting.
I upgraded to high-brightness LEDs specifically designed for visibility, arranging them to be visible from all angles. The improvement was dramatic—my drone remained clearly visible even at 200+ meters distance.
For orientation during night flights, I found that having dramatically different colors front and back was essential. The white/red combination provides instant orientation feedback even when the drone is just a small point of light in the distance.
Adding a subtle strobe effect to the rear LEDs further enhanced visibility without being distracting in the FPV feed. The pulsing light catches the eye more effectively than steady illumination, particularly when the drone is hovering at distance.
Status Indication
My drones now communicate their status through lighting patterns:
• Battery Status: After a few close calls with battery depletion, I configured my LEDs to change color based on voltage: green above 3.8V per cell, blue at 3.5-3.8V, yellow at 3.3-3.5V, and flashing red below 3.3V. This visual battery gauge has become second nature to interpret at a glance.
• Flight Mode Indication: Each flight mode on my drones has a distinctive lighting pattern: solid colors for stable modes, pulsing patterns for acro, and rapid flashing for special modes like return-to-home. This immediate visual confirmation has been particularly useful when testing new builds or troubleshooting mode switch issues.
• Signal Quality: One of my most useful configurations shows RSSI through LED brightness—full brightness indicates strong signal, dimming as signal weakens. This visual feedback complements the OSD information and has helped me identify signal issues before they become critical.
• GPS Status: My long-range explorer uses color-coded indication for GPS status: red for no fix, yellow for 2D fix, and green for 3D fix with sufficient satellites. The immediate visual confirmation of GPS status has proven invaluable during the critical takeoff phase of autonomous missions.
Search and Rescue Applications
While primarily a hobby pilot, I've assisted in a few search operations where LED capabilities proved valuable:
• Visibility Features: For a night search operation, I equipped my drone with ultra-bright strobes visible from over a kilometer away. This allowed ground teams to track the drone's position easily while it searched using a thermal camera.
• Signaling Capabilities: I programmed specific flash patterns to indicate when something of interest was located. This simple communication method allowed the drone to effectively "signal" to ground teams without requiring radio communication.
• Illumination Functions: Adding a 10W spotlight to my larger drone created an effective illumination tool for search areas. The ability to direct light precisely where needed helped ground teams investigate areas of interest identified by the thermal camera.
Racing and Competition
The racing scene has embraced LED systems for both functional and spectator benefits:
Pilot Identification
At my first drone racing event, I struggled to identify my drone among similar-looking aircraft. This experience led me to develop distinctive lighting for racing:
• Team Colors: Our racing team now uses a consistent blue/orange color scheme across all our drones. This visual consistency helps teammates identify each other during practice sessions and creates a professional appearance at competitions.
• Individual Marking: Within our team color scheme, each pilot has a unique pattern—I use a pulsing effect that's distinctly different from my teammates' solid and strobing patterns. This subtle difference allows for individual identification while maintaining team branding.
• Automated Race Systems: At a recent competition, the race management software assigned LED colors to each pilot based on their heat assignment. My programmable LED system allowed me to quickly match the assigned color, making it easier for judges and spectators to track competitors.
Gate and Course Marking
LED-equipped gates have transformed the racing experience:
At night races, illuminated gates create a Tron-like experience that's both functional and visually stunning. Flying through glowing gates while your drone leaves light trails in long-exposure photographs creates a futuristic aesthetic that has helped attract new people to the hobby.
For spectators, the combination of LED-marked courses and distinctively lit drones makes races much easier to follow. The ability to clearly track each drone through the course has improved the spectator experience significantly compared to early races where similar-looking drones were difficult to distinguish.
Creative and Aesthetic Applications
LEDs open up creative possibilities beyond functional applications:
Light Painting and Photography
Some of the most memorable drone projects involve light painting. Using long-exposure photography techniques, people create "light paintings" in the night sky by programming specific patterns and flying precise paths. The results are otherworldly images that show the drone's flight path as continuous light trails.
For one project, I programmed my drone to "write" text in the air using carefully timed LED patterns and precise flight paths. The resulting photographs showed glowing words floating in the night sky—a magical effect that combined technical precision with artistic expression.
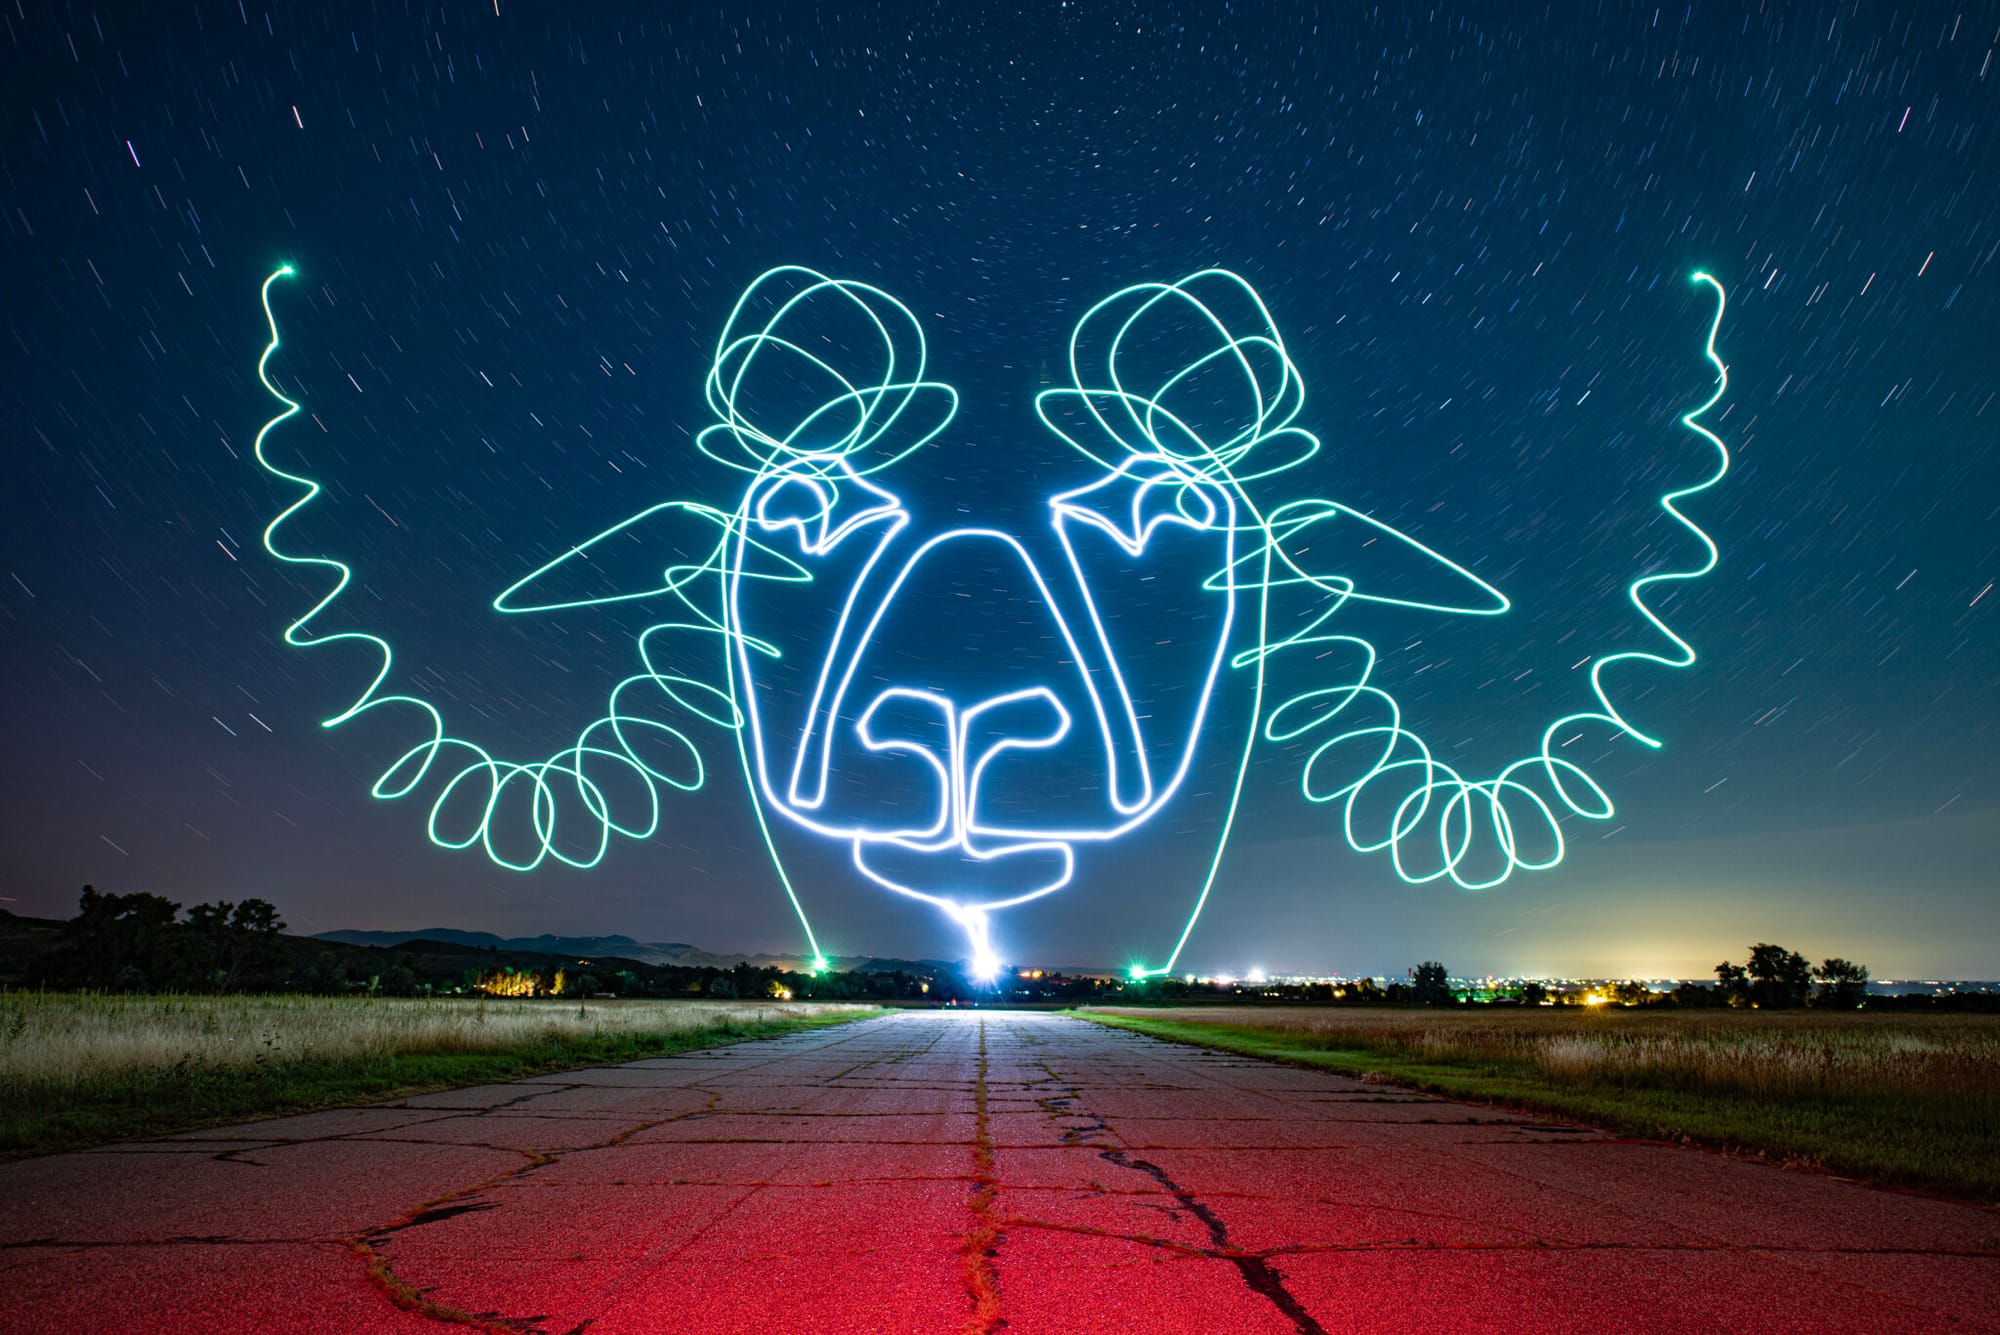
The key to successful light painting is brightness and pattern timing. Through experimentation, I found that setting LEDs to maximum brightness and using solid colors rather than patterns produces the cleanest light trails in photographs.
Drone Light Shows
Inspired by professional drone light shows, I worked with fellow pilots to create our own synchronized performances:
Our first attempt was modest—just three drones with coordinated lighting performing simple patterns. Even this small-scale show created a magical experience for onlookers unfamiliar with drone capabilities.
As we gained experience, we expanded to eight drones with programmed color changes synchronized to music. The complexity required careful planning and practice, but the resulting performance created a memorable spectacle that showcased the artistic potential of drone technology.
Drone light show
The technical challenges were significant—maintaining precise positioning while executing lighting changes required reliable GPS, well-tuned position hold, and thoroughly tested lighting systems. The effort invested in overcoming these challenges resulted in a uniquely satisfying blend of technical and artistic achievement.
Advanced LED Techniques
As my experience with drone lighting has grown, I've explored increasingly sophisticated implementations:
Synchronized Systems
Coordinating multiple LED systems creates impressive visual effects:
Multi-Drone Synchronization
For a special event, I worked with fellow pilots to create a synchronized light show with multiple drones:
The technical challenge was significant—we needed precise timing across all aircraft. Our solution combined GPS time synchronization with pre-programmed patterns triggered at specific timestamps. The result was a coordinated light show where multiple drones appeared to communicate with each other through lighting changes.
For smaller-scale synchronization, we used a master-slave configuration where one drone broadcast simple radio signals that triggered pattern changes on the others. This approach provided reliable coordination without requiring precise time synchronization.
The most impressive implementation used autonomous coordination where drones sensed each other's positions and adjusted lighting patterns accordingly. When drones came within proximity of each other, their lighting patterns would interact—creating the impression of communication between aircraft.
Music Synchronization
Synchronizing LED patterns to music creates captivating performances:
My first attempt at music synchronization used a simple microphone-based system that changed patterns based on beat detection. While basic, the visual effect of lights pulsing with the music created an engaging experience for spectators.
For more precise synchronization, I developed a pre-programmed approach where lighting patterns were timed to specific points in a known music track. This required careful planning and programming but resulted in perfectly synchronized performances where complex lighting changes matched specific musical moments.
The most advanced implementation used real-time frequency analysis to drive different aspects of the lighting. Bass frequencies controlled color intensity, mid-range affected pattern speed, and high frequencies triggered accent effects. The resulting organic response to music created a dynamic visual representation of the audio.
Interactive LED Systems
LED systems that respond to flight dynamics add another dimension to the experience:
Sensor-Driven Lighting
Integrating sensor data with lighting control creates responsive visual effects:
• Accelerometer Integration: One of my favorite implementations uses accelerometer data to drive lighting effects. During aggressive maneuvers, the LEDs intensify and change color based on G-forces. The visual effect is striking—the drone appears to "power up" during high-energy flying and calm down during gentle hovering.
• Altitude and Airspeed Response: For my photography drone, I configured the lighting to change based on altitude—subtle blue at low altitudes transitioning to purple at higher elevations. This provides an intuitive visual reference for altitude that complements the OSD data.
• Temperature and Environmental Response: After experiencing an ESC overheat issue, I added temperature monitoring that changes LED colors if components exceed safe operating temperatures. This early warning system has prevented potential component failures by alerting me to cooling issues before they become critical.
Remote Control Interaction
Adding pilot control to lighting systems enhances their utility:
• Spectator Interaction: For public demonstrations, I created an interactive system where spectators could influence drone lighting through a simple app. This engagement feature was particularly popular with children, who delighted in seeing the drone respond to their color selections.
• Pilot Control Options: My racing setup includes transmitter-based pattern selection through a three-position switch. Position one activates high-visibility mode for orientation, position two enables team colors for identification, and position three activates a distinctive "victory pattern" for celebration laps.
• Automated Interactions: My most advanced implementation uses proximity sensors to create automated interactions with the environment. When the drone approaches objects, the lighting responds—brightening in the direction of the object and changing color based on distance. This provides intuitive proximity feedback that's particularly useful when flying in confined spaces.
Advanced Programming Techniques
Creating sophisticated LED behaviors requires specialized programming approaches:
Pattern Generation Algorithms
Mathematical approaches create complex, engaging patterns:
After experimenting with basic pre-programmed patterns, I began exploring algorithmic generation. Using sine wave functions to control color transitions created smooth, organic effects that were more visually appealing than simple on/off patterns.
For one project, I implemented a cellular automaton algorithm (similar to Conway's Game of Life) that generated evolving patterns across the LED array. The emergent behavior created fascinating, never-repeating patterns that drew attention whenever I flew the drone.
The most sophisticated implementation used a particle system simulation where virtual particles flowed along the drone's arms, changing color and intensity based on flight dynamics. During fast forward flight, the particles would stream backward, while yaw rotation created spiral effects—all responding organically to actual flight behavior.
Custom Controller Development
Creating purpose-built controllers unlocks maximum potential:
While off-the-shelf controllers are convenient, I eventually developed custom solutions for specific needs. My first custom controller used an Arduino Nano to interface between the flight controller and LED strips, translating flight data into lighting patterns.
As my requirements grew more complex, I upgraded to ESP32-based systems that offered more processing power and built-in wireless capabilities. The ability to update patterns via Wi-Fi made field adjustments much more convenient than earlier systems that required USB connections.
For my most advanced builds, I've created integrated systems where the LED controller receives direct sensor input alongside flight controller data. This fusion of information sources allows for more responsive and informative lighting patterns that reflect both pilot inputs and environmental conditions.
Selecting the Right LED System
Choosing appropriate LED systems for specific applications:
Use Case Considerations
Matching LED systems to specific needs:
Racing
For racing drones, visibility and identification are paramount:
My racing builds use bright, distinctive color schemes optimized for visibility during high-speed flight. I've found that solid colors with minimal animation provide the clearest orientation cues when the drone is moving rapidly.
Team color schemes help spotters and race officials track specific drones through the course. I use a consistent blue/orange pattern that's instantly recognizable even when the drone is just a blur through a gate.
Power efficiency is critical in racing, so I use minimal LED counts (typically 8-12 total) and efficient mounting to minimize weight and drag. The performance impact is negligible while maintaining essential visibility.
Freestyle
Freestyle requires clear orientation while adding personal style:
My freestyle quads balance functional orientation lighting with aesthetic appeal. The front/rear color differentiation is pronounced for clear orientation, while side lighting adds style without compromising functional clarity.
I've found that dynamic patterns that respond to flight inputs create engaging video content. My current setup pulses with throttle input and changes intensity during flips and rolls, adding visual interest to flight footage.
Durability is essential for freestyle builds that experience frequent crashes. I use protected mounting systems and robust connections that can withstand the abuse of aggressive flying and inevitable impacts.
Long Range
Long-range flying demands efficiency and status indication:
For my long-range explorer, power efficiency is the primary consideration. I use a minimal LED count with efficient control systems and lower brightness settings to minimize power consumption during extended flights.
Status indication is critical when flying at distance, so I prioritize clear communication of battery status, GPS health, and radio link quality. The lighting system provides redundant status information that complements OSD data.
Visibility at distance requires careful color selection. I've found that green and white provide the best visibility at long range, while red tends to fade more quickly with distance. My long-range setup uses bright white front LEDs visible from over 500 meters.
Cinematic
Photography drones benefit from aesthetic and functional lighting:
My cinematic build uses lighting that enhances video quality without creating distracting elements in the frame. Underglow mounting creates a pleasing effect in footage without LEDs appearing directly in the shot.
Adjustable brightness is essential for adapting to different shooting conditions. I can dial the intensity from subtle to dramatic depending on the creative requirements of the shoot.
Color temperature consideration is important for cinematic applications. I've found that warm white (3000K) LEDs create more pleasing effects for sunset and golden hour footage, while cool white (6000K) works better for daylight and urban environments.
Night Flying
Night operations require maximum visibility and orientation clarity:
For dedicated night flyers, I use high-output LEDs with wide viewing angles to ensure visibility from all directions. The brightness difference between my day and night setups is substantial—night configurations use approximately triple the LED count of daytime builds.
Anti-collision lighting becomes essential for night operations. I incorporate aviation-style strobes that make the drone visible from significant distances, enhancing safety when sharing airspace.
Illumination capabilities add utility to night flying. Forward-facing spotlights help identify landing areas and obstacles, while downward illumination assists with altitude judgment when ground features are difficult to discern in darkness.
Troubleshooting and Maintenance
Even the best LED systems occasionally develop issues. Through years of experience, I've developed effective troubleshooting approaches:
Common LED Issues
Identifying and resolving typical problems:
Power-Related Problems
Power issues are the most common source of LED problems:
My first complex LED installation suffered from frustrating flickering issues that I eventually traced to inadequate power supply capacity. The 5V regulator was rated for 1A continuous, but the LED system drew brief peaks of 1.2A during color transitions, causing voltage sags.
I've learned to be conservative with power specifications, typically selecting regulators rated for at least 50% more current than the theoretical maximum draw. This headroom ensures stable operation even during peak demands.
For one particularly power-hungry installation, I added a large capacitor (1000μF) near the LED power input to smooth out current spikes. This simple addition eliminated flickering issues by providing a reservoir of energy for momentary high-current demands.
The most reliable solution I've found for power-sensitive installations is a dedicated voltage regulator exclusively for the LED system. This isolation prevents LED-related power fluctuations from affecting flight electronics and vice versa.
Signal and Control Issues
Data signal problems can cause erratic behavior:
On an early addressable LED build, I experienced bizarre pattern corruption that would occur randomly during flight. After much troubleshooting, I discovered that the data wire was picking up interference from nearby ESC signal lines. Rerouting the wire and adding a small ferrite bead solved the issue completely.
For longer LED runs, I've found that signal degradation can occur if the data wire exceeds about 30cm. In these cases, adding a simple buffer circuit refreshes the signal and ensures reliable operation. For most builds, I now place the controller as close as possible to the start of the LED strip to minimize signal path length.
One particularly challenging issue involved intermittent LED failures during specific flight maneuvers. I eventually traced this to a marginal solder joint on the data line that would briefly disconnect during high-G maneuvers. Since then, I've been meticulous about solder joint quality and strain relief for all LED connections.
Physical Damage
LEDs are vulnerable to crash damage:
After losing several LED strips to crash damage, I developed more robust mounting approaches. For exposed installations, I now use clear heat shrink tubing over the entire strip, which provides significant protection against abrasion and impact while allowing light to pass through.
For my freestyle builds that experience frequent crashes, I've moved to recessed mounting wherever possible. By creating channels in the frame or 3D printed parts that fully enclose the LED strips, I've dramatically improved survival rates without compromising visibility.
When damage does occur, I've found that addressable LED strips can often be repaired by cutting out damaged sections and bridging the power and data connections. This modular repairability has saved numerous strips that would otherwise be completely replaced.
Maintenance Best Practices
Keeping LED systems in optimal condition:
Regular Inspection
Preventative maintenance prevents failures:
Before every flying session, I perform a quick visual inspection of all LED components. I look for loose connections, damaged strips, and signs of wire fatigue. This simple check has caught numerous developing issues before they caused in-flight failures.
For functional testing, I cycle through all lighting modes to verify proper operation. This not only confirms basic functionality but also exercises the control systems and power supply under various load conditions.
After particularly rough flying sessions or crashes, I perform a more thorough inspection, checking mounting security and connection integrity. Reseating connectors and reinforcing any weakened mounting points has prevented many potential failures.
Waterproofing and Protection
Environmental protection extends LED lifespan:
After losing an LED system to moisture damage during an unexpected rain shower, I began applying conformal coating to all LED electronics. This thin protective layer has proven effective at preventing moisture-related failures without affecting light output.
For drones that regularly fly in challenging conditions, I've upgraded to IP65-rated waterproof LED strips. While slightly heavier than standard strips, their durability in wet or dusty environments has made them worth the weight penalty for certain applications.
Physical protection is equally important. I use clear polycarbonate covers for exposed LED installations, providing impact protection while allowing light transmission. These shields have saved countless LEDs during crashes that would otherwise have caused direct impacts.
For more detailed information on waterproofing, see:
Waterproofing and Flying in Rain and Snow
Repair Techniques
Effective repairs extend system lifespan:
When individual LEDs fail in an addressable strip, I've developed a technique for replacement that preserves the rest of the strip. Using a hot air rework station, I carefully remove the failed LED and solder in a replacement. While delicate work, this approach has saved expensive strips that would otherwise need complete replacement.
For controller repairs, I focus on the most common failure points—connectors and power regulation components. Keeping spare parts for these components has allowed me to quickly repair controllers rather than replacing entire units.
Wiring repairs are critical for reliability. I've found that proper strain relief at connection points prevents most wire failures. For repairs, I use heat-shrink solder connectors that create reliable joints with excellent strain relief in a single step.
FAQ: Common Questions About Drone LED Systems
How much flight time will I lose by adding LEDs?
This question comes up frequently, and my experience provides some practical insights:
The impact varies significantly based on the LED system and how it's used. For my typical freestyle build with 16 RGB LEDs running at 50% brightness, the power consumption is approximately 400-500mA at 5V. On a 4S 1500mAh battery, this represents about 3-5% of the total power budget.
In real-world testing, I've measured the difference with and without LEDs active on identical flights. On my 5-inch freestyle quad, the difference was approximately 30 seconds on an 8-minute flight—about 6% reduction in flight time.
The impact can be minimized through smart power management. Using lower brightness settings, efficient color choices (red uses less power than white), and patterns that don't illuminate all LEDs simultaneously can reduce power consumption significantly. On my long-range builds, I use these techniques to keep the power impact under 2%.
For most recreational FPV applications, the benefits of improved orientation and visibility far outweigh the modest reduction in flight time. I consider LEDs essential safety equipment rather than optional accessories.
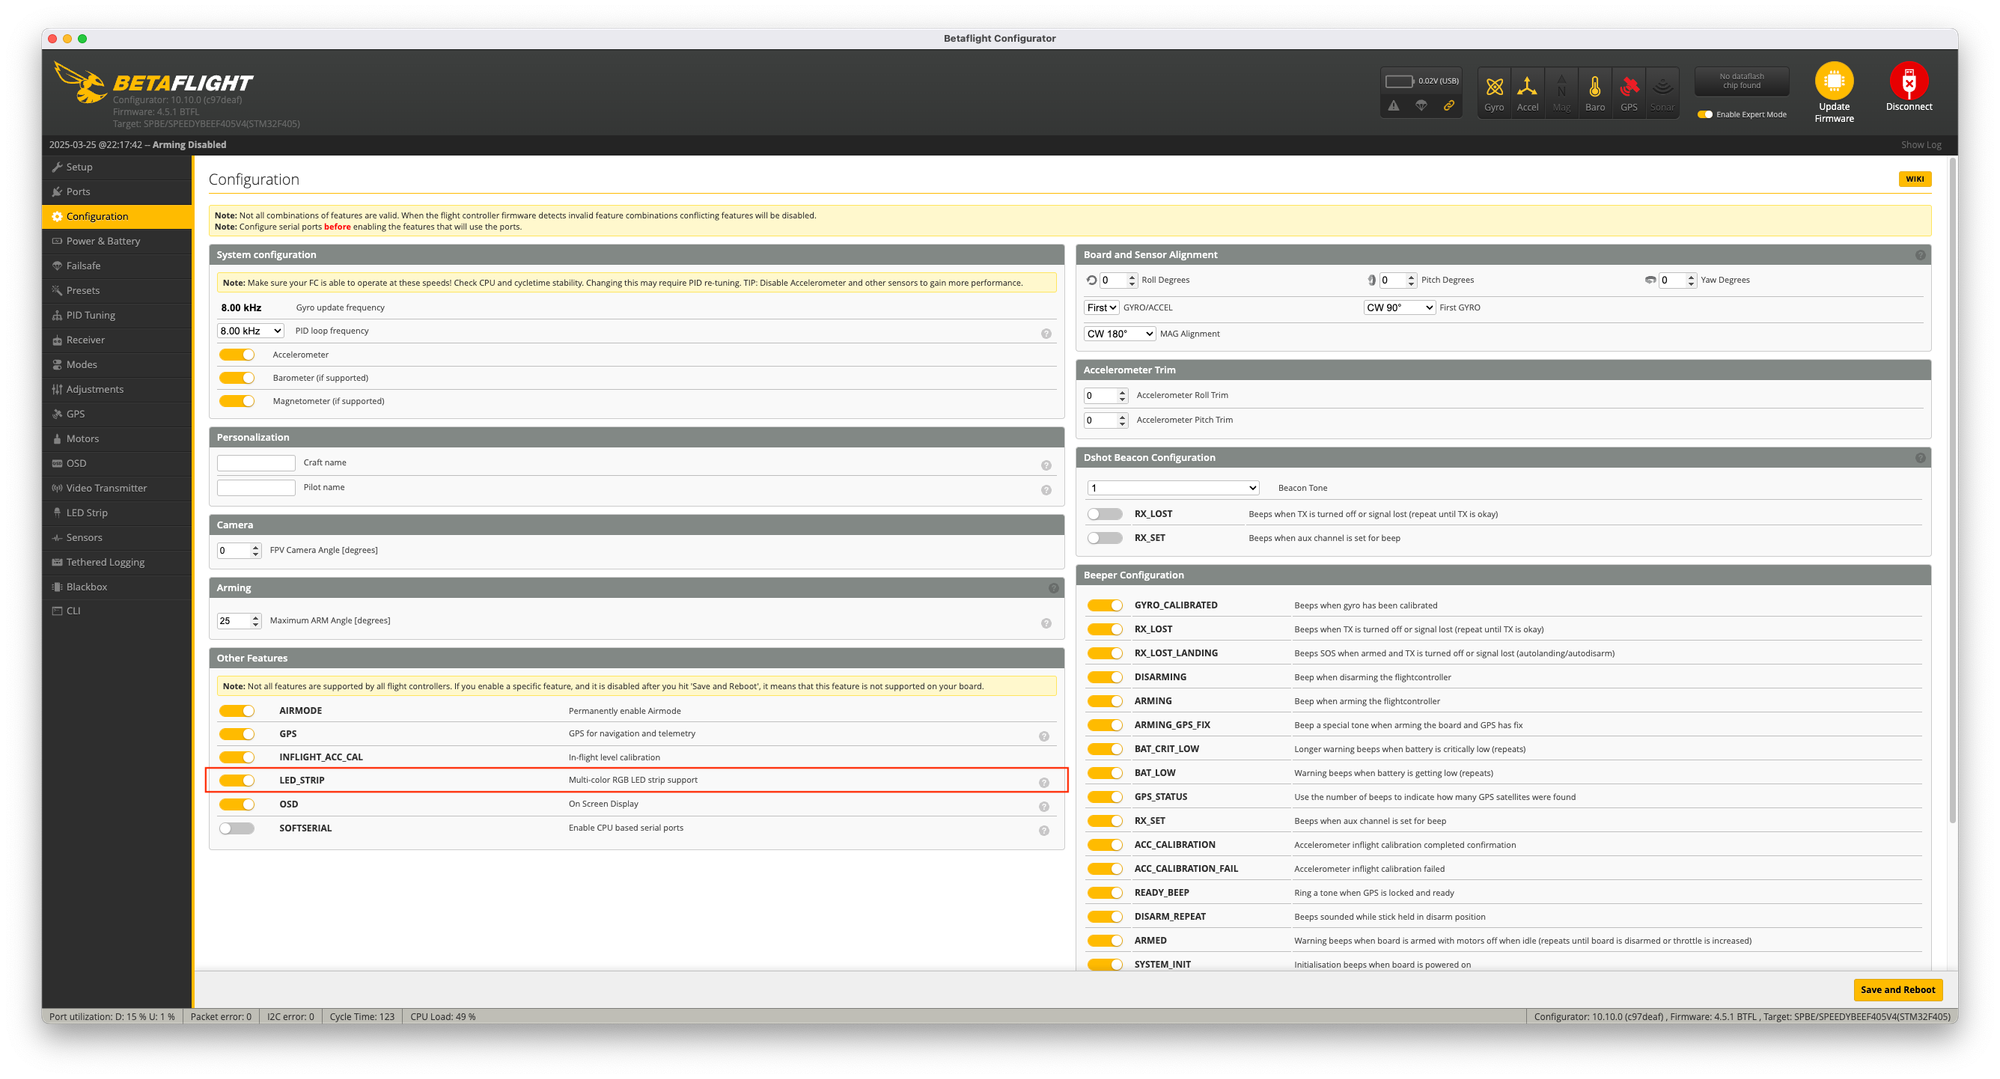
How do I set up LEDs in Betaflight?
Setting up LEDs in Betaflight involves several steps:
Hardware Connection:
First, identify the correct pad on your flight controller—usually labeled "LED" or "LED_STRIP." Connect the data wire from your WS2812B strip to this pad, and connect power (5V) and ground to appropriate pads. Ensure your power source can handle the current requirements of your LED count.
Software Configuration:
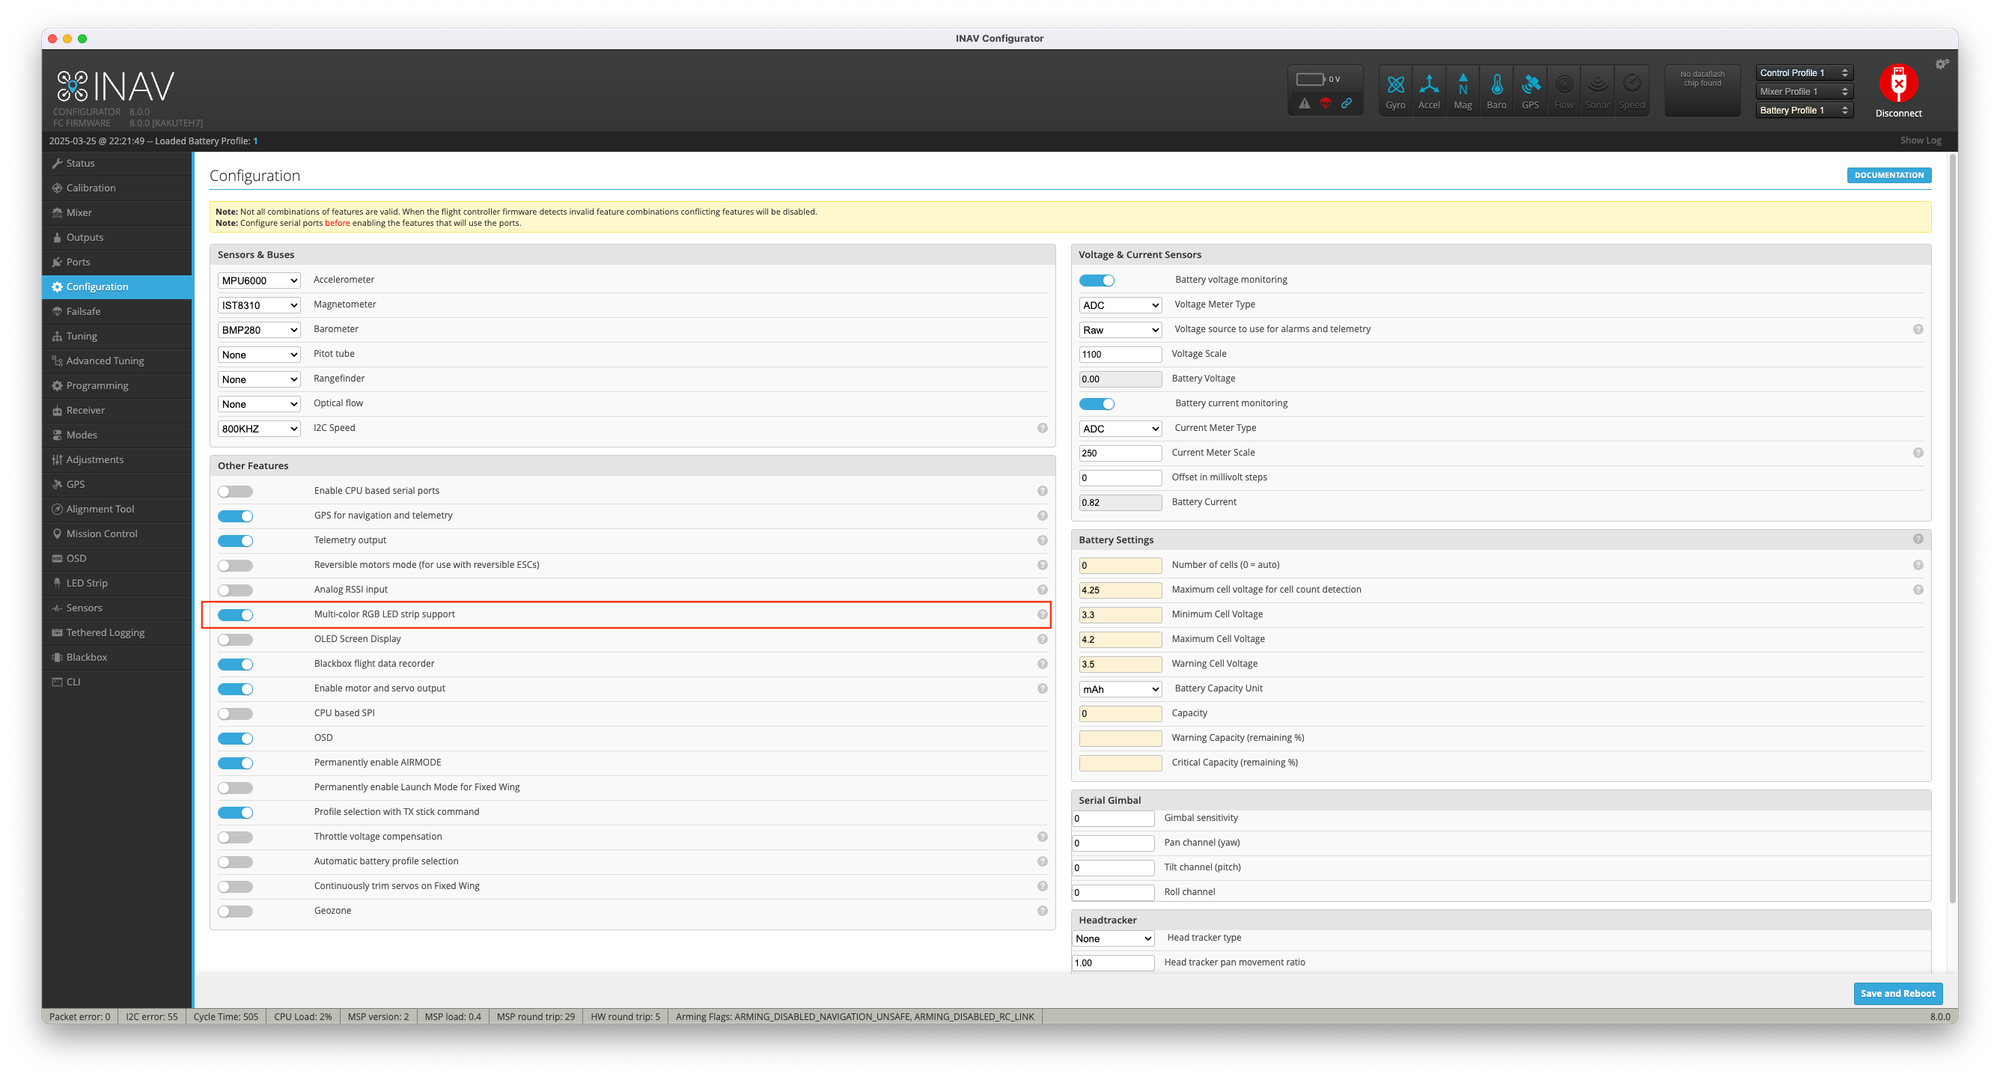
- In Betaflight Configurator, go to the Configuration tab
- Under "Other Features," enable "LED_STRIP"
- Save and reboot
- Navigate to the LED Strip tab
LED Mapping:
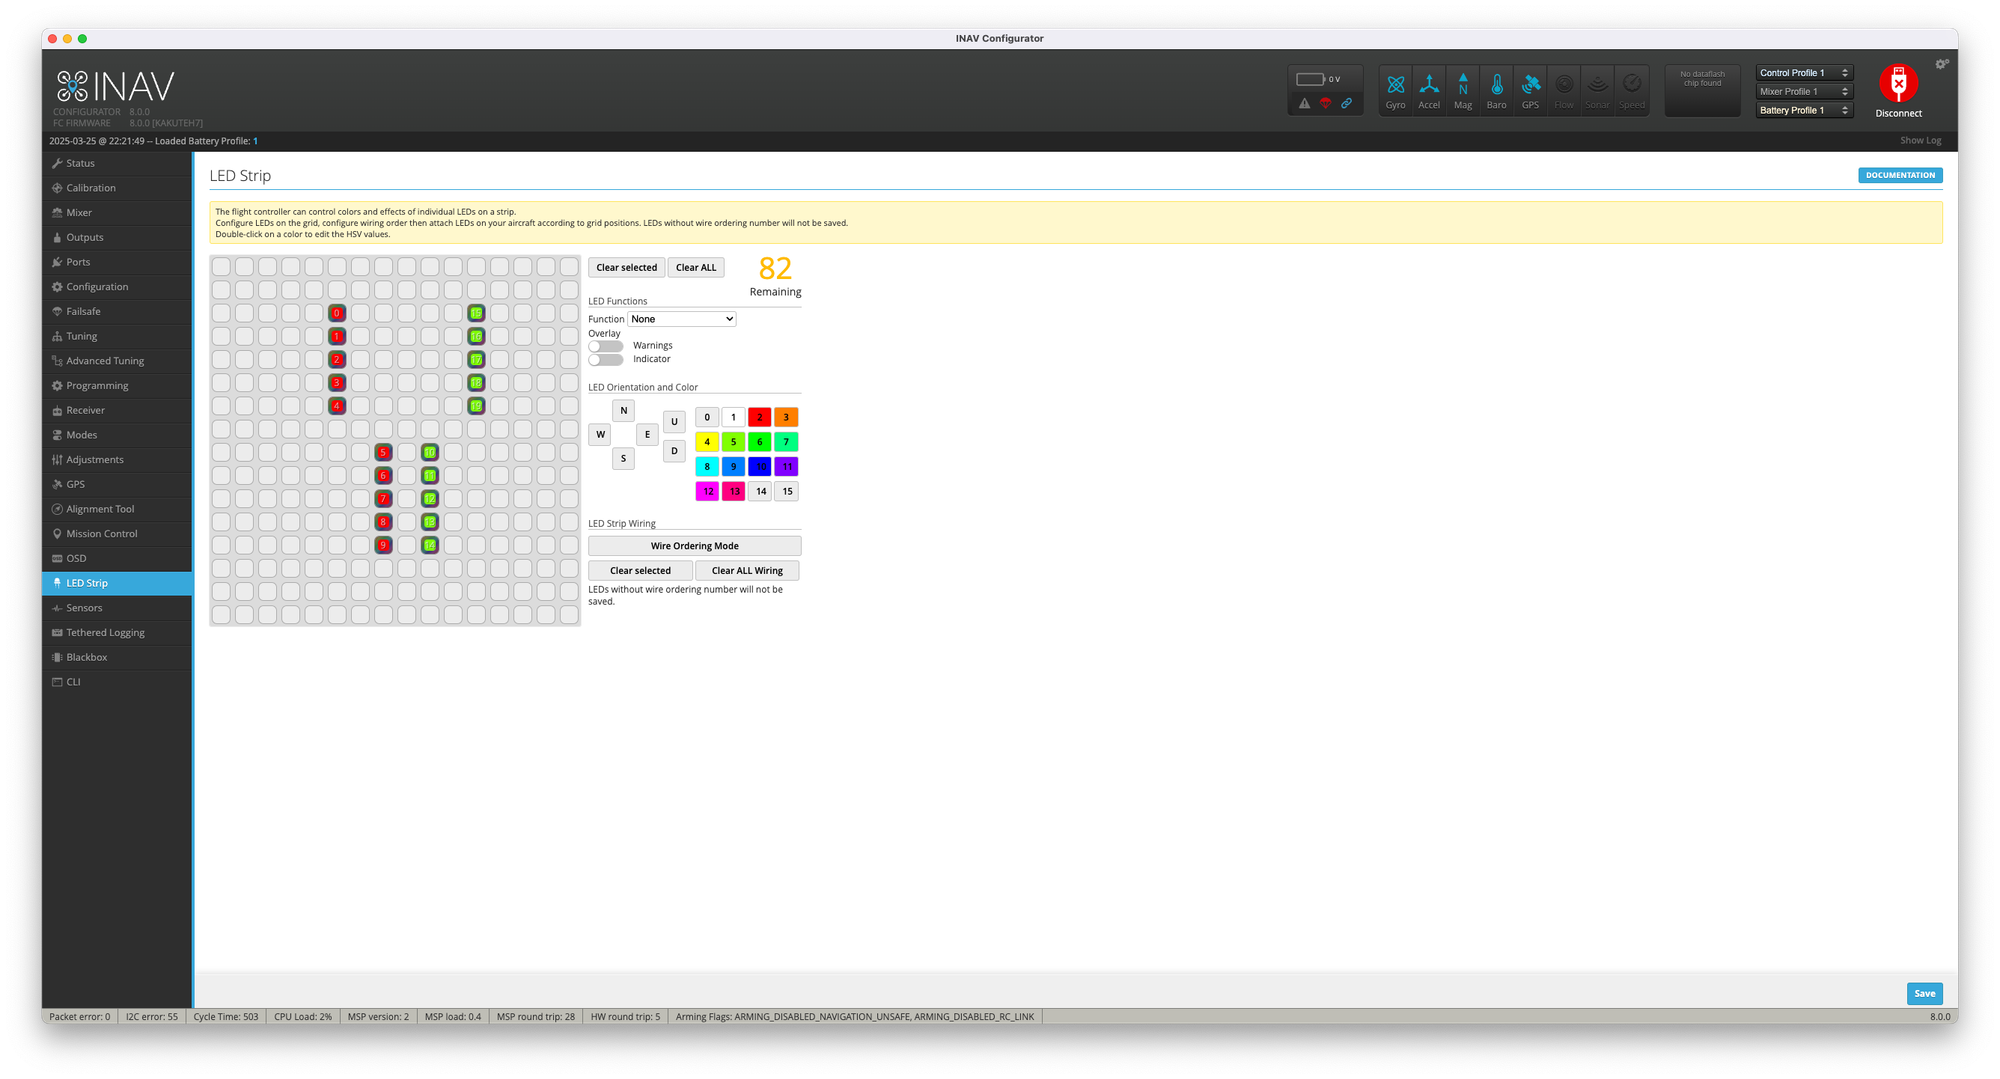
The grid in the LED tab represents a top-down view of your drone. Click on the grid to add LEDs in the physical arrangement of your strip. For each LED, you'll need to set:
- Wire order (the sequence number on your physical strip)
- Functions (what this LED should indicate)
- Color (base color and function colors)
- Direction (for orientation functions)
My Recommended Setup:
For a typical quad, I place LEDs in the grid matching their physical positions, then configure:
- Front LEDs: White color, orientation function
- Rear LEDs: Red color, orientation + larson scanner functions
- All LEDs: Warning function (overrides others when triggered)
CLI Advanced Configuration:
For more precise control, I use CLI commands. For example:
led 0 15,15:ES:IA:0
This configures LED 0 at position 15,15 on the grid with functions E (arm state), S (flight status), I (indicator), and A (angle mode) using color index 0.
The learning curve can be steep, but the results are worth the effort. I recommend starting with a simple configuration and gradually adding complexity as you become comfortable with the system.
What's the difference between WS2812B and other addressable LEDs?
Through testing various LED types, I've found significant differences that affect drone applications:
WS2812B (NeoPixel):
This is my standard choice for most builds due to its widespread support and reliability. The single-wire digital protocol simplifies wiring, and the 5V operation works well with flight controller systems. The refresh rate of ~400Hz is adequate for most patterns, though it can create visible flickering in some high-speed video.
SK6812:
I use these when I need better color accuracy or RGBW capability. The RGBW variants include a dedicated white LED that produces truer white than RGB combinations. They're slightly more expensive but worth it for photography drones where color quality matters. They use the same protocol as WS2812B, making them drop-in compatible with most controllers.
APA102 (DotStar):
For high-speed applications or situations with potential interference, I prefer these LEDs. The two-wire SPI interface (clock + data) makes them less susceptible to timing issues and allows for much higher refresh rates (~20kHz). This eliminates flickering in high-frame-rate video. The downside is more complex wiring and slightly higher power consumption.
WS2811:
I occasionally use these for 12V systems since they operate natively at that voltage. This eliminates the need for voltage regulation on 3S builds, simplifying the installation. The downside is they control LEDs in groups of three rather than individually, reducing pattern flexibility.
For most drone applications, WS2812B offers the best balance of compatibility, simplicity, and performance. I only recommend alternatives for specific requirements like color accuracy (SK6812), high-speed video (APA102), or direct 12V operation (WS2811).
How do I protect my LEDs from crash damage?
After losing numerous LED strips to crashes, I've developed effective protection strategies:
Mounting Strategies:
Recessed mounting provides the best protection. I create channels in the frame or 3D printed parts that fully enclose the LED strips, leaving only the light-emitting surface exposed. This approach has dramatically improved survival rates in my freestyle builds.
For builds where recessed mounting isn't feasible, I use clear protective covers. Thin polycarbonate sheets formed to cover the LEDs provide excellent impact protection while allowing light transmission. These can be attached with small screws or VHB tape.
Material Choices:
Silicone-encased LED strips have proven far more durable than bare strips. The flexible silicone coating absorbs impact energy and prevents the rigid PCB from snapping. For my crash-prone builds, I exclusively use IP65 or higher rated strips, even when water resistance isn't required.
For connections, I use flexible silicone wire with strain relief at solder joints. This prevents the rigid connection points from breaking during impact. Adding a small dab of silicone conformal coating over solder joints provides additional mechanical reinforcement.
Wiring Protection:
Proper wire routing is critical for crash survival. I run wires through the interior of the frame wherever possible and use small zip ties with heat shrink to secure them at regular intervals. This prevents wires from being snagged or pulled during crashes.
For connections, I prefer JST plugs with positive locking mechanisms. These rarely disconnect during crashes but allow for easy maintenance and replacement of damaged sections. The slight weight penalty is well worth the reliability improvement.
Repair Preparation:
Despite best efforts, damage sometimes occurs. I design my installations with repair in mind, using modular approaches where possible. Addressable LED strips can be cut and rejoined at marked points, allowing replacement of damaged sections rather than entire strips.
I keep spare sections of pre-wired LED strip in my field kit for quick repairs. Having the appropriate connectors, heat shrink, and basic soldering equipment available has saved many flying sessions that would otherwise end early due to lighting damage.
Can LEDs cause interference with other drone systems?
This is a legitimate concern that I've encountered and resolved in several builds:
Potential Interference Sources:
The primary source of interference is the digital signal controlling addressable LEDs. The rapid switching creates electromagnetic noise that can affect sensitive systems. I've observed this most commonly with analog video systems, where LED updates can cause visible lines or distortion in the video feed.
Power system noise is another concern. The varying current draw of LED patterns can create voltage fluctuations that affect other components. This is particularly noticeable during pattern transitions where many LEDs change state simultaneously.
Systems Most Susceptible:
Analog video is by far the most sensitive to LED interference. I've experienced visible horizontal lines in the video feed that correspond exactly to LED update timing. Digital video systems (DJI, HDZero, etc.) are generally more resistant but not immune.
GPS reception can also be affected if the LED data lines run close to GPS antenna cables. On one build, I traced inconsistent GPS performance to interference from nearby LED wiring. Rerouting the wires resolved the issue completely.
Prevention Strategies:
Power filtering is essential. I add a large capacitor (470-1000μF) near the LED power input to smooth current fluctuations. For sensitive builds, I use a separate voltage regulator exclusively for the LED system to isolate it from flight electronics.
Signal routing requires careful planning. I keep LED data wires away from sensitive components like receiver antennas, video transmitters, and GPS modules. When crossings are unavoidable, I try to route them at 90-degree angles to minimize coupling.
For particularly sensitive installations, I've found that adding a simple buffer circuit between the flight controller and LED strip can reduce interference. This reshapes the digital signal with cleaner edges that produce less electromagnetic noise.
In extreme cases, I've used shielded wire for LED data lines. While rarely necessary, this approach has resolved stubborn interference issues in complex builds with multiple potential interference sources.
What are the best LEDs for night visibility?
Night flying demands specific LED characteristics for optimal visibility:
LED Characteristics for Night Visibility:
High brightness is essential, but the type of brightness matters. I've found that LEDs with a focused beam pattern (30-60 degree viewing angle) provide better long-distance visibility than wider-angle LEDs that disperse light in all directions.
Color choice significantly affects visibility distance. Through extensive testing, I've determined that green provides the best visibility at distance, followed by white, then red. Blue, despite appearing bright up close, has the poorest long-distance visibility. For my night setups, I use green for maximum visibility points and white/red for orientation.
Optimal Configurations:
For orientation, I use a distinctive pattern with bright white in front and red in back, with the white noticeably brighter than the red. This creates instant orientation awareness even at significant distances.
Adding a subtle strobe effect dramatically improves visibility without being distracting in the FPV feed. I program a gentle pulse rather than a sharp on/off flash, which catches the eye effectively while remaining comfortable to watch.
For maximum visibility to others, I mount high-intensity strobes on the top of the aircraft. These are typically dedicated modules rather than standard LED strips, as they provide the brightness and flash patterns optimized for long-distance visibility.
Recommended Systems:
For serious night flying, I use a combination approach:
- Orientation: High-brightness addressable strips with focused patterns
- Visibility: Dedicated aviation-style strobes for maximum distance visibility
- Ground reference: Underglow lighting that creates a light pool on the ground
This multi-layer approach ensures the drone remains visible to me, visible to others, and provides ground reference information for altitude awareness—all critical aspects of safe night operations.
Conclusion
LED systems have evolved from simple orientation aids to sophisticated components that enhance functionality, safety, and aesthetics of FPV drones. Through years of building and flying with various lighting configurations, I've seen firsthand how proper implementation can transform the flying experience.
The journey from basic individual LEDs to advanced programmable systems mirrors the overall evolution of the hobby—increasingly sophisticated yet more accessible. What began as a simple necessity for orientation has expanded into a rich area for both functional improvement and creative expression.
For new builders, I recommend starting with the basics—clear orientation lighting with distinct front/back colors—then gradually expanding as your needs and interests evolve. The modular nature of LED systems allows for incremental upgrades that can grow with your skills and requirements.
As drone technology continues to advance, LED systems will likely become more integrated with flight controllers, offering greater functionality with less weight and power consumption. Smart systems that automatically adapt to flight conditions, battery status, and pilot preferences represent the future of drone lighting.
Whether you're flying for racing, freestyle, long-range exploration, or professional applications, a well-designed LED system can enhance your flying experience, improve safety, and add a distinctive personal touch to your drone. The combination of practical benefits and creative possibilities makes LED systems one of the most rewarding aspects of drone customization.


Comments ()