Drone Battery Mounting

After building and flying hundreds of drones over the years, I've learned that how you secure your battery is far more important than many pilots realize. This guide explores the various methods for mounting LiPo and Li-ion batteries to your drone frame, with insights on which approaches work best for different flying styles and situations.
Introduction: Why Battery Mounting Matters
Proper battery mounting affects several critical aspects of your drone's performance and safety:
- Center of Gravity: Battery position directly impacts flight characteristics
- Crash Resistance: Secure mounting prevents ejection during impacts
- Vibration Isolation: Some mounting methods dampen vibrations
- Weight Distribution: Affects handling, especially during aggressive maneuvers
- Quick Access: Enables efficient battery swapping in the field
- Heat Management: Proper mounting can aid in battery cooling
- Frame Stress: Incorrect mounting can stress or damage frames
I've seen countless drones crash due to batteries shifting in flight or ejecting during maneuvers. A battery that comes loose can cause catastrophic failure—from sudden power loss to damaged electronics from flailing battery leads. Investing time in proper battery mounting is one of the most cost-effective safety measures you can take.
Common Battery Mounting Methods
There are several approaches to securing batteries, each with distinct advantages and limitations:
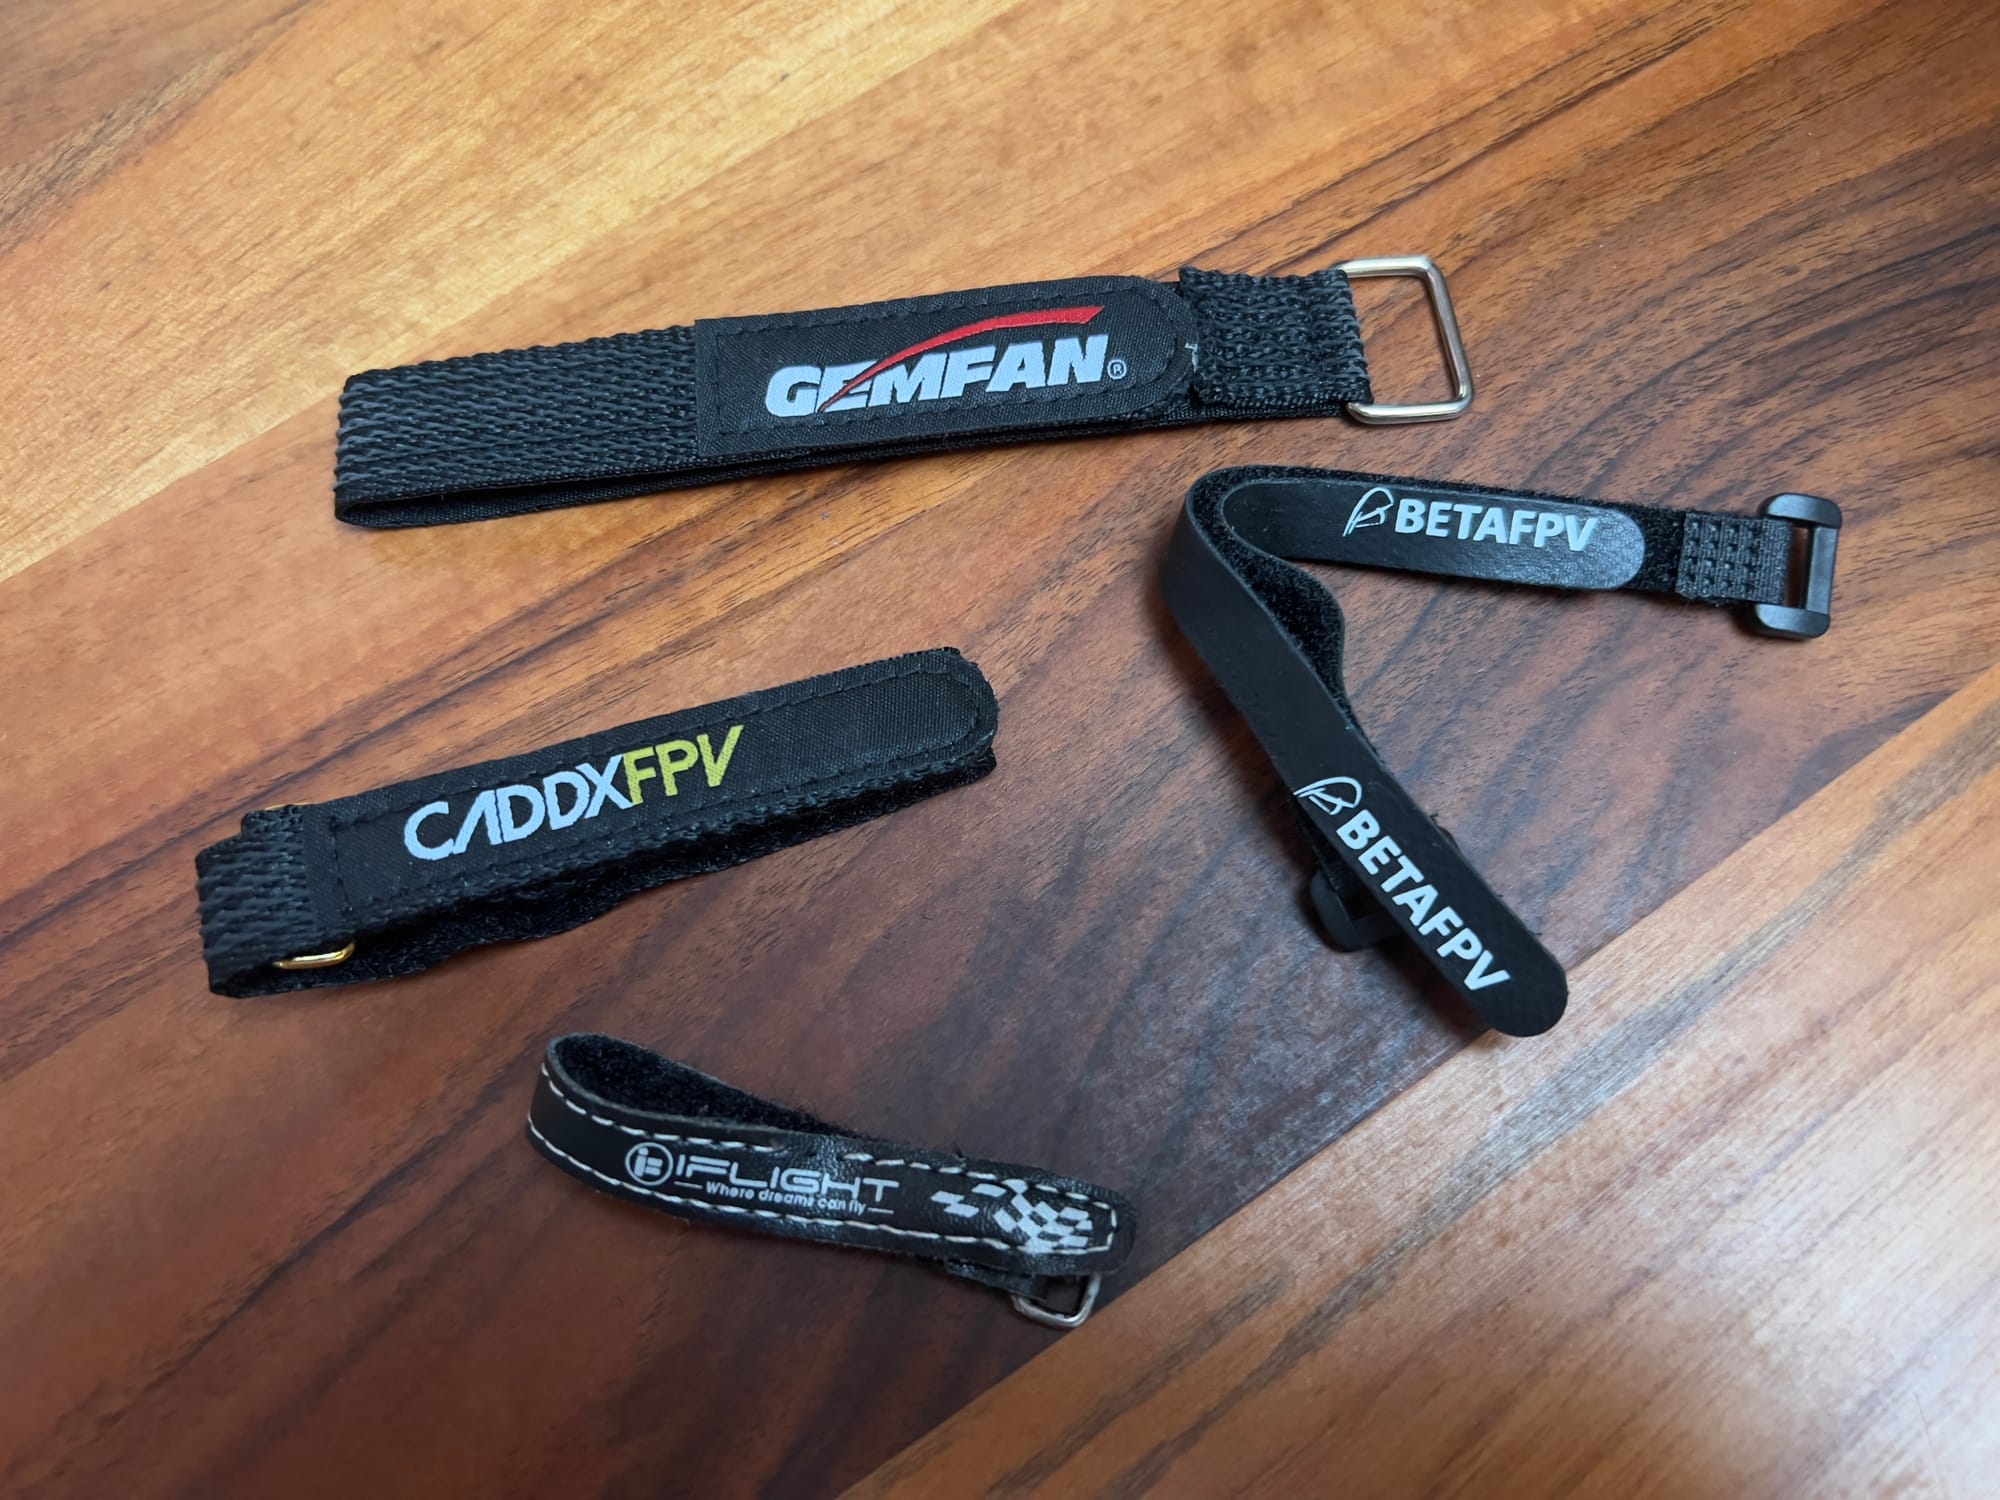
1. Strap Systems
Battery straps are the most common mounting method, particularly in the FPV community:
| Strap Type | Pros | Cons | Best For |
|---|---|---|---|
| Nylon/Polyester Straps | Inexpensive, widely available, lightweight | Can wear out, limited grip | Budget builds, lightweight applications |
| Rubber-Backed Straps | Better grip, reduced slippage | Slightly heavier, more expensive | General purpose, most FPV builds |
| Silicone-Backed Straps | Excellent grip, durable | Higher cost, can collect dirt | Racing, freestyle, aggressive flying |
| Quick-Release Systems | Fast battery changes | More complex, heavier | Long flying sessions, commercial operations |
| Kevlar/Reinforced Straps | Extremely durable, cut-resistant | Highest cost, less elastic | Professional applications, crash-prone flying |
For most of my freestyle builds, I use 20mm silicone-backed straps, which provide excellent grip while still allowing quick battery changes. For racing builds where every gram counts, I might opt for lighter nylon straps, accepting the slightly reduced security for weight savings.
Strap Placement Techniques
How you route and tension straps significantly affects their effectiveness:
- Cross-Strap Method: Two straps in an X pattern
- Provides maximum security
- Prevents movement in all directions
- Best for aggressive flying styles
- Parallel Strap Method: Two or more straps running parallel
- Distributes pressure evenly
- Easier battery changes
- Good for most applications
- Loop-Through Method: Straps loop through frame cutouts
- Very secure attachment to frame
- Prevents strap movement
- Requires compatible frame design
I've found that for freestyle and long-range flying, two parallel straps with one near each end of the battery provides the best balance of security and convenience. For racing, where ejection is more likely due to high-G maneuvers, the cross-strap method offers additional security.
2. Pad-Based Systems
Various pad materials can be used either alone or in combination with straps:
| Pad Type | Grip Level | Durability | Best Applications |
|---|---|---|---|
| Adhesive Foam Tape | Moderate | Low-Moderate | Budget builds, light-duty use |
| Silicone/Gel Pads | High | High | Vibration-sensitive builds, general use |
| Rubber Anti-Slip Mats | High | Moderate | General purpose, most builds |
| Hook-and-Loop (Velcro) | Very High | Moderate | Quick-change setups, heavier batteries |
| 3M Dual Lock | Extremely High | High | Professional rigs, camera drones |
Pad systems work by creating friction between the battery and mounting surface. They're particularly effective for:
- Reducing vibrations transmitted to the battery
- Preventing lateral movement
- Providing thermal insulation in extreme temperatures

For my cinematic builds where vibration reduction is critical, I use 3mm silicone pads combined with straps. The pads isolate the battery from frame vibrations while the straps provide security.
3. Frame-Integrated Solutions
Many modern frames include purpose-built features for battery mounting:
| Integration Type | Description | Advantages | Limitations |
|---|---|---|---|
| Battery Bays | Recessed areas sized for batteries | Perfect fit, low profile | Limited to specific battery sizes |
| Mounting Rails | Raised rails that contain battery | Excellent lateral stability | May add weight, limited adjustability |
| TPU Mounts | Flexible printed mounts attached to frame | Custom fit, shock absorption | Requires design/printing skills |
| Integrated Strap Channels | Frame cutouts for strap routing | Clean look, secure strap positioning | Fixed strap positions |
Frame-integrated solutions often provide the cleanest and most secure mounting, but at the cost of flexibility. When selecting a frame, consider how its battery mounting system will accommodate your preferred batteries.
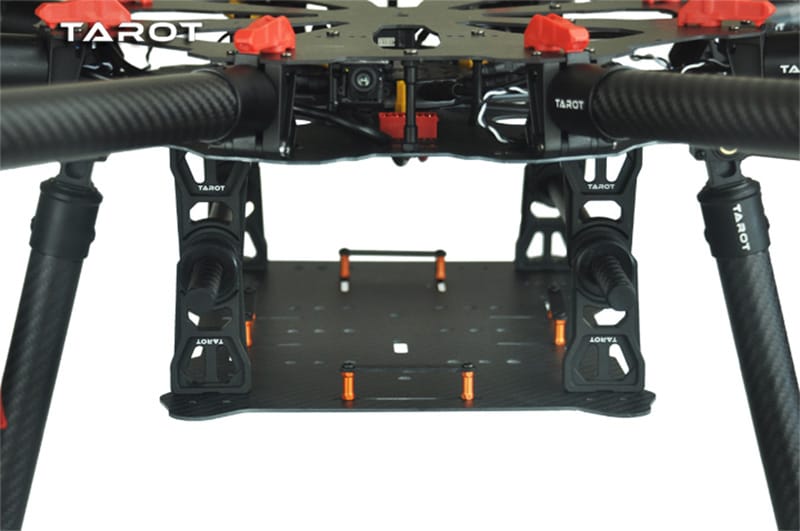
I particularly appreciate frames with thoughtfully designed strap channels that prevent straps from sliding while still allowing some adjustment for different battery sizes.
4. Cage and Tray Systems
For maximum security or specialized applications, enclosed systems offer advantages:
| System Type | Security Level | Weight Impact | Best For |
|---|---|---|---|
| Full Battery Cages | Extremely High | High | Commercial operations, extreme conditions |
| Slide-In Trays | High | Moderate | Quick battery swaps, professional use |
| Partial Cages | High | Moderate | Balance of security and weight |
| Clip Systems | Moderate-High | Low-Moderate | Racing, quick changes |
These systems typically add more weight than strap or pad methods but provide superior security. They're particularly valuable for:
- Commercial operations where battery ejection would be catastrophic
- Flying in extreme conditions (high winds, turbulence)
- Applications requiring very frequent battery changes
For my long-range builds that operate far from home, I sometimes use a lightweight TPU printed partial cage combined with a strap, accepting the small weight penalty for the added security.
5. Hybrid Approaches
Most experienced pilots eventually develop hybrid mounting systems that combine multiple methods:
| Hybrid Combination | Benefits | Use Cases |
|---|---|---|
| Straps + Pads | Security with vibration isolation | Freestyle, general purpose |
| Tray + Strap | Quick changes with added security | Professional, long sessions |
| TPU Mount + Pad | Custom fit with vibration damping | Cinematic, sensitive electronics |
| Cage + Pad | Maximum security with protection | Extreme conditions, commercial |
My personal preference for most builds is a combination of:
- Silicone pad on the bottom of the battery
- Two silicone-backed straps
- Small TPU battery bumpers at the edges
This combination provides excellent security while damping vibrations and protecting the battery edges during crashes.
Battery Mounting for Different Drone Types
Different drone types and flying styles have unique battery mounting requirements:
Racing Drones
For racing, priorities are:
- Minimal weight: Every gram counts
- Secure mounting: High-G turns and potential crashes
- Quick changes: Fast battery swaps between heats
Recommended approach:
- Lightweight but strong straps (20mm width typical)
- Minimal padding to save weight
- Consider TPU battery bumpers to prevent ejection during crashes
- Position battery for optimal center of gravity
Freestyle Drones
Freestyle flying demands:
- Very secure mounting: Inverted flight, flips, rolls
- Crash resistance: Protection during inevitable impacts
- Balanced weight distribution: For predictable handling
Recommended approach:
- Silicone-backed straps in cross pattern
- TPU battery plate or bumpers
- Anti-slip pad underneath
- Position battery to achieve slightly nose-heavy balance
Long-Range Drones
Long-range setups require:
- Absolute reliability: Failure is not an option at distance
- Efficient cooling: Extended flight times generate heat
- Weight efficiency: Every gram affects range
Recommended approach:
- Combination of secure straps and TPU mounts
- Allow some airflow around battery for cooling
- Consider battery position for optimal aerodynamics
- Redundant mounting (secondary retention system)
Cinematic Drones
For smooth footage, priorities are:
- Vibration isolation: Prevent jello effect in footage
- Absolute security: Protect expensive camera gear
- Balance precision: Maintain perfect gimbal performance
Recommended approach:
- Thick silicone/gel pads for vibration damping
- Wide, secure straps (25-30mm)
- Position battery to perfectly balance gimbal
- Consider quick-release systems for production efficiency

Battery Position and Center of Gravity
Where you place your battery significantly affects flight characteristics:
Horizontal Positioning
| Position | Effect on Flight | Best For |
|---|---|---|
| Forward | More nose-heavy, faster forward flight | Racing, long-range cruising |
| Centered | Neutral balance, predictable handling | Freestyle, general purpose |
| Rearward | More tail-heavy, quicker pitch response | 3D flying, technical freestyle |
Vertical Positioning
| Position | Effect on Flight | Considerations |
|---|---|---|
| Below Frame | Lower CoG, more stable | More vulnerable in crashes, standard for most builds |
| Within Frame | Centered CoG, balanced handling | Better protection, may require specific frame |
| Above Frame | Higher CoG, more agile but less stable | Rare, used for specific handling characteristics |
Stack Positioning
| Configuration | Pros | Cons |
|---|---|---|
| Battery-on-bottom | Lower CoG, standard approach | More vulnerable in crashes |
| Stack-on-bottom | Protected electronics, better cooling | Higher CoG, less stable |
| Split configuration | Distributed weight, unique handling | Complex wiring, non-standard |
I typically position batteries slightly forward of center for most freestyle builds, which provides a slightly nose-heavy balance that aids in forward flight stability while still maintaining good agility. For racing builds, I position the battery further forward to improve forward flight characteristics.
DIY Battery Mounting Solutions
Custom solutions can address specific needs or limitations:
3D Printed Options
If you have access to a 3D printer, consider these custom solutions:
- TPU Battery Plates
- Custom-sized to your frame and battery
- Can include features like strap channels and bumpers
- Flexible material absorbs impacts
- Battery Bumpers/Guards
- Protect battery corners and edges
- Prevent ejection during crashes
- Can be designed for specific battery sizes
- Quick-Release Mechanisms
- Custom-designed for your specific needs
- Can combine security with fast changes
- Often uses combination of printed parts and hardware
I've designed several TPU battery plates for my builds that include integrated bumpers and strap channels. These provide excellent protection while ensuring the battery stays perfectly positioned.
Repurposed Materials
Don't have a 3D printer? Try these alternatives:
- Craft Foam + Double-Sided Tape
- Inexpensive vibration damping
- Can be cut to exact size needed
- Adds minimal weight
- Silicone Kitchen Mats
- Excellent grip properties
- Can be cut to size
- Heat resistant and durable
- Rubber Shelf Liner
- Good grip, widely available
- Inexpensive and easy to work with
- Comes in various thicknesses
- Old Mouse Pads
- Good combination of grip and cushioning
- Often free (repurposed)
- Easy to cut and shape
One of my favorite DIY solutions is cutting small pieces from silicone kitchen mats to create custom-sized battery pads. These provide excellent grip and vibration damping at minimal cost.
Commercial Battery Mounting Products
Many purpose-built products offer advantages over DIY solutions:
| Product Type | Notable Brands | Best Features |
|---|---|---|
| Premium Straps | Ethix, Ummagrip, TBS | Silicone backing, perfect width, durability |
| Battery Pads | RDQ, NewBeeDrone, Ummagrip | Pre-cut, perfect thickness, optimal materials |
| Non-Slip Mats | Tattu, GoPro | High-quality grip surface, perfect size |
| Battery Protectors | Pyrodrone, RDQ | Impact protection, secure fit |
| Quick-Release Systems | CNHL, Spektrum | Fast changes, secure locking |
While DIY solutions can work well, commercial products often offer refinements that justify their cost. I particularly recommend investing in high-quality silicone-backed straps, as these offer significant improvements over basic nylon straps.
Common Battery Mounting Mistakes
Avoid these frequent errors I've observed (and occasionally made myself):
Insufficient Tension
Problem: Straps too loose, allowing battery movement
Solution: Ensure straps are tight enough that the battery cannot shift, but not so tight that they damage the battery
Relying Solely on Velcro/Hook-and-Loop
Problem: Adhesive fails during aggressive maneuvers
Solution: Use hook-and-loop as a secondary system, with straps as primary retention
Blocking Battery Cooling
Problem: Completely encasing battery prevents cooling
Solution: Ensure some airflow around battery, especially for long flights
Improper Strap Routing
Problem: Straps slide off battery edges during flight
Solution: Use frames with strap channels or add TPU guides to keep straps positioned
Ignoring Battery Protection
Problem: Battery damaged during crashes
Solution: Add edge protection with TPU bumpers or protective cases
Overlooking Balance Issues
Problem: Battery position creates handling problems
Solution: Test different positions to find optimal center of gravity
I once lost an expensive drone due to using worn-out straps that allowed the battery to shift during a flip, causing a catastrophic crash. Since then, I inspect straps regularly and replace them at the first sign of wear.
Battery Mounting for Extreme Conditions
Special situations require additional considerations:
High-Vibration Environments
For drones operating near industrial equipment or with unbalanced props:
- Use thick silicone pads (3-5mm)
- Consider dual-layer damping systems
- Isolate battery from frame with soft mounting
Extreme Temperatures
For very hot or cold environments:
- Allow additional cooling space in heat
- Insulate batteries in extreme cold
- Use temperature-resistant mounting materials
- Consider thermal barriers between battery and frame
High-Impact Applications
For racing or aggressive freestyle:
- Use redundant mounting systems
- Add TPU protection at all battery corners
- Consider full or partial cage systems
- Use cut-resistant Kevlar straps
Water/Moisture Exposure
For operations near water:
- Use non-absorbent mounting materials
- Ensure drainage paths if water enters
- Consider conformal coating on battery connections
- Use corrosion-resistant hardware
For my winter flying in the Swiss Alps, I use a combination of insulating pads and windproof battery wraps to maintain battery temperature, with silicone-backed straps that maintain flexibility even in extreme cold.
Pro Tips from Experience
After years of experimentation, here are my top battery mounting insights:
- Pre-flight Check: Always tug firmly on your battery before flight to verify secure mounting
- Strap Maintenance: Replace straps showing any signs of wear or reduced elasticity
- Pad Replacement: Clean or replace grip pads when they begin collecting debris or losing tackiness
- Temperature Consideration: Slightly looser straps in cold weather, as batteries can expand when warm
- Crash Inspection: Always check mounting system after any crash before flying again
- Battery Size Standardization: When possible, standardize on 1-2 battery sizes across your fleet for consistent mounting
- Landing Gear Clearance: Ensure battery mounting doesn't interfere with landing gear compression
- Cable Management: Route battery cables to prevent strain or damage during battery installation/removal
- Strap Width Selection: Use wider straps (25-30mm) for larger batteries, narrower (15-20mm) for smaller builds
- Backup Retention: For critical operations, consider a secondary retention system like a safety leash
FAQ: Common Questions About Battery Mounting
What's better: one thick strap or two thinner straps?
Two straps are almost always better than one, even if the single strap is thicker. Two straps prevent the battery from pivoting around a single axis and provide redundancy if one strap fails. I recommend two 20mm straps for most builds rather than a single 30mm strap.
How tight should battery straps be?
Straps should be tight enough that the battery cannot move when you apply moderate force, but not so tight that they deform the battery or make removal difficult. You should be able to slide a finger under the strap with firm pressure. Over-tightening can damage battery cells over time.
Is it safe to use metal hardware in battery mounting systems?
Metal hardware (screws, nuts, etc.) is fine as long as it cannot contact the battery's electrical connections or puncture the battery wrapper. I recommend using TPU or plastic protection between any metal components and the battery itself. For maximum safety, avoid exposed metal in battery mounting systems.
How do I know if my battery mounting is secure enough?
Perform this test before flying: with the drone powered off, hold it securely and firmly shake it in all directions. Then turn it upside down and shake again. If the battery moves at all, your mounting system needs improvement. For freestyle or racing, the test should be even more vigorous.
Should I use different mounting methods for different types of batteries (LiPo vs Li-ion)?
Yes. Li-ion cells (especially in packs without a hard case) are more susceptible to physical damage than LiPos. They benefit from additional protection like TPU cases or bumpers. Additionally, Li-ion packs are often heavier and may require stronger mounting systems. I use more comprehensive protection for my Li-ion packs, particularly on long-range builds.
Conclusion
Proper battery mounting is a critical yet often overlooked aspect of drone building and maintenance. The right mounting solution depends on your specific drone, flying style, and operational environment. By understanding the principles and options outlined in this guide, you can develop a battery mounting system that provides security, convenience, and appropriate protection.
Remember that battery mounting directly affects safety—a detached battery can cause catastrophic failure and potential injury. Invest the time to develop and maintain a reliable mounting system, and make checking it part of your pre-flight routine.
I've found that the small details of battery mounting—the quality of straps, the positioning of pads, the addition of edge protection—often distinguish a merely functional drone from one that's truly reliable and enjoyable to fly. These details are worth getting right.
References and Further Reading
Internal References
- Drone Pre-Flight Checklists
- Drone Wiring Guide: Understanding Wire Sizes, Types, and Best Practices
- Overview of Drone Battery Types and Chemistry
- Drone Frames: Sizes, Materials, and Selection


Comments ()