Battery Health Analysis

After testing hundreds of LiPo batteries over the years, I've found that proper battery analysis is one of the most valuable yet underutilized practices in the drone hobby. This guide provides a detailed walkthrough of battery testing using the SkyRC D200neo charger and BD350 discharger, with practical insights on interpreting results and maintaining your battery fleet.
Introduction: Why Battery Testing Matters
Battery testing goes far beyond simply checking if a battery holds a charge. Proper testing reveals:
- True Capacity: The actual usable capacity versus the rated capacity
- Internal Resistance: A key indicator of battery health and performance
- Discharge Curve: How voltage behaves under load throughout the discharge cycle
- Cell Balance: Consistency between individual cells in a pack
- Cycle Health: How the battery performs after multiple charge/discharge cycles
I've saved thousands of swiss franks by identifying problematic batteries before they caused catastrophic failures in flight. More importantly, regular testing has prevented numerous potential safety incidents, as degraded LiPo batteries can pose serious fire hazards.
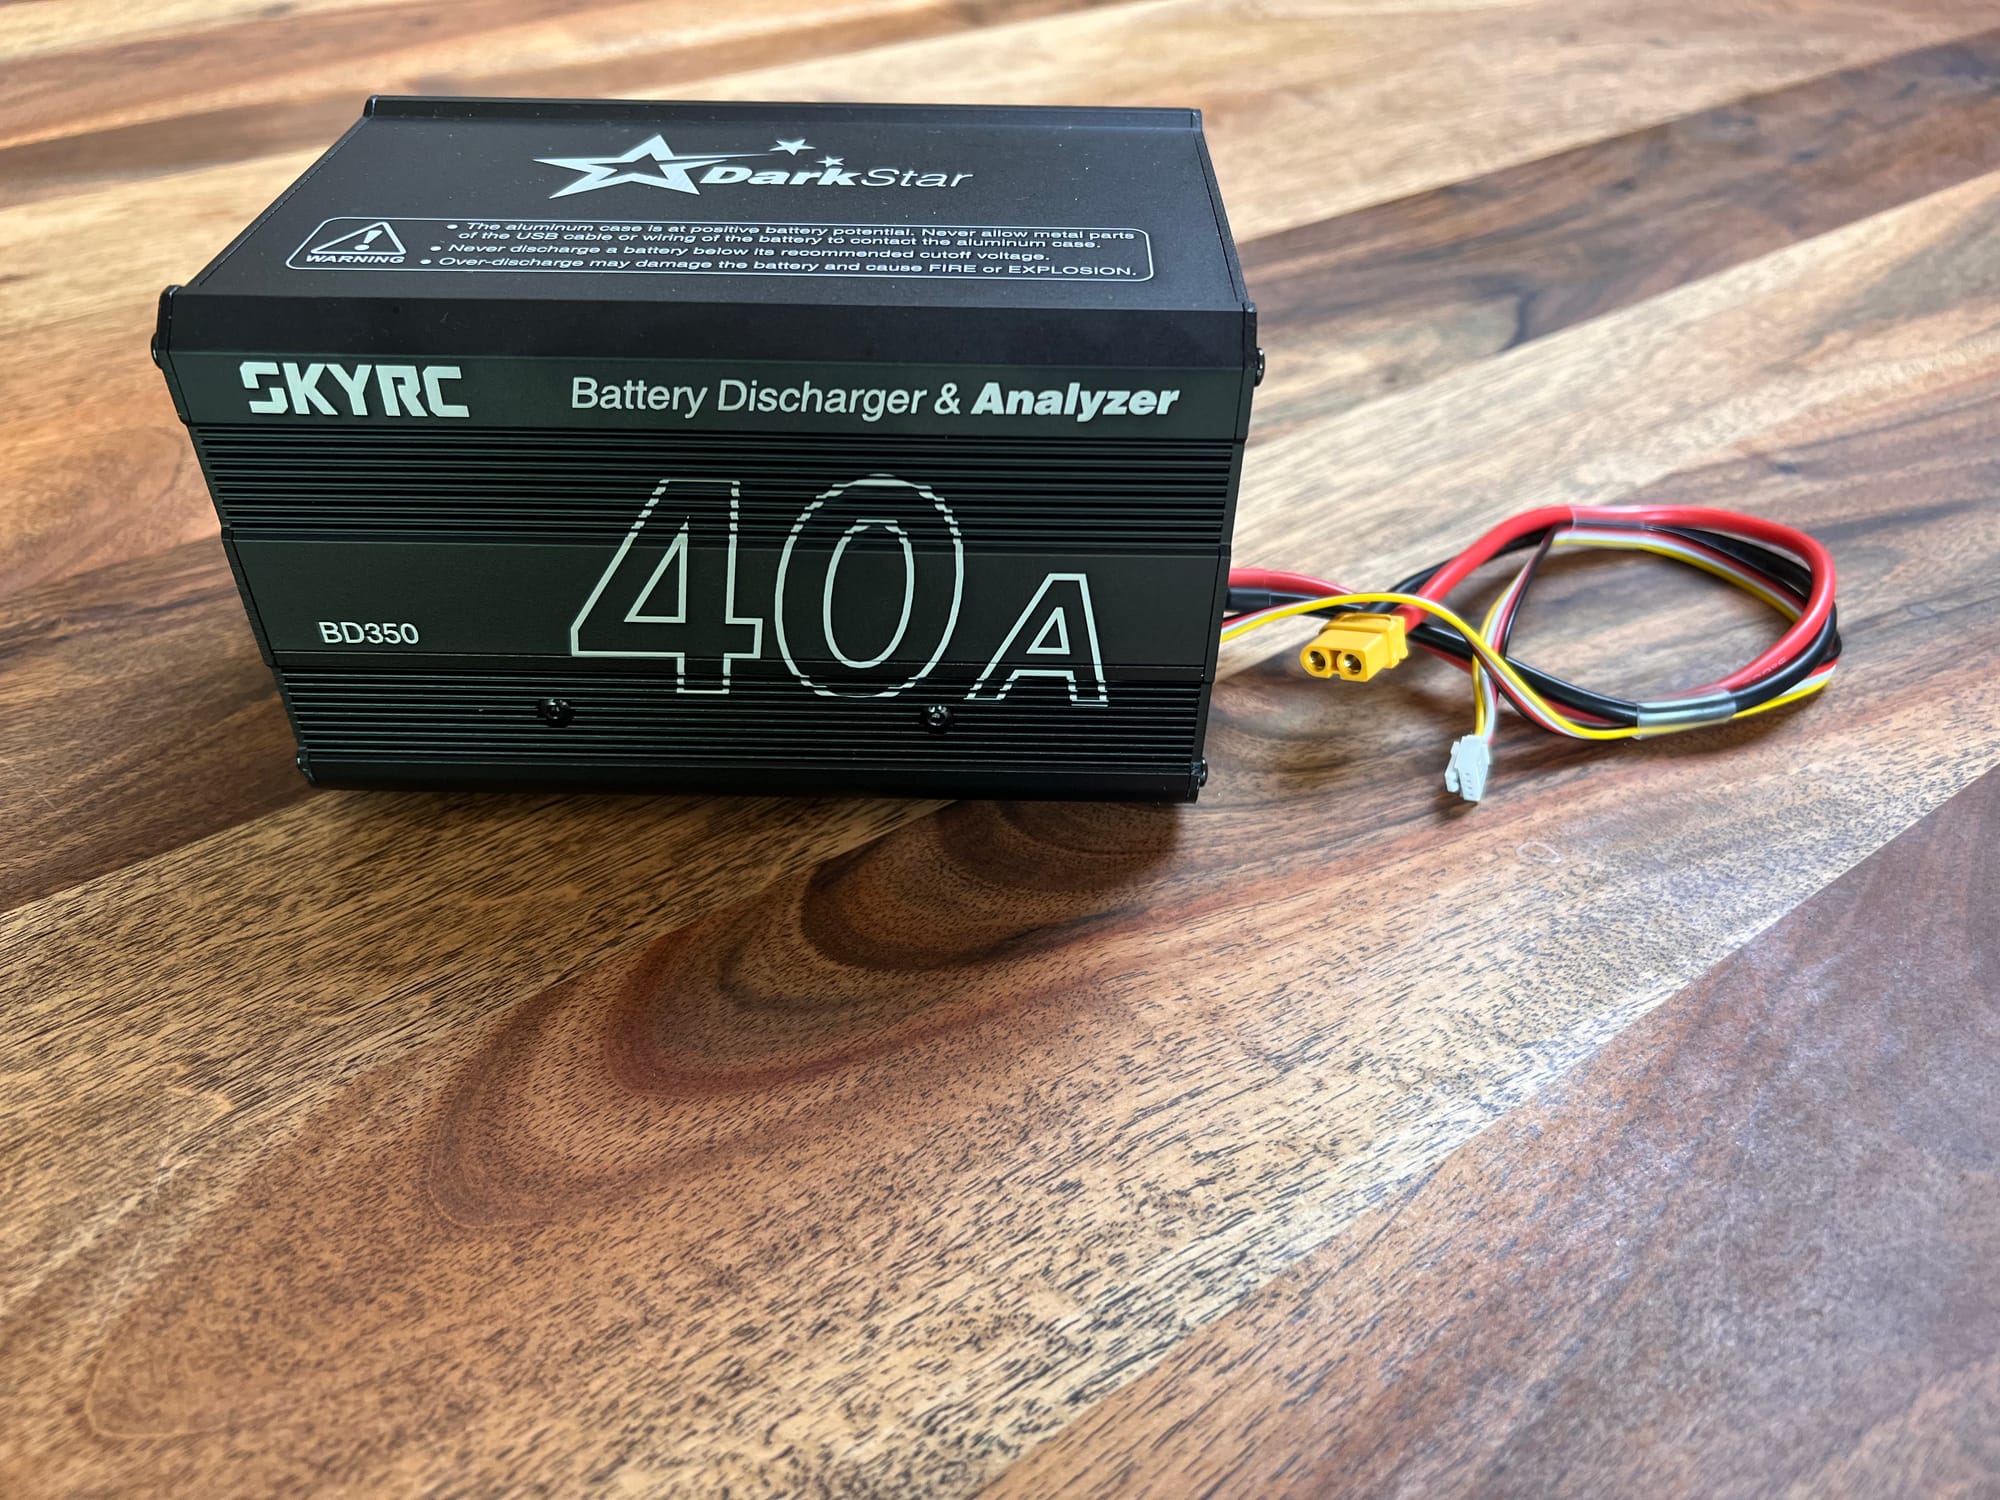
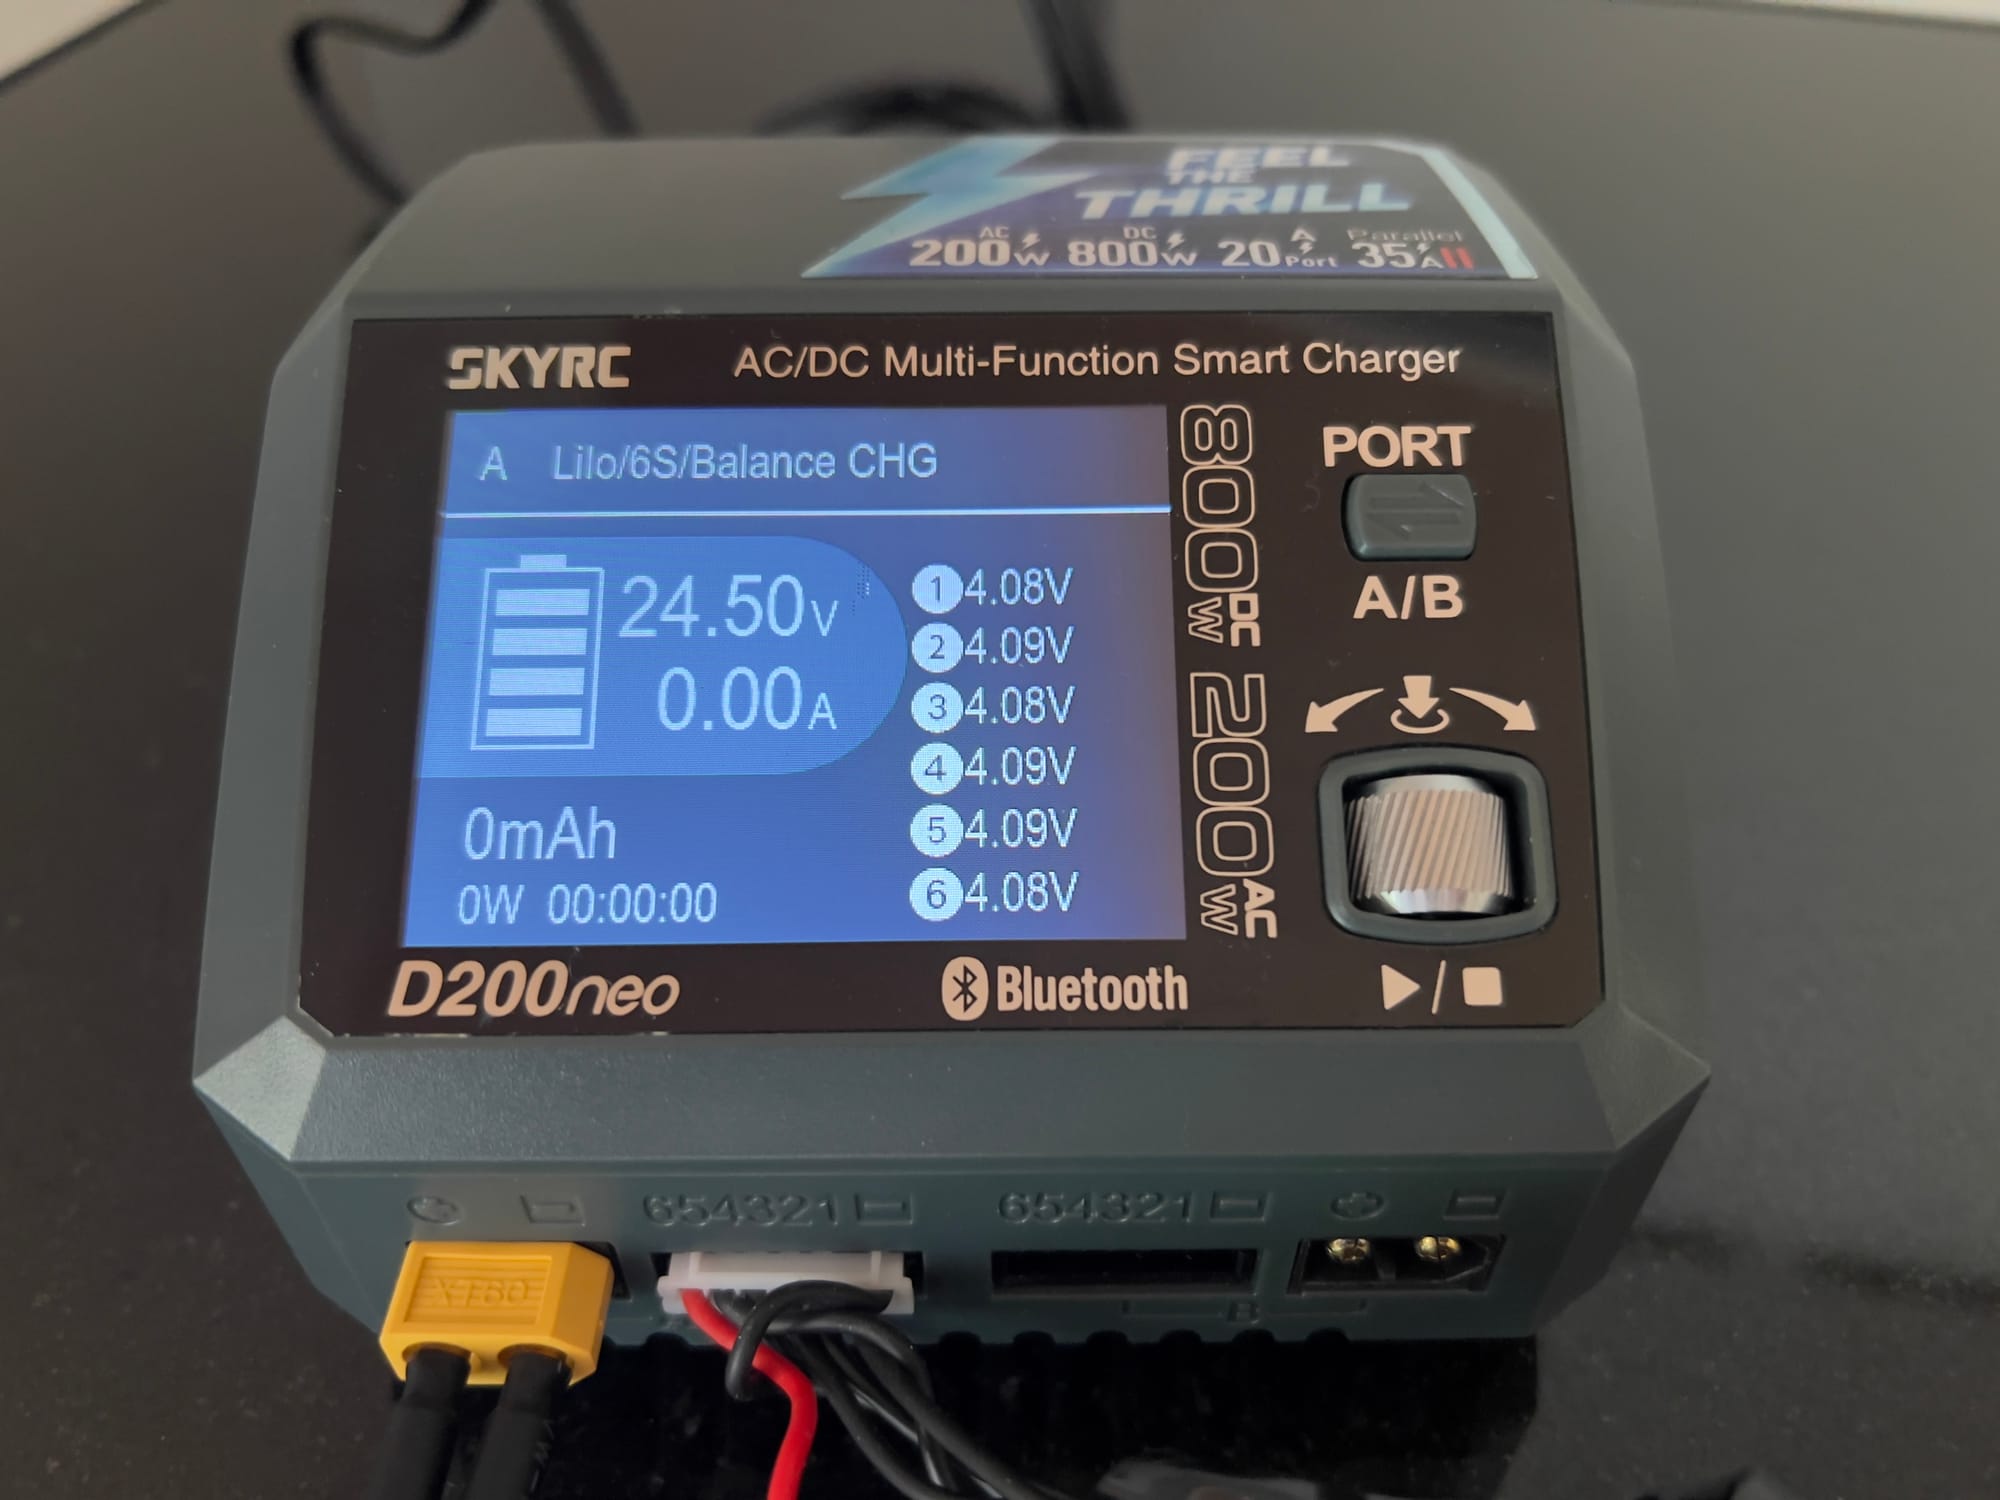
The SkyRC D200neo and BD350 Testing System
The SkyRC D200neo charger paired with the BD350 discharger creates a powerful battery analysis system:
Key Features for Battery Testing
| Component | Feature | Testing Benefit |
|---|---|---|
| D200neo | Dual Ports | Test two batteries simultaneously |
| ARM Cortex-M4 Processor | High-precision measurements | |
| HyperBoost Algorithm | Accurate charging for consistent results | |
| Internal Resistance Test | Quick health assessment | |
| BD350 | 40A Discharge Capability | Tests batteries under realistic load |
| 350W Discharge Power | Handles high-capacity packs | |
| LED Status Indicator | Easy monitoring of test progress | |
| Thermal Protection | Safe testing of degraded batteries | |
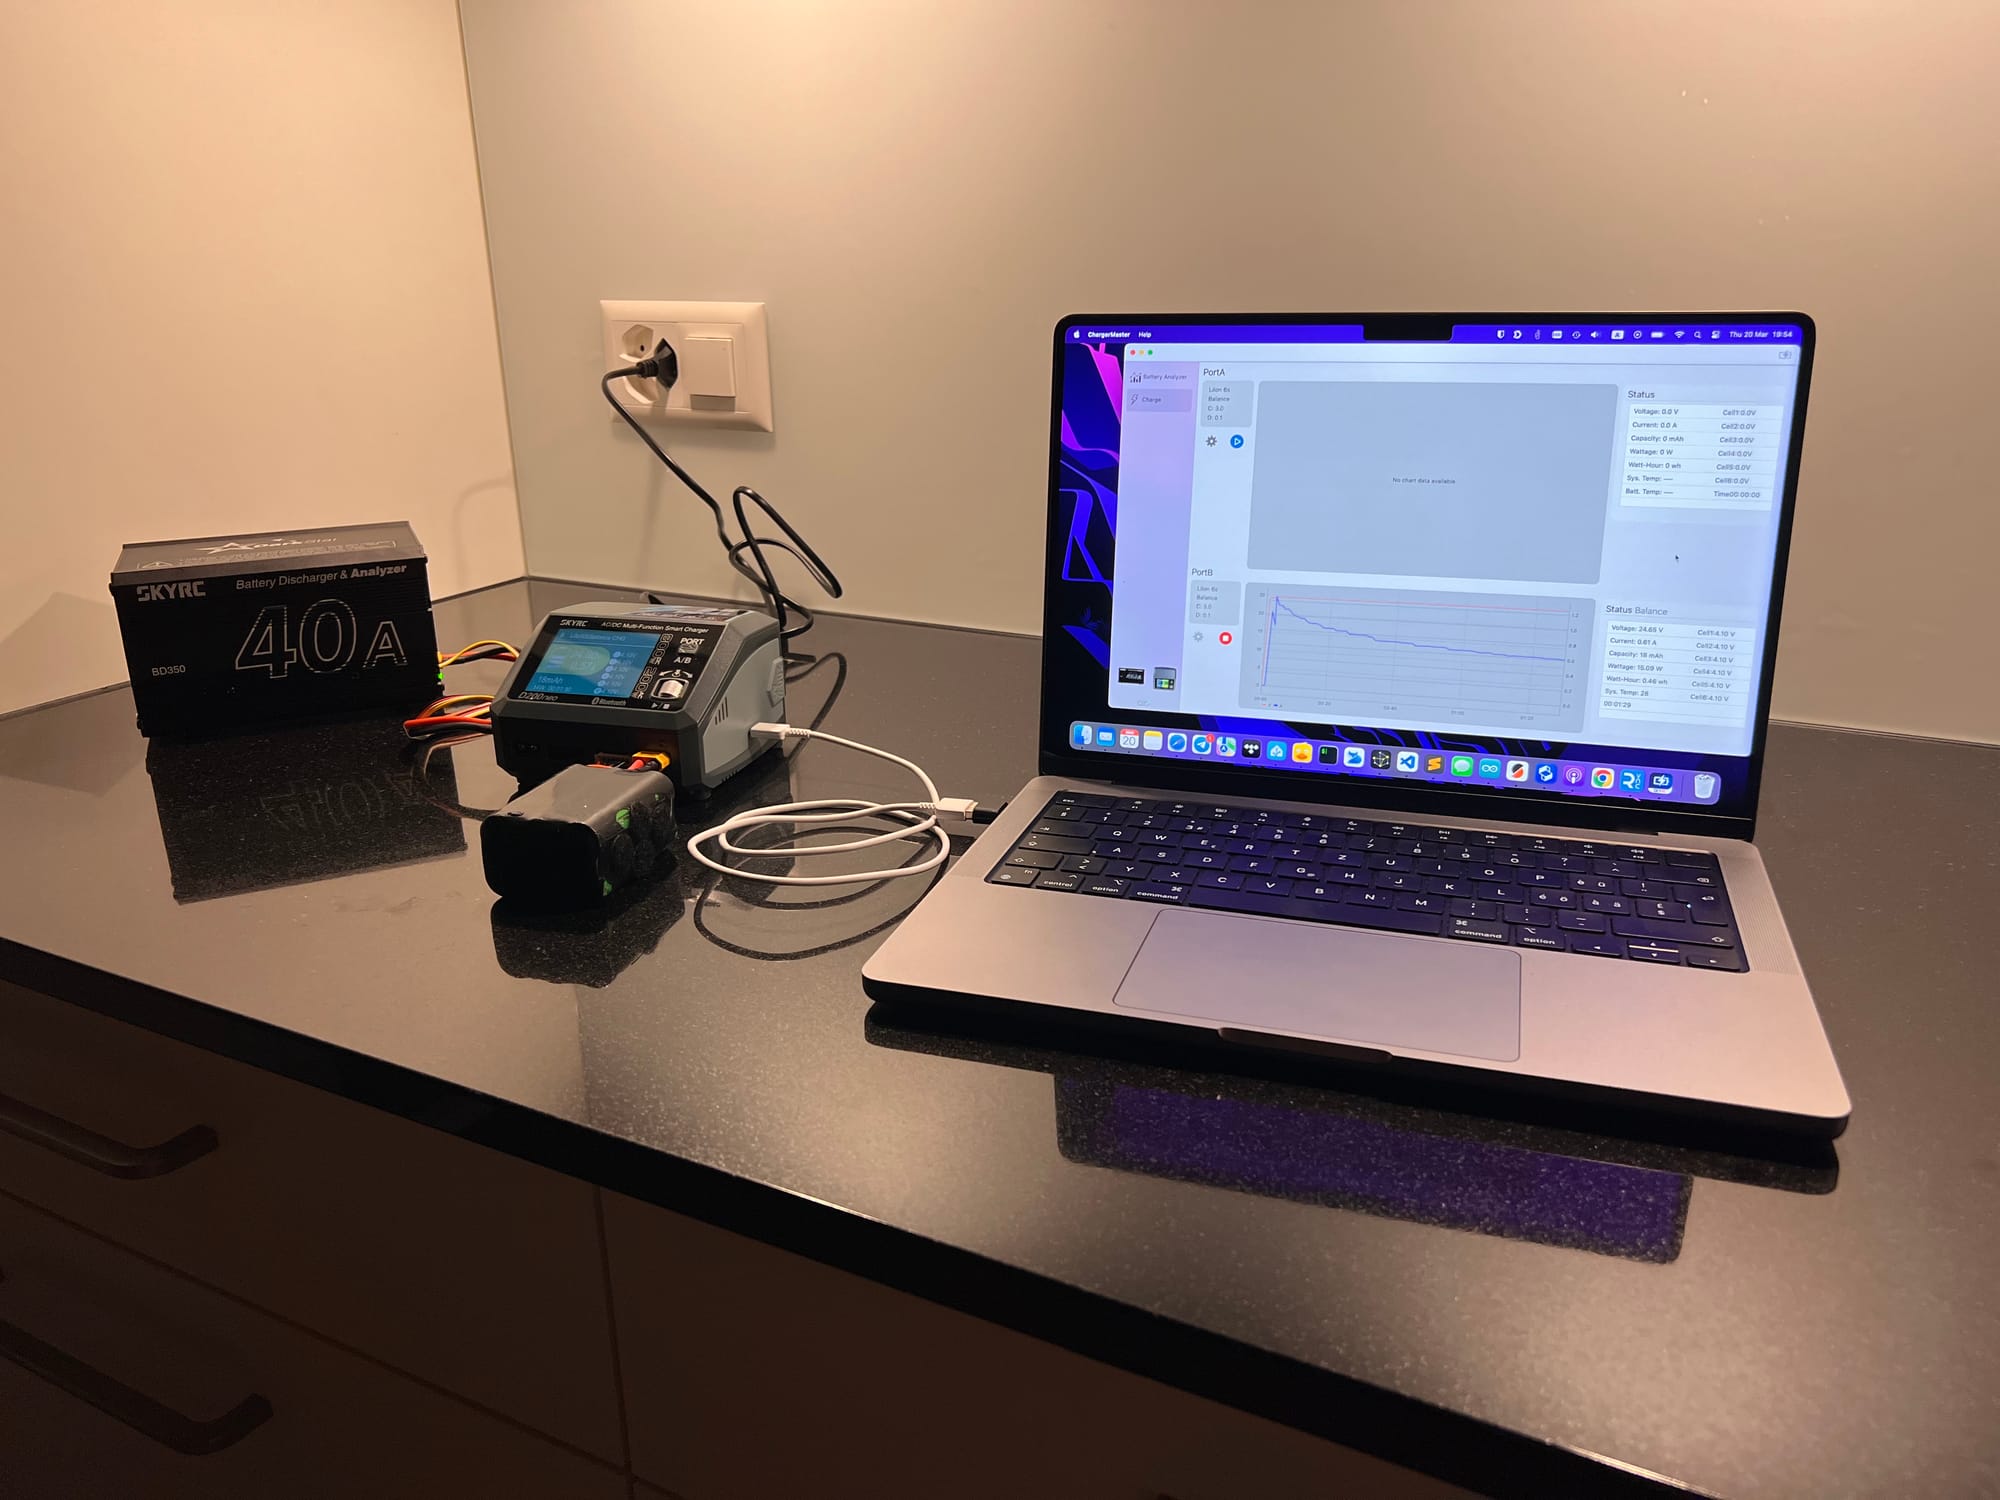
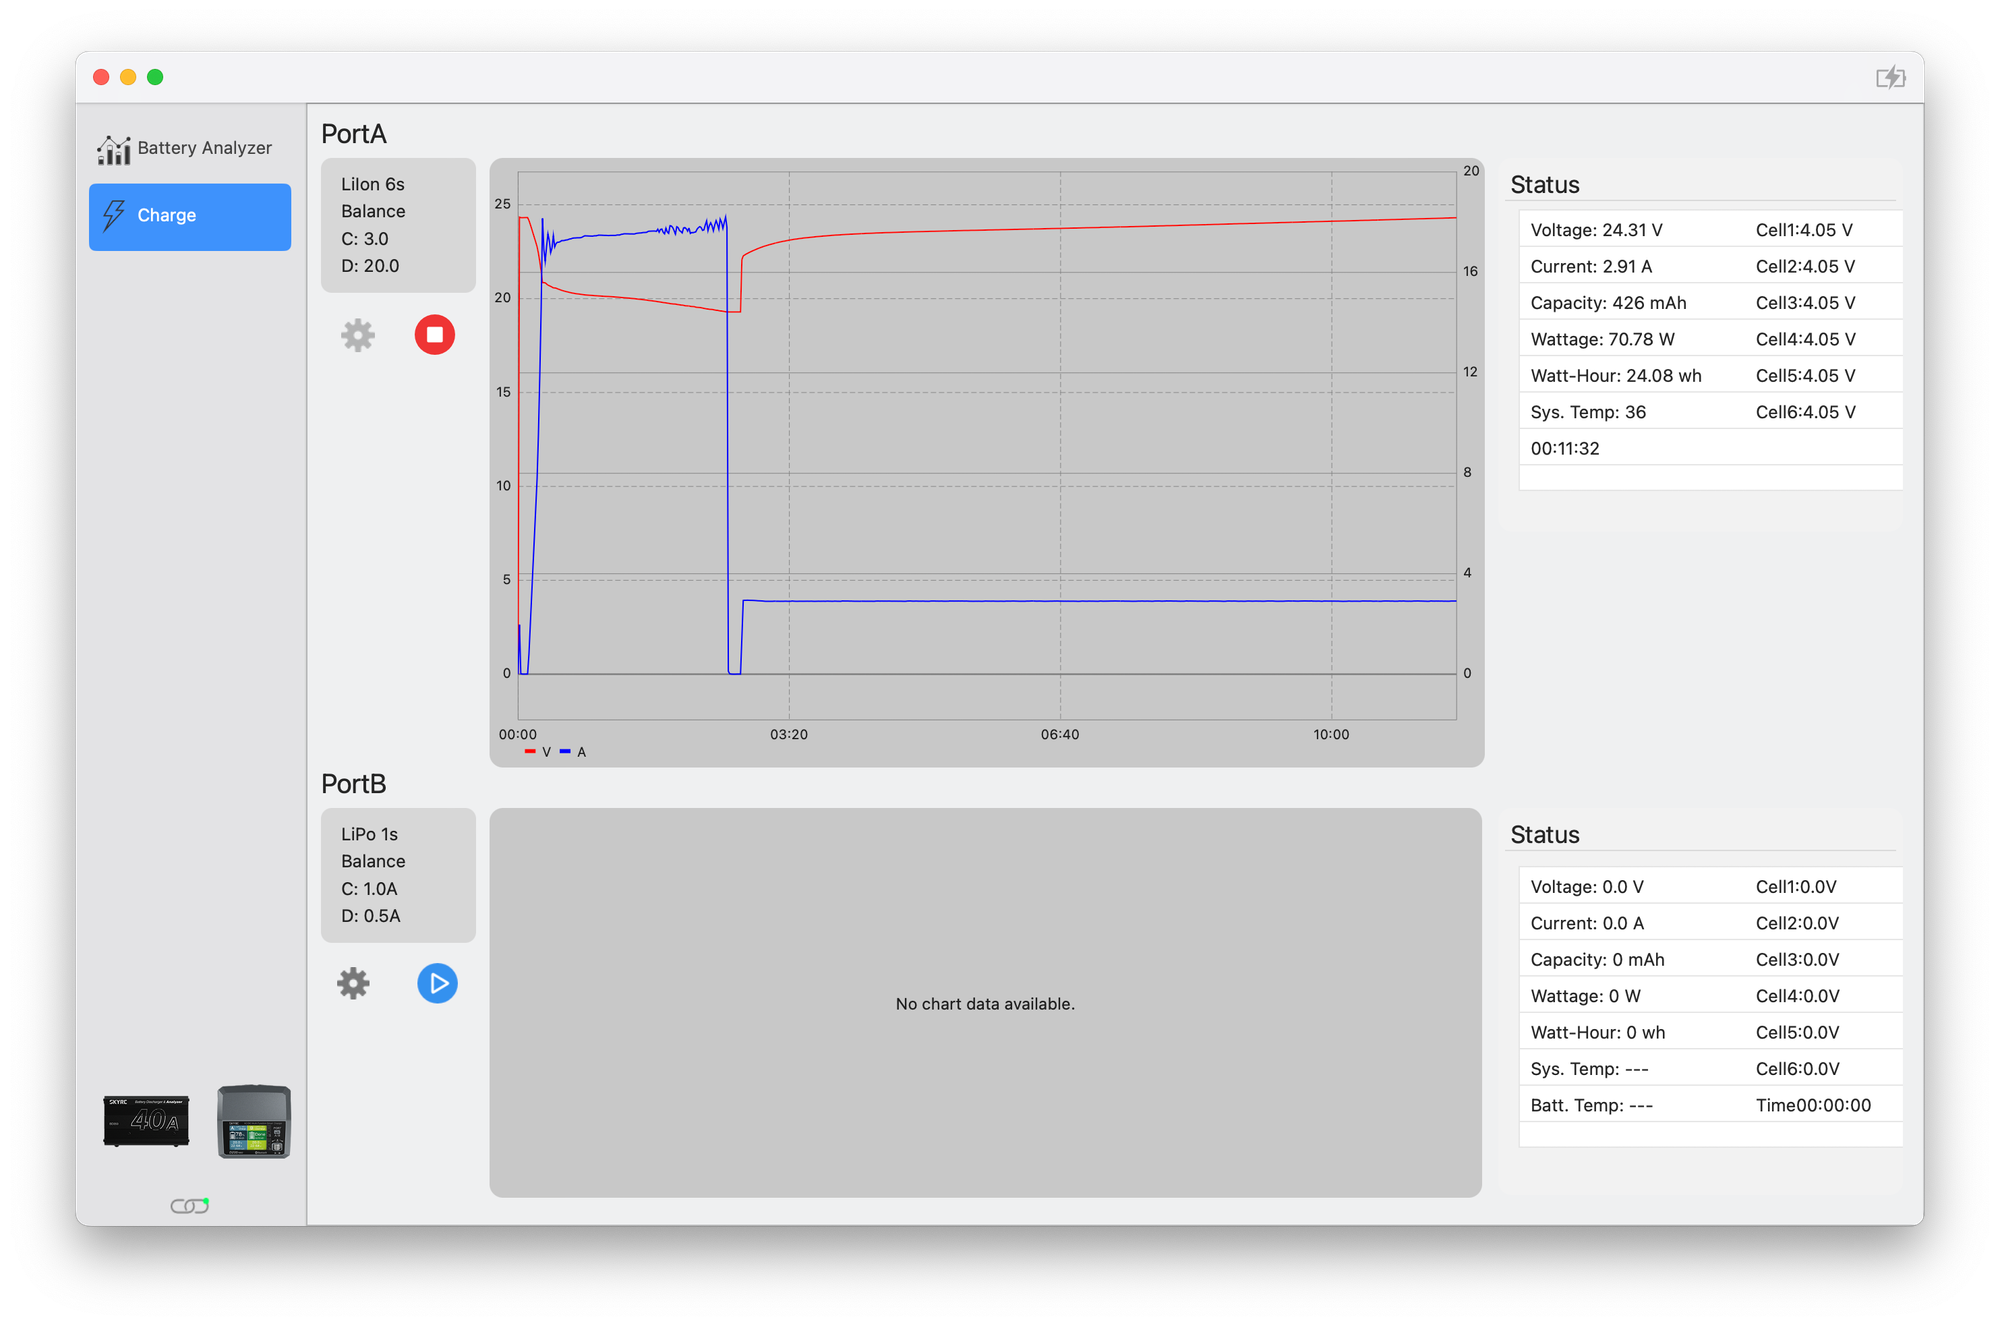
| Charger Master | Real-time Graphs | Visual analysis of battery performance |
| Data Export | Long-term tracking and comparison | |
| Multiple Battery Comparison | Identify outliers in your battery fleet |
After testing dozens of charger/discharger combinations, I've found this setup offers the best balance of accuracy, features, and ease of use for serious drone pilots.
Setting Up Your Battery Testing Station
A proper testing setup ensures accurate, safe, and consistent results:
Physical Setup
- Workspace Requirements
- Well-ventilated area
- Non-flammable work surface
- Away from flammable materials
- Temperature-controlled environment (ideally 20-25°C)
- Accessible fire safety equipment
- Equipment Arrangement
- D200neo charger positioned for good airflow
- BD350 discharger with minimum 10cm clearance on all sides
- Computer within USB cable reach for Charger Master software
- LiPo safe bag or fireproof container nearby
- Power Considerations
- For maximum testing capability, use DC input (power supply)
- Ensure power supply can deliver at least 30V/30A for full capability
- For AC operation, use a dedicated circuit when possible
Software Setup
- Charger Master Installation
- Download latest version from SkyRC website
- Install on Windows PC or Mac
- Connect D200neo via USB-C cable
- Update firmware if prompted
- Initial Configuration
- Set temperature units (°C/°F)
- Configure safety cutoffs
- Set default test parameters
- Create battery profiles for your common packs
Essential Battery Tests
Here are the key tests I recommend performing on your drone batteries:
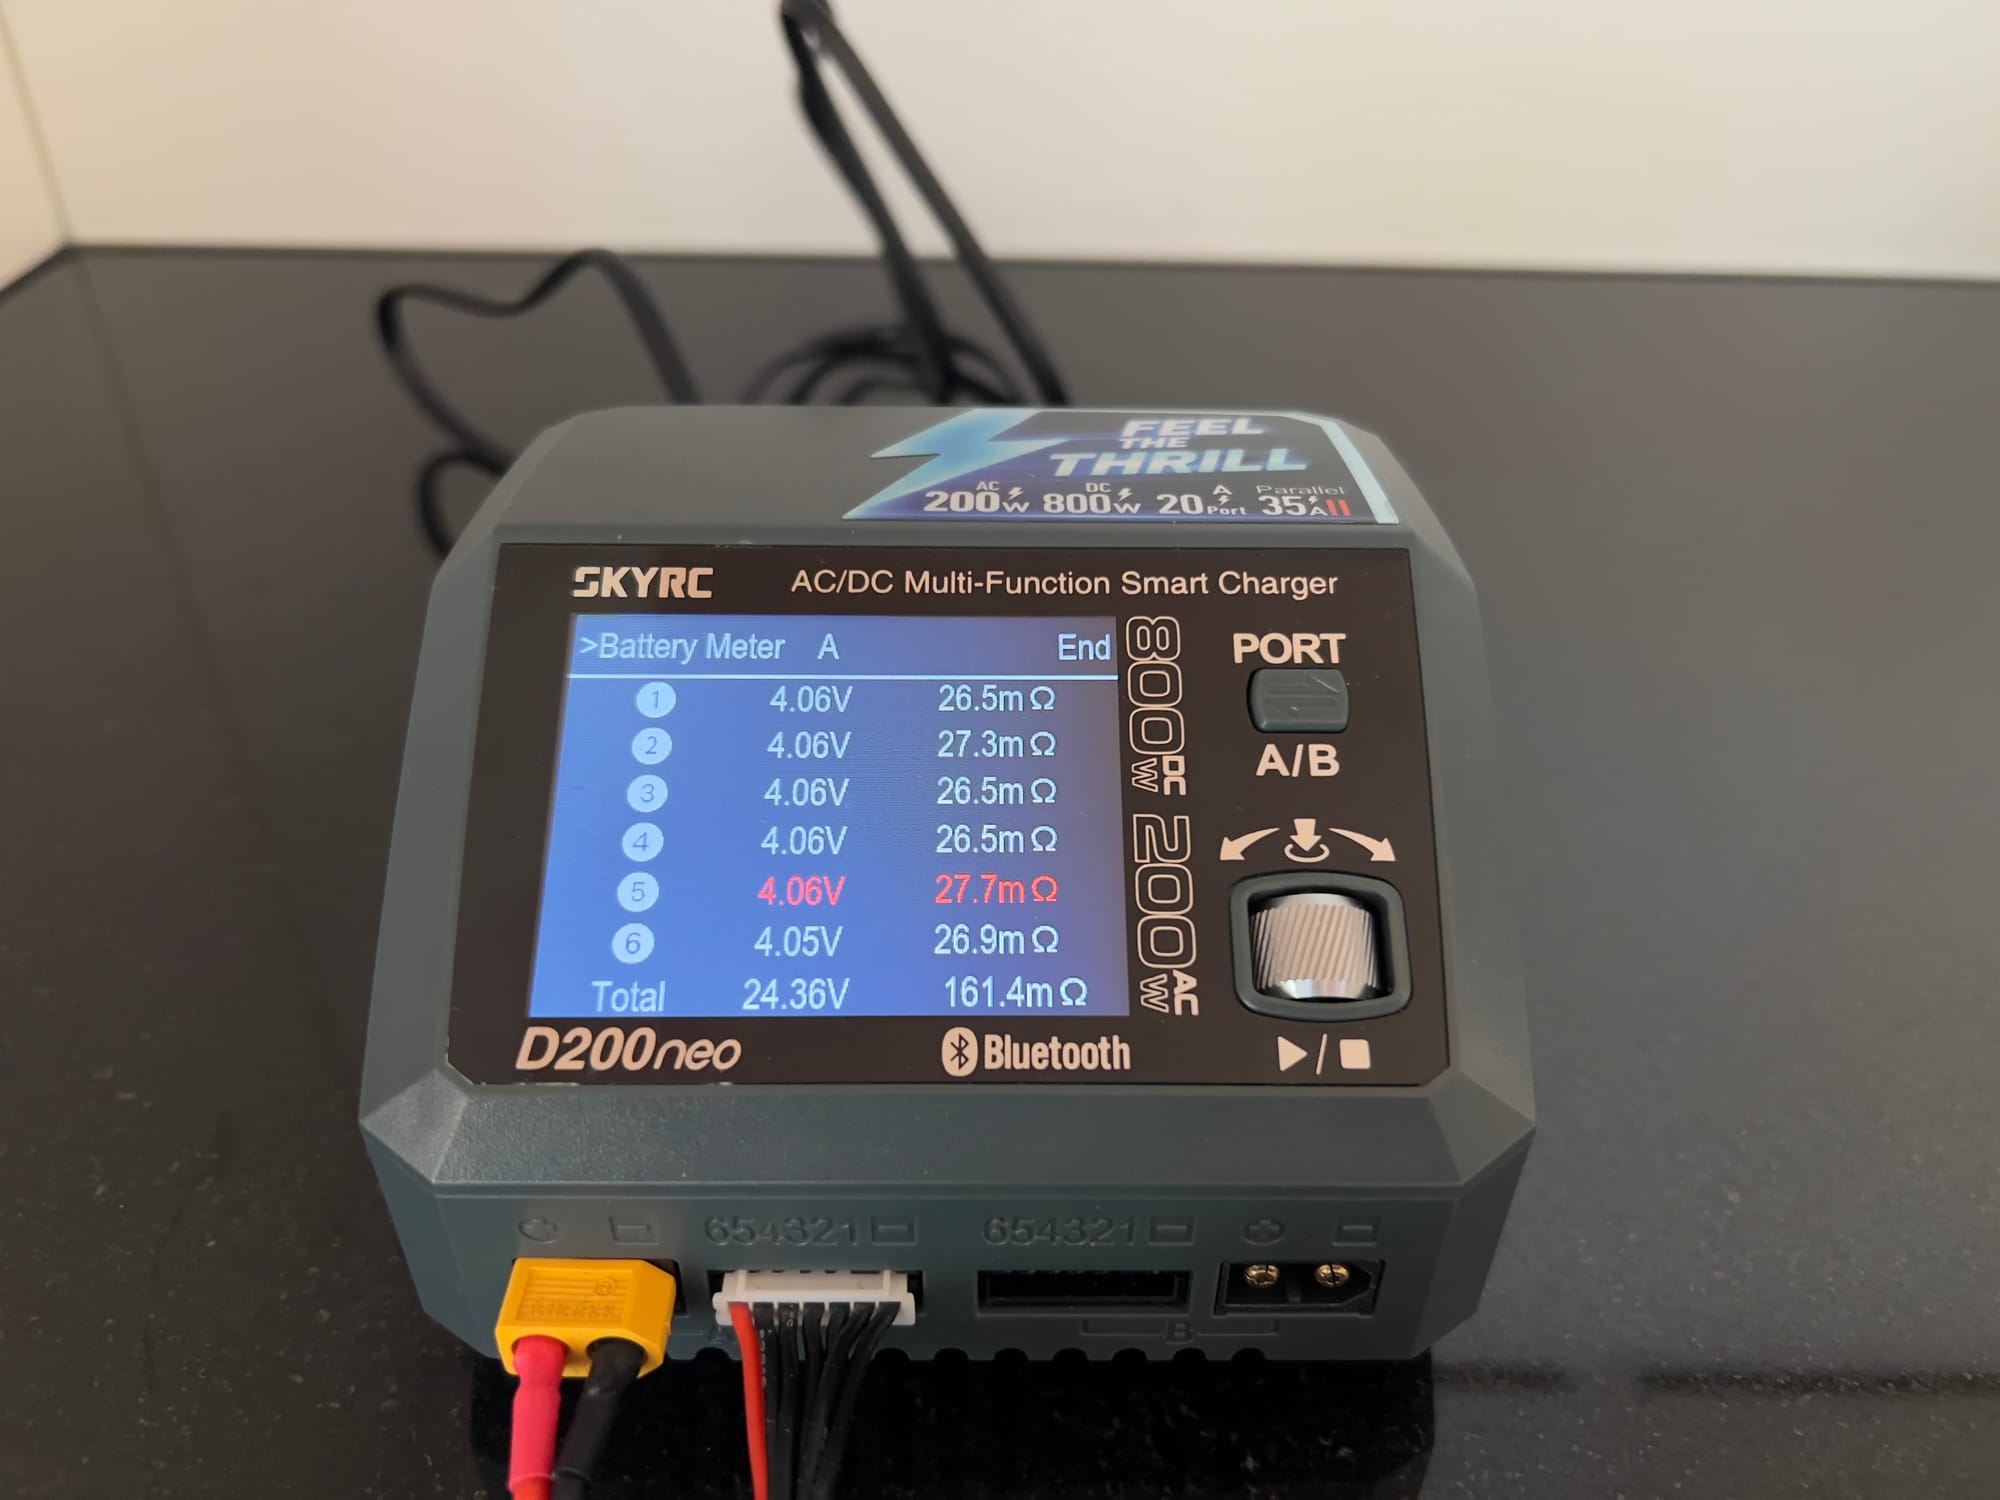
1. Internal Resistance (IR) Test
Internal resistance is one of the quickest ways to assess battery health:
| Battery Type | Good IR Range (per cell) | Acceptable Range | Poor/Replace Range |
|---|---|---|---|
| LiPo 1S | 2-8 mΩ | 8-15 mΩ | >15 mΩ |
| LiPo 3-4S | 3-10 mΩ | 10-20 mΩ | >20 mΩ |
| LiPo 5-6S | 4-12 mΩ | 12-25 mΩ | >25 mΩ |
| Li-ion 18650/21700 | 15-40 mΩ | 40-60 mΩ | >60 mΩ |
How to perform the test:
- Connect battery to D200neo (balance lead + main leads)
- Select "Battery Meter" from main menu
- Choose "Internal Resistance"
- Wait for measurement to complete (~5 seconds)
- Record values for each cell and total pack
What the results mean:
- Low and consistent IR: Healthy battery with good performance
- High but consistent IR: Aging battery with reduced performance
- Inconsistent IR between cells: Potential cell imbalance issues
- Very high IR: Battery approaching end of life, potential safety risk
I've found that tracking IR over time is more valuable than a single measurement. A sudden increase in IR (>20% from previous test) is a strong indicator of developing issues.
2. Capacity Test
This test verifies the actual capacity of your battery compared to its rating:
How to perform the test:
- Charge battery to 100% using D200neo
- Connect battery to D200neo and BD350 discharger
- In Charger Master software, select "Discharge Test"
- Set discharge rate (1C is standard, 2C for performance testing)
- Set cutoff voltage (3.3V per cell for LiPo is standard)
- Start test and monitor in Charger Master
- Record final capacity and discharge curve
Interpreting capacity results:
| Measured Capacity | Health Status | Recommended Action |
|---|---|---|
| >90% of rated | Excellent | Continue normal use |
| 80-90% of rated | Good | Monitor more frequently |
| 70-80% of rated | Fair | Consider retiring from critical applications |
| 60-70% of rated | Poor | Retire from high-performance use |
| <60% of rated | Very Poor | Recycle/dispose safely |
For my freestyle drones, I retire batteries when they fall below 80% capacity. For long-range flights, I'm even more conservative, retiring packs at 85% capacity to ensure maximum reliability.
3. Discharge Curve Analysis
The discharge curve reveals how a battery performs throughout its capacity range:
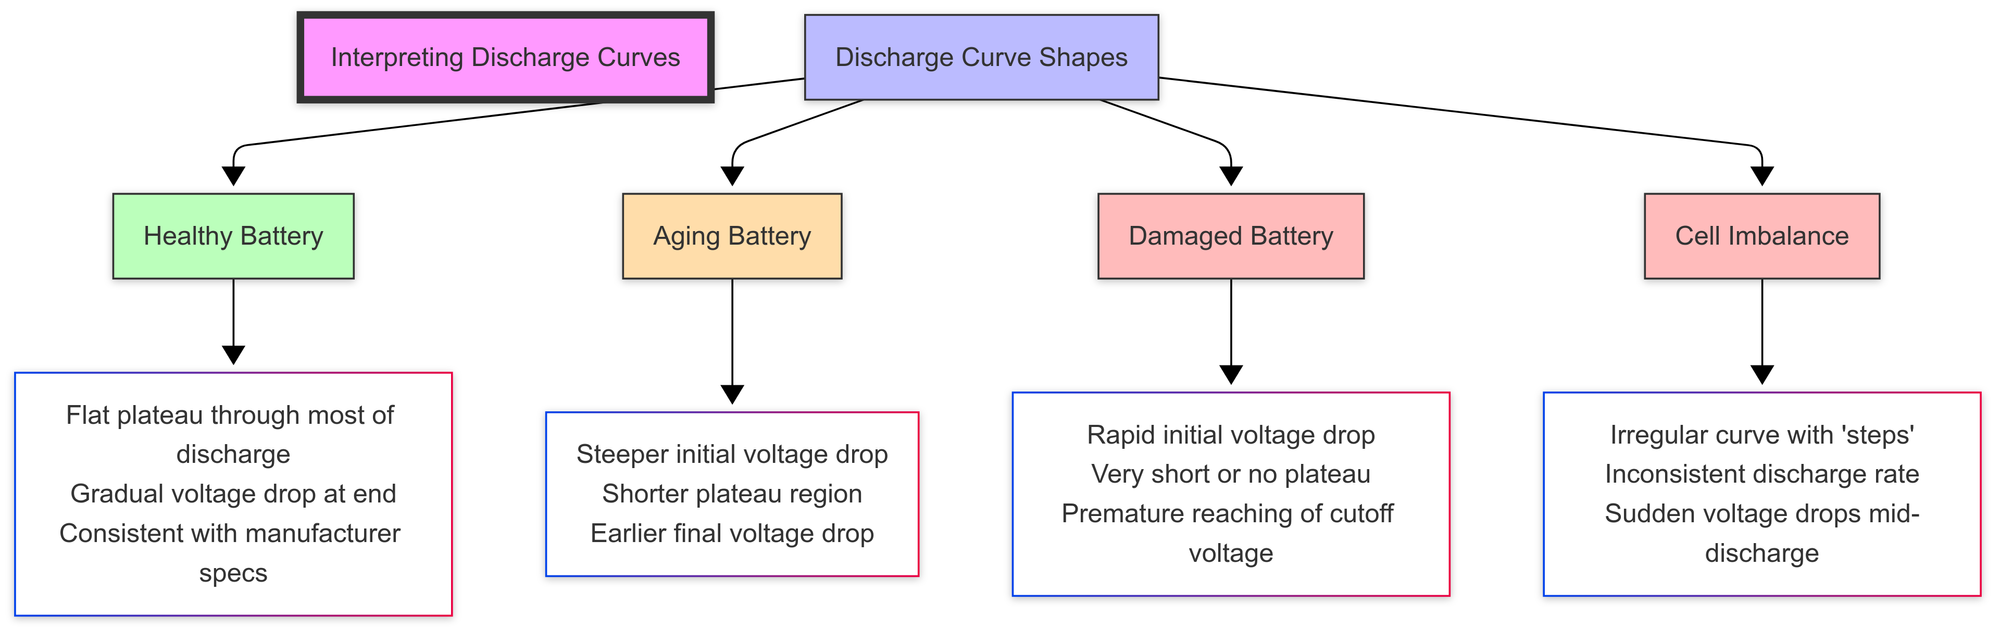
How to analyze the curve:
- Look for a flat, stable voltage during the middle 60-70% of discharge
- Check for sudden drops or irregularities in the curve
- Compare the curve shape to previous tests of the same battery
- Compare against other batteries of the same type and age
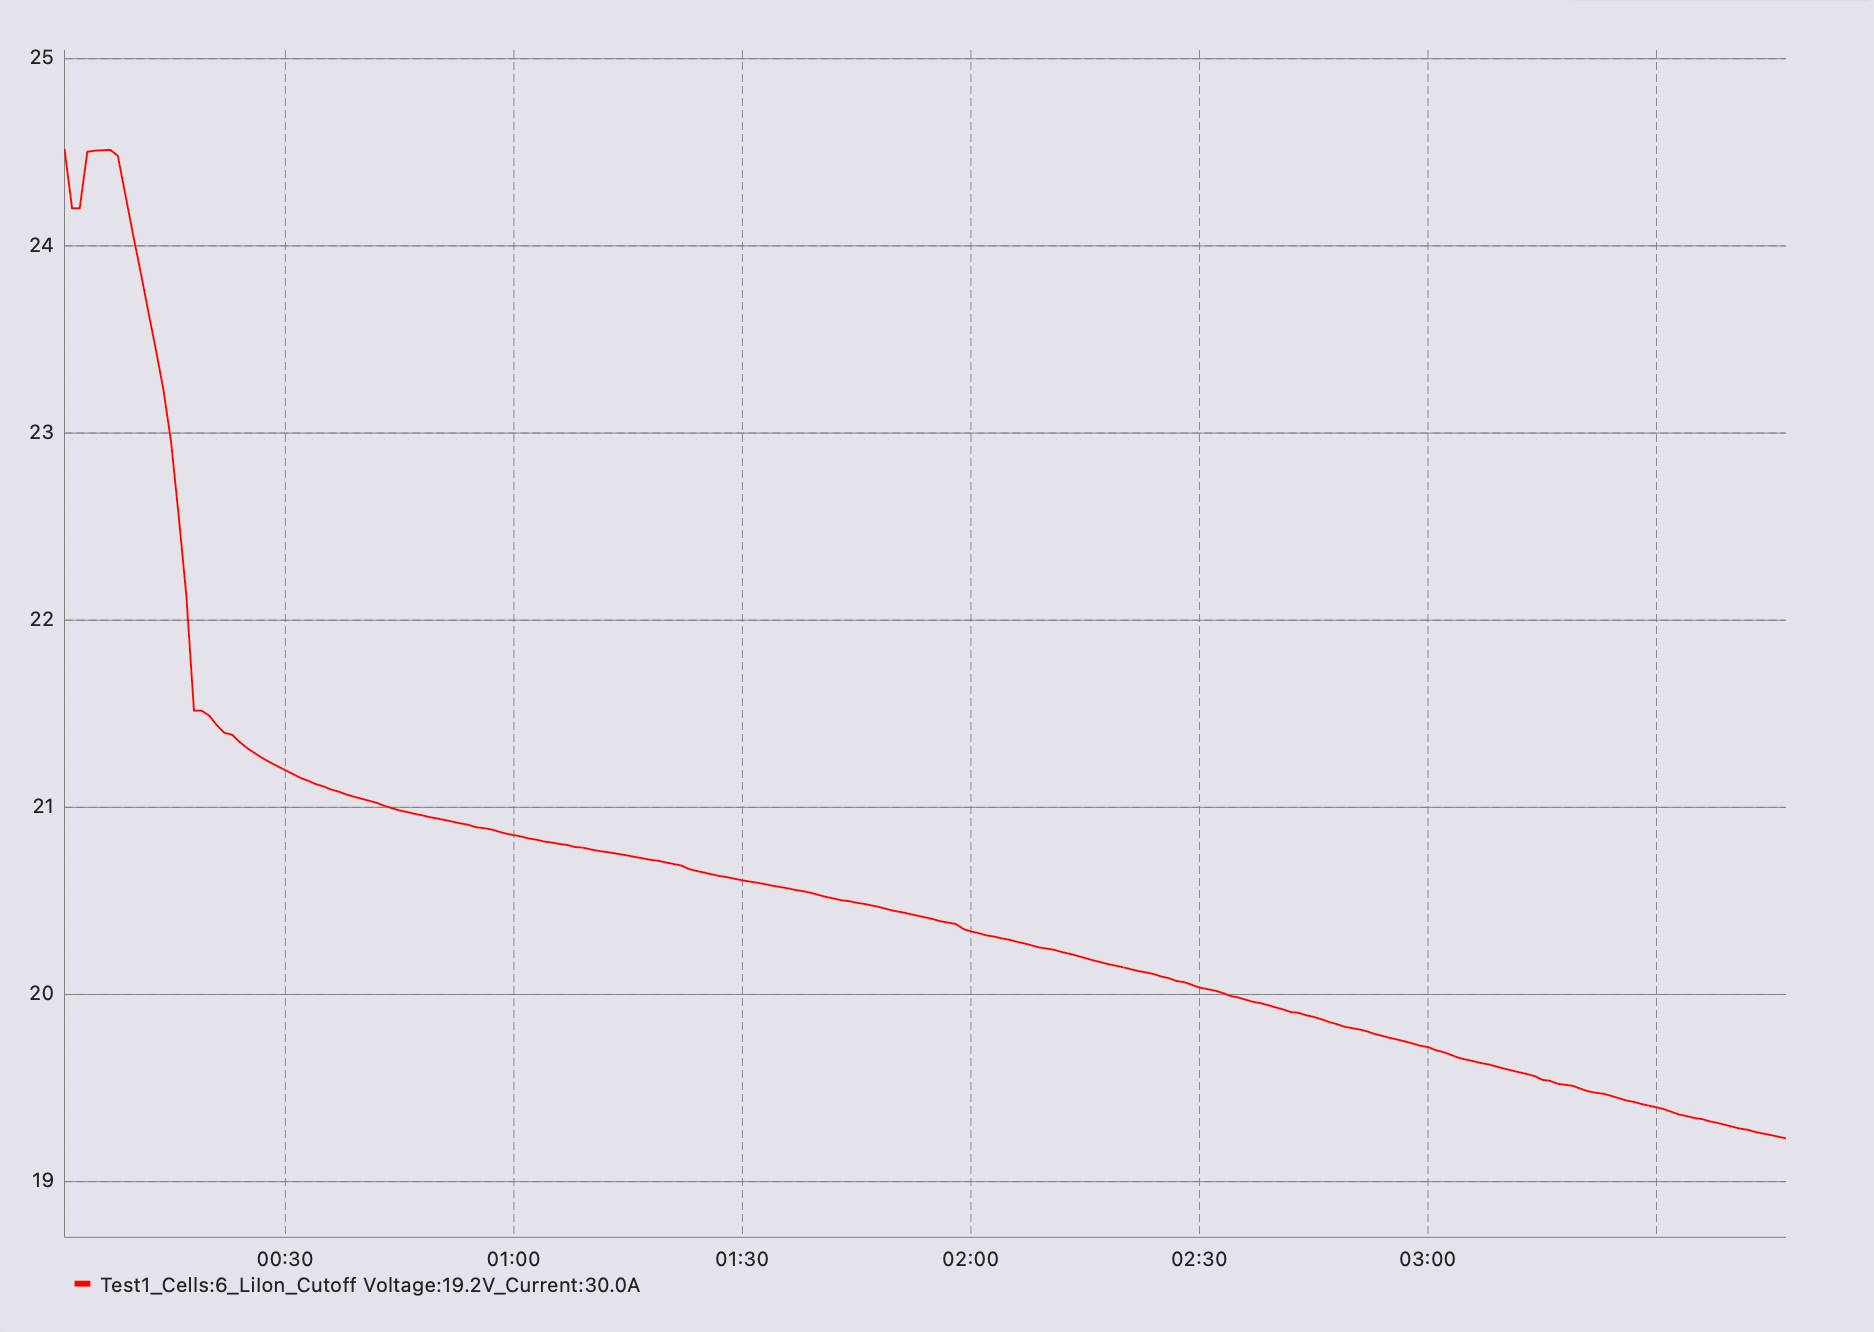
I pay special attention to how quickly voltage drops under load at the beginning of discharge. A healthy battery should show minimal initial voltage sag, while a degraded battery will show a steep initial drop.
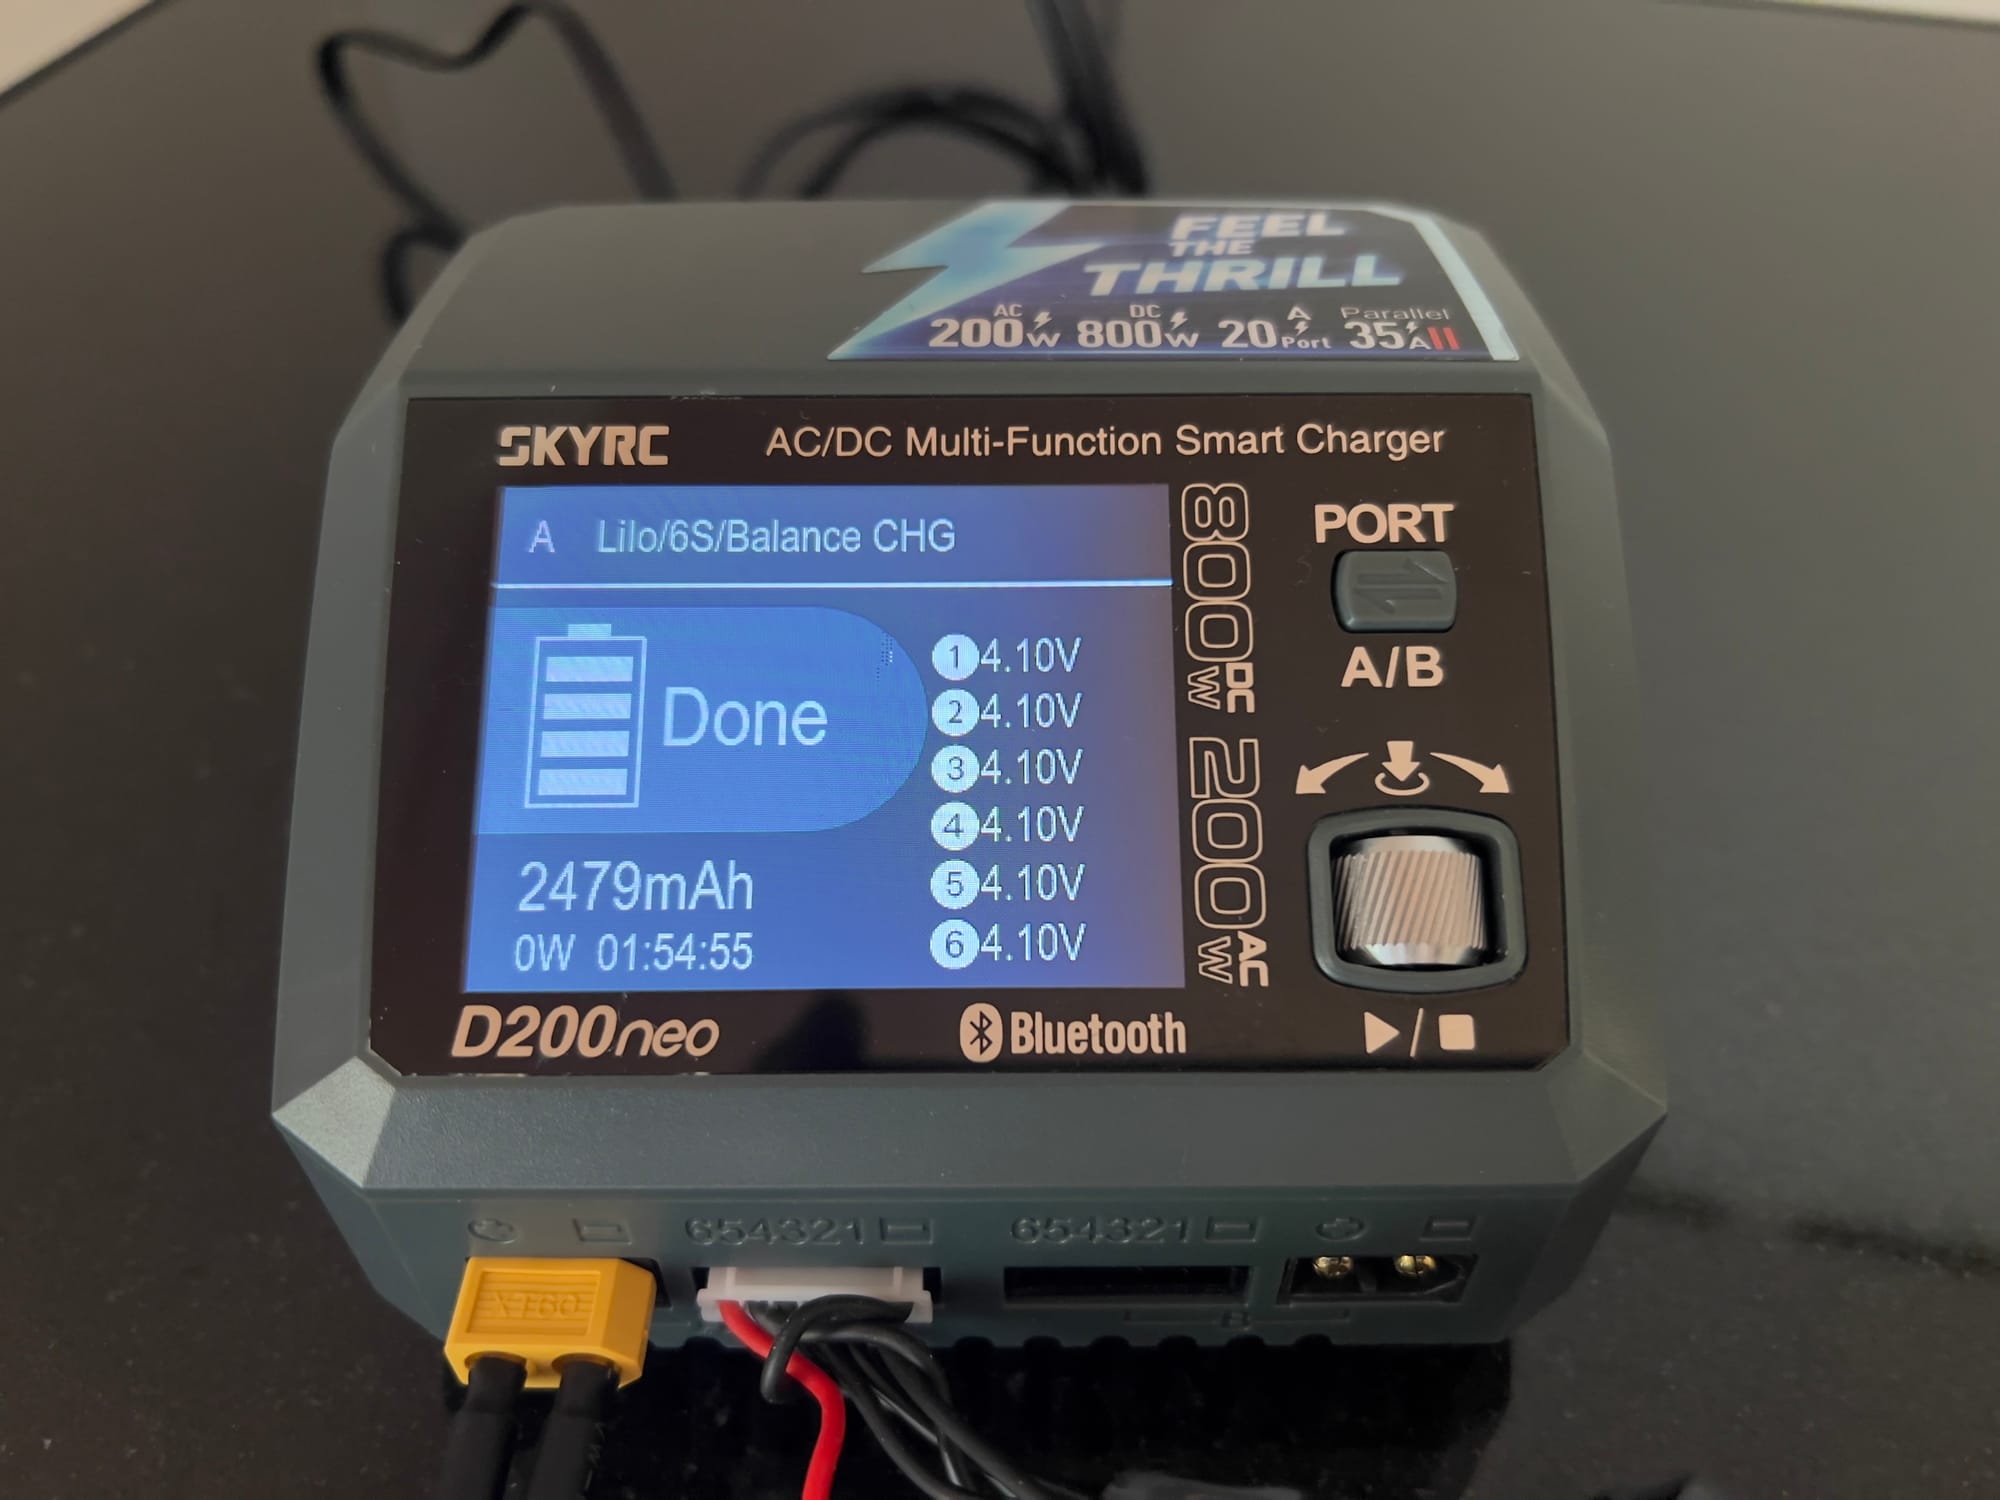
4. Cell Balance Test
This test checks how well matched the cells are within a pack:
How to perform the test:
- Charge battery to 100% using D200neo with balance charging
- Let battery rest for 1 hour
- Use D200neo's battery meter to check individual cell voltages
- Record maximum voltage difference between cells
- Perform a standard discharge test
- Monitor cell voltages throughout discharge in Charger Master
Interpreting cell balance results:
| Max Cell Difference (Resting) | Max Difference (Under Load) | Health Status |
|---|---|---|
| <0.01V | <0.05V | Excellent |
| 0.01-0.02V | 0.05-0.10V | Good |
| 0.02-0.03V | 0.10-0.15V | Fair |
| 0.03-0.05V | 0.15-0.20V | Poor |
| >0.05V | >0.20V | Very Poor |
Cell imbalance is often an early warning sign of battery issues. I've found that packs with significant imbalance (>0.03V at rest) typically develop more serious problems within the next 5-10 cycles.
5. Cycle Test
This test evaluates how well a battery maintains capacity over multiple charge/discharge cycles:
How to perform the test:
- In D200neo, select "Cycle" operation
- Set number of cycles (typically 3-5)
- Configure charge rate (1C standard)
- Configure discharge rate (1C standard)
- Set discharge cutoff voltage (3.0V/cell for LiPo)
- Start test and monitor in Charger Master
- Compare capacity measurements across cycles
What to look for:
- Capacity stability: Less than 3% variation between cycles is excellent
- Capacity trend: Declining capacity across cycles indicates degradation
- Charge efficiency: Compare charge input vs. discharge output
- Temperature behavior: Increasing temperatures across cycles can indicate issues
This test is particularly valuable for evaluating new batteries. A quality pack should show very consistent capacity across multiple cycles, while lower-quality batteries often show declining capacity even in the first few cycles.
Advanced Testing Techniques
For those wanting to dig deeper into battery analysis:
1. Performance Testing at Different Discharge Rates
Testing how a battery performs at various discharge rates reveals its true capabilities:
| Test Type | Discharge Rate | What It Reveals |
|---|---|---|
| Endurance Test | 0.5C | Maximum flight time potential |
| Standard Test | 1C | Baseline capacity reference |
| Performance Test | 2C | Typical high-performance usage |
| Stress Test | 3C+ | Maximum power delivery capability |
How to perform multi-rate testing:
- Fully charge battery
- Discharge at 0.5C, record capacity
- Recharge fully
- Discharge at 1C, record capacity
- Recharge fully
- Discharge at 2C, record capacity
- Compare results across rates
A healthy high-performance battery should deliver at least 90% of its 1C capacity when discharged at 2C. If performance drops significantly at higher rates, the battery may not be suitable for high-current applications like freestyle or racing.
2. Temperature Monitoring During Testing
Temperature behavior during charge and discharge provides valuable insights:
How to monitor temperature:
- Attach temperature sensor to battery surface (center of pack)
- Record starting temperature
- Monitor temperature rise during charge/discharge
- Record maximum temperature
- Note how quickly battery cools after test
Temperature indicators:
| Temperature Behavior | What It Indicates |
|---|---|
| Minimal heating (<10°C rise) | Healthy battery with low internal resistance |
| Moderate heating (10-20°C rise) | Normal behavior for most batteries |
| Significant heating (20-30°C rise) | Potential internal resistance issues |
| Excessive heating (>30°C rise) | Dangerous condition, battery should be retired |
| Uneven heating (hot spots) | Possible cell damage or internal short |
I've found temperature monitoring particularly valuable for identifying batteries that appear functional but are actually developing internal issues. Excessive heating is often the first sign of problems that will lead to performance degradation.
3. Storage Charge Retention Test
This test evaluates how well a battery holds its charge when not in use:
How to perform the test:
- Charge or discharge battery to storage voltage (3.8V/cell for LiPo)
- Record exact voltage of each cell
- Store battery at room temperature for a set period (1-4 weeks)
- Measure voltage again after storage period
- Calculate voltage drop per week
Interpreting results:
| Voltage Drop Rate | Battery Health |
|---|---|
| <0.01V per week | Excellent |
| 0.01-0.03V per week | Good |
| 0.03-0.05V per week | Fair |
| 0.05-0.10V per week | Poor |
| >0.10V per week | Very Poor |
Batteries with high self-discharge rates are not only inconvenient but often indicate internal issues that will affect performance and safety. I retire any battery that shows a self-discharge rate above 0.05V per week.
Interpreting Test Results and Making Decisions
After testing, you need to make informed decisions about each battery:
Battery Health Classification System
I use this classification system to categorize my batteries:
| Grade | Criteria | Recommended Use |
|---|---|---|
| A+ | >90% capacity, low IR, excellent balance | Critical missions, long-range, competition |
| A | >85% capacity, good IR, good balance | General freestyle, photography, everyday use |
| B | 75-85% capacity, acceptable IR | Training, non-critical flights, hover testing |
| C | 65-75% capacity, higher IR | Ground testing, very short flights, indoor practice |
| D | <65% capacity or cell imbalance | Retire and recycle |
Decision Flowchart for Battery Management

Tracking Battery Performance Over Time
Maintaining a battery log is essential for serious pilots:
| Data to Track | Purpose | Update Frequency |
|---|---|---|
| Purchase date | Age tracking | Once |
| Cycle count | Usage tracking | Every 5-10 cycles |
| Capacity | Performance tracking | Every 10-20 cycles |
| IR measurements | Health tracking | Every 5-10 cycles |
| Minimum flight voltage | Performance tracking | Every flight |
| Notes on behavior | Issue identification | As needed |
I use a simple spreadsheet to track this data, with conditional formatting to highlight values that indicate degradation. This system has helped me identify patterns in battery degradation and adjust my usage and storage practices accordingly.
Practical Testing Workflows
Here are step-by-step workflows for common testing scenarios:
Quick Health Check (5-10 minutes)
Ideal for regular monitoring or pre-flight verification:
- Connect battery to D200neo
- Perform IR test
- Check cell voltages for balance
- Compare results to previous tests
- Make go/no-go decision
I perform this quick check before any critical flight or competition to ensure I'm using only the healthiest batteries.
Comprehensive New Battery Evaluation (2-3 hours)
For testing new batteries to verify quality and establish baseline:
- Inspect battery for physical defects
- Perform IR test to check initial quality
- Charge to 100% at 1C
- Perform capacity test at 1C
- Recharge to 100%
- Perform capacity test at 2C
- Run 3-cycle test
- Record all data as baseline
- Label battery with ID for tracking
This thorough process has helped me identify substandard batteries early, allowing me to return or exchange them within the warranty period.
Annual Battery Fleet Assessment (1-2 days)
For evaluating your entire collection:
- Sort batteries by age and usage
- Perform IR test on all batteries
- Eliminate obvious failures
- Run capacity tests on remaining batteries
- Update tracking database
- Re-grade all batteries
- Apply new labels/markings
- Reorganize storage by grade
I perform this assessment every winter during the off-season, which helps me plan battery purchases for the coming year and ensures I'm not surprised by battery failures during the flying season.
Common Issues and Troubleshooting
Battery Testing Problems
| Issue | Possible Causes | Solution |
|---|---|---|
| Inconsistent capacity results | Temperature variations, Connection issues | Control testing environment, Check all connections |
| IR readings fluctuate | Poor connections, Battery not at rest temperature | Clean terminals, Let battery rest 1-2 hours before testing |
| Charger Master connection issues | USB driver problems, Software version | Update software, Reinstall drivers, Try different USB port |
| BD350 overheating | Insufficient airflow, High ambient temperature | Improve ventilation, Reduce discharge rate |
| Test aborts mid-cycle | Safety cutoff triggered, Connection issue | Check all connections, Verify safety settings appropriate |
Battery Issues Revealed by Testing
| Test Result | Likely Issue | Action |
|---|---|---|
| One cell with much higher IR | Cell damage | Retire battery |
| Capacity drops rapidly in first few cycles | Manufacturing defect | Return under warranty if new |
| Battery heats excessively during testing | Internal damage or short | Retire immediately |
| Voltage rebounds significantly after discharge | Internal resistance issues | Retire from critical use |
| Capacity varies widely between tests | Possible intermittent connection | Check battery terminals and balance lead |
Safety Considerations During Battery Testing
Battery testing involves pushing batteries to their limits, which requires careful safety measures:
Testing Safety Checklist
- [ ] Never leave testing unattended
- [ ] Use a fire-resistant testing surface
- [ ] Keep a LiPo-rated fire extinguisher nearby
- [ ] Use LiPo safe bags or fireproof containers
- [ ] Ensure good ventilation
- [ ] Inspect batteries for damage before testing
- [ ] Set appropriate temperature cutoffs
- [ ] Allow cooling time between tests
- [ ] Never exceed manufacturer's max charge/discharge rates
- [ ] Disconnect batteries immediately if they swell or heat excessively
I once had a battery enter thermal runaway during a discharge test. Because I was following proper safety protocols, the incident was contained to the LiPo safe bag with no damage to my home or equipment. Never compromise on battery testing safety.
FAQ: Common Questions About Battery Performance Testing
How often should I test my drone batteries?
For active pilots, I recommend:
- Quick IR test: Before critical flights or every 5-10 cycles
- Full capacity test: Every 20-30 cycles or 3-6 months
- Comprehensive testing: Annually or when performance issues are noticed
Can testing damage my batteries?
Proper testing should not damage healthy batteries. However, testing does use a charge cycle, so excessive testing can contribute to normal cycle wear. Balance this by testing frequently enough to catch issues early but not so often that you significantly reduce battery life.
What's more important: capacity or internal resistance?
Both matter, but for different reasons. Internal resistance is the better indicator of a battery's ability to deliver power under load (crucial for freestyle and racing), while capacity better indicates flight time potential (important for long-range and photography). For most applications, a battery with low IR but slightly reduced capacity is preferable to one with full capacity but high IR.
How accurate is the D200neo's internal resistance measurement?
The D200neo provides relatively accurate IR measurements for comparative purposes. While the absolute values may differ slightly from laboratory equipment, the relative measurements are consistent enough to track battery health over time and compare batteries within your fleet.
Can I test batteries from different manufacturers using the same criteria?
While the testing process is the same, you should adjust your expectations based on the manufacturer. Some brands consistently deliver their rated capacity, while others typically deliver 5-10% less. Establish baselines for each brand in your collection and judge against those standards.
What should I do with batteries that fail testing?
Batteries that no longer meet your performance needs but are otherwise safe can be:
- Downgraded to less demanding uses
- Used for ground testing
- Stored at storage voltage as emergency backups
- Properly recycled through battery recycling programs
Never throw LiPo batteries in regular trash, and always fully discharge them before recycling.
Conclusion
Battery testing is an investment that pays dividends in safety, reliability, and cost savings. The SkyRC D200neo and BD350 combination provides professional-level testing capabilities that can transform how you manage your battery fleet.
By implementing regular testing, you'll not only extend the useful life of your batteries but also gain confidence in knowing exactly what to expect from each pack. This knowledge translates directly to safer flights, more consistent performance, and a better understanding of when to retire and replace your batteries.
Remember that battery testing is not just about finding problems—it's about developing a deeper understanding of one of the most critical components in your drone system. The insights gained through systematic testing will make you a more knowledgeable and safer pilot.
References and Further Reading
Internal References
- Overview of Drone Battery Types and Chemistry
- Drone Battery Charging: A Guide to Safety and Efficiency
- Parallel Battery Charging: Basic Principles and Advanced Techniques
- Drone Battery Storage, Transport, and Discharge
- Battery Health Analysis
- Overview of Battery Charging Connectors


Comments ()