Parallel Battery Charging: Basic Principles and Advanced Techniques

Parallel charging is a powerful technique that allows drone pilots to charge multiple batteries simultaneously, dramatically reducing total charging time. As someone who's been parallel charging for several years, I can tell you it's a game-changer for pilots with multiple batteries—but it requires proper understanding, equipment, and safety procedures to implement correctly. This comprehensive guide covers everything I've learned from basic principles to advanced techniques for safely parallel charging LiPo, LiHV, and Li-ion batteries.
Introduction to Parallel Charging
Parallel charging connects multiple batteries of the same type and cell count to a single charger, effectively combining them into one larger capacity battery for charging purposes.
The Benefits of Parallel Charging
Parallel charging offers several significant advantages:
- Time Efficiency: Charge multiple batteries in roughly the same time as a single battery
- Equipment Optimization: Maximize the output capability of your charger
- Workflow Improvement: Prepare multiple batteries for flying sessions simultaneously
- Convenience: Reduce the need to swap batteries during charging sessions
- Energy Efficiency: Slightly better overall efficiency than sequential charging
When I first started in the hobby, I would charge one battery at a time, which meant spending hours preparing for a 30-minute flying session. Switching to parallel charging transformed my workflow—I can now charge 6 batteries in the time it used to take to charge one, getting me in the air faster and more often.
Understanding the Principles
To safely implement parallel charging, it's essential to understand the underlying electrical principles:
Parallel Circuit Basics
- Voltage Relationship: All batteries in parallel receive the same voltage
- Current Distribution: Current divides among batteries based on internal resistance and state of charge
- Capacity Addition: Total capacity is the sum of all connected batteries
- Resistance Relationship: Total resistance decreases as more batteries are added
I find it helpful to think of parallel charging like filling multiple water tanks with a single hose. The water pressure (voltage) is the same for all tanks, but tanks that are emptier will fill faster initially until all reach the same level.
Charging Dynamics
- Initial Balancing: Current flows between batteries to equalize voltage
- Charging Current: Each battery draws current based on its state of charge
- Balancing Process: Individual cells balance through the balance leads
- Termination: Charging completes when all batteries reach full charge
When connecting batteries at slightly different voltages, there's an initial "settling period" where they equalize. You can sometimes hear a faint buzzing sound during this process—that's the current flowing between batteries as they reach equilibrium.
Safety Considerations
Parallel charging introduces specific safety considerations beyond regular charging:
Risk Factors
- Higher Energy Content: Multiple batteries mean more stored energy
- Cross-Contamination: Problems with one battery can affect others
- Increased Complexity: More connections create more potential failure points
- Higher Current Demands: Charger must handle combined charging current
- Balance Management: Multiple balance connections must be managed
I learned about these risks the hard way. I connected a battery with a damaged cell to my parallel board, and it quickly affected the other batteries. Fortunately, I caught it early, but it taught me to be much more careful about inspecting each battery before connecting it.
Potential Hazards
- Voltage Mismatch: Connecting batteries at different voltages
- Reverse Polarity: Incorrect connection of main power leads
- Balance Lead Issues: Incorrect or loose balance connections
- Thermal Problems: Heat buildup from multiple batteries in close proximity
- Charger Overload: Exceeding charger's power or current capability
After witnessing a minor thermal event caused by connecting batteries with too much voltage difference, I now religiously check every battery's voltage before connecting it to my parallel board. This simple step has prevented numerous potential issues.
For more detailed information on LiPo safety, see:
Drone Battery Charging: A Guide to Safety and Efficiency
Equipment for Parallel Charging
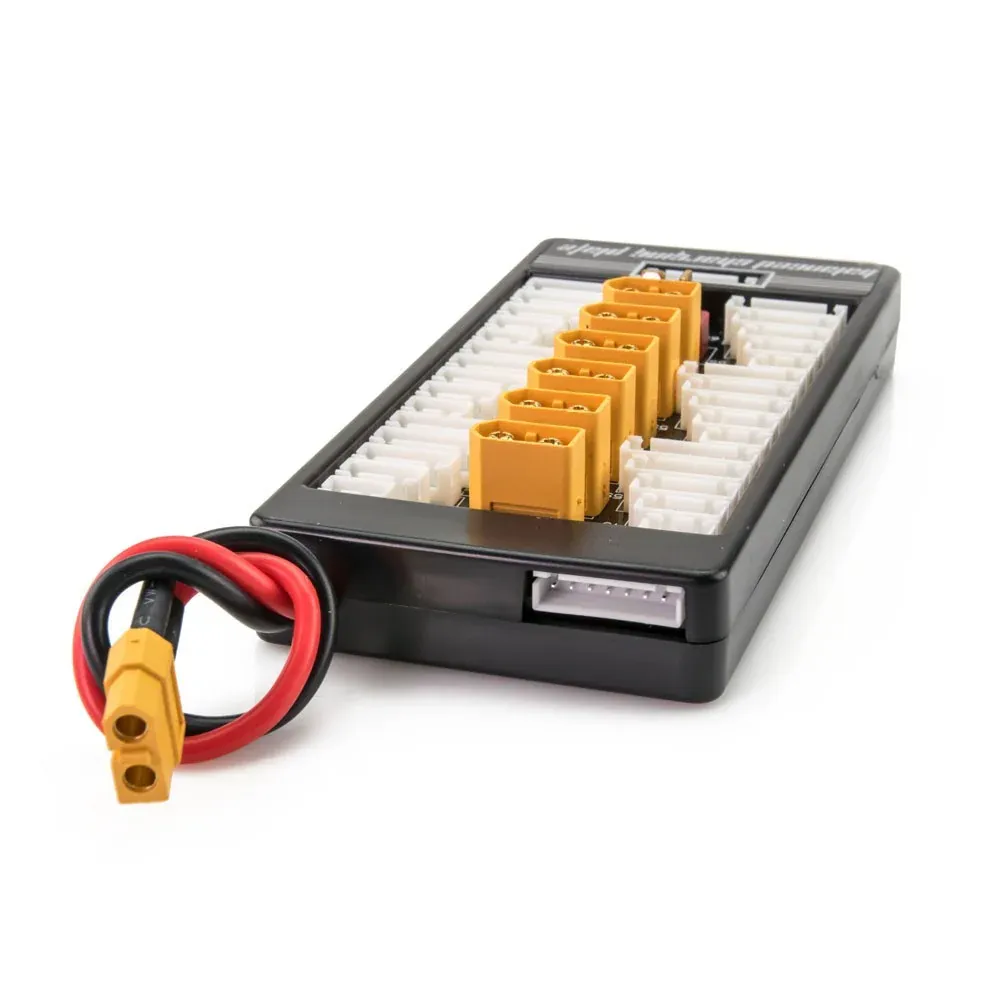
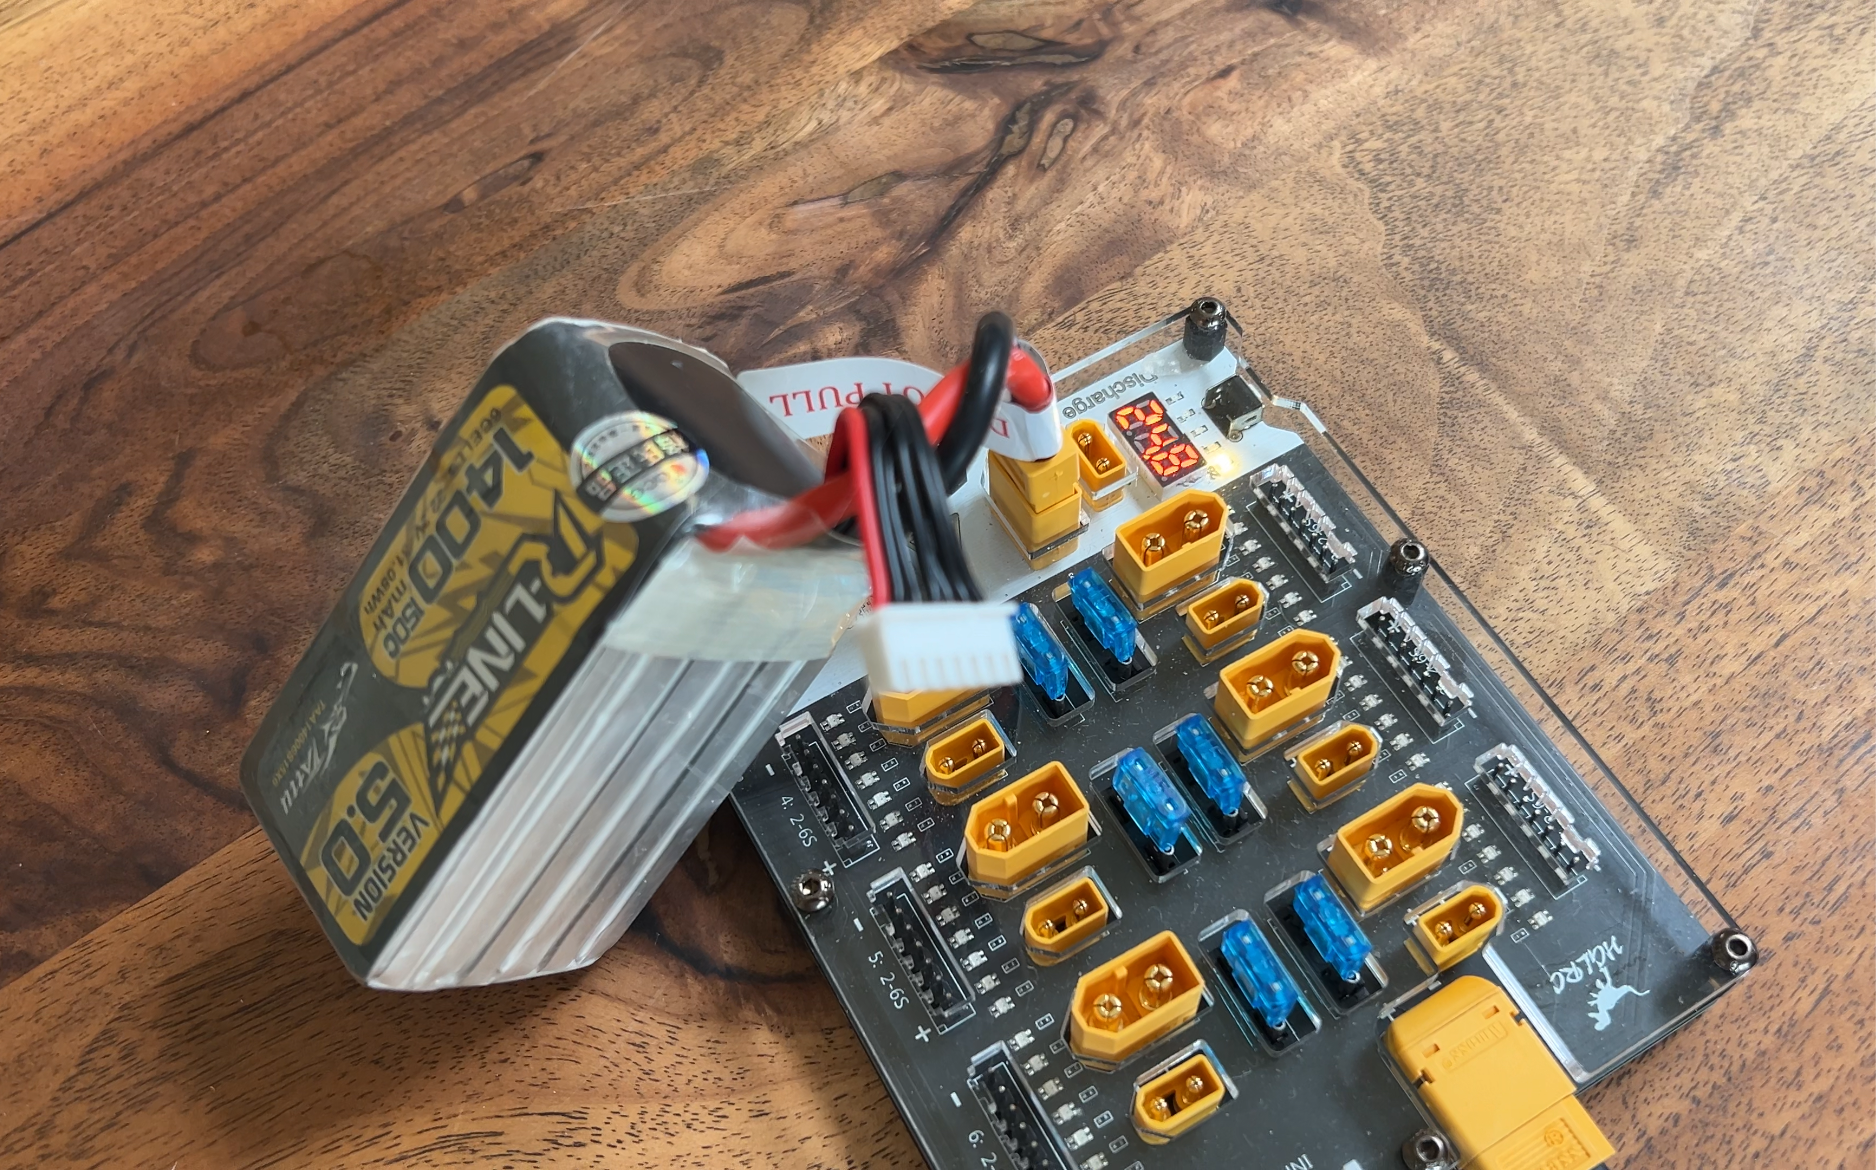
Parallel Charging Boards
The parallel charging board is the central component that enables connecting multiple batteries to a single charger.
Types of Parallel Boards
- Basic Parallel Boards:
- Simple connection points for multiple batteries
- No additional safety features
- Typically lower cost
- Suitable for experienced users
- Protected Parallel Boards:
- Individual fuses for each battery connection
- Reverse polarity protection
- Balance lead protection
- Higher quality connectors
- Recommended for most users
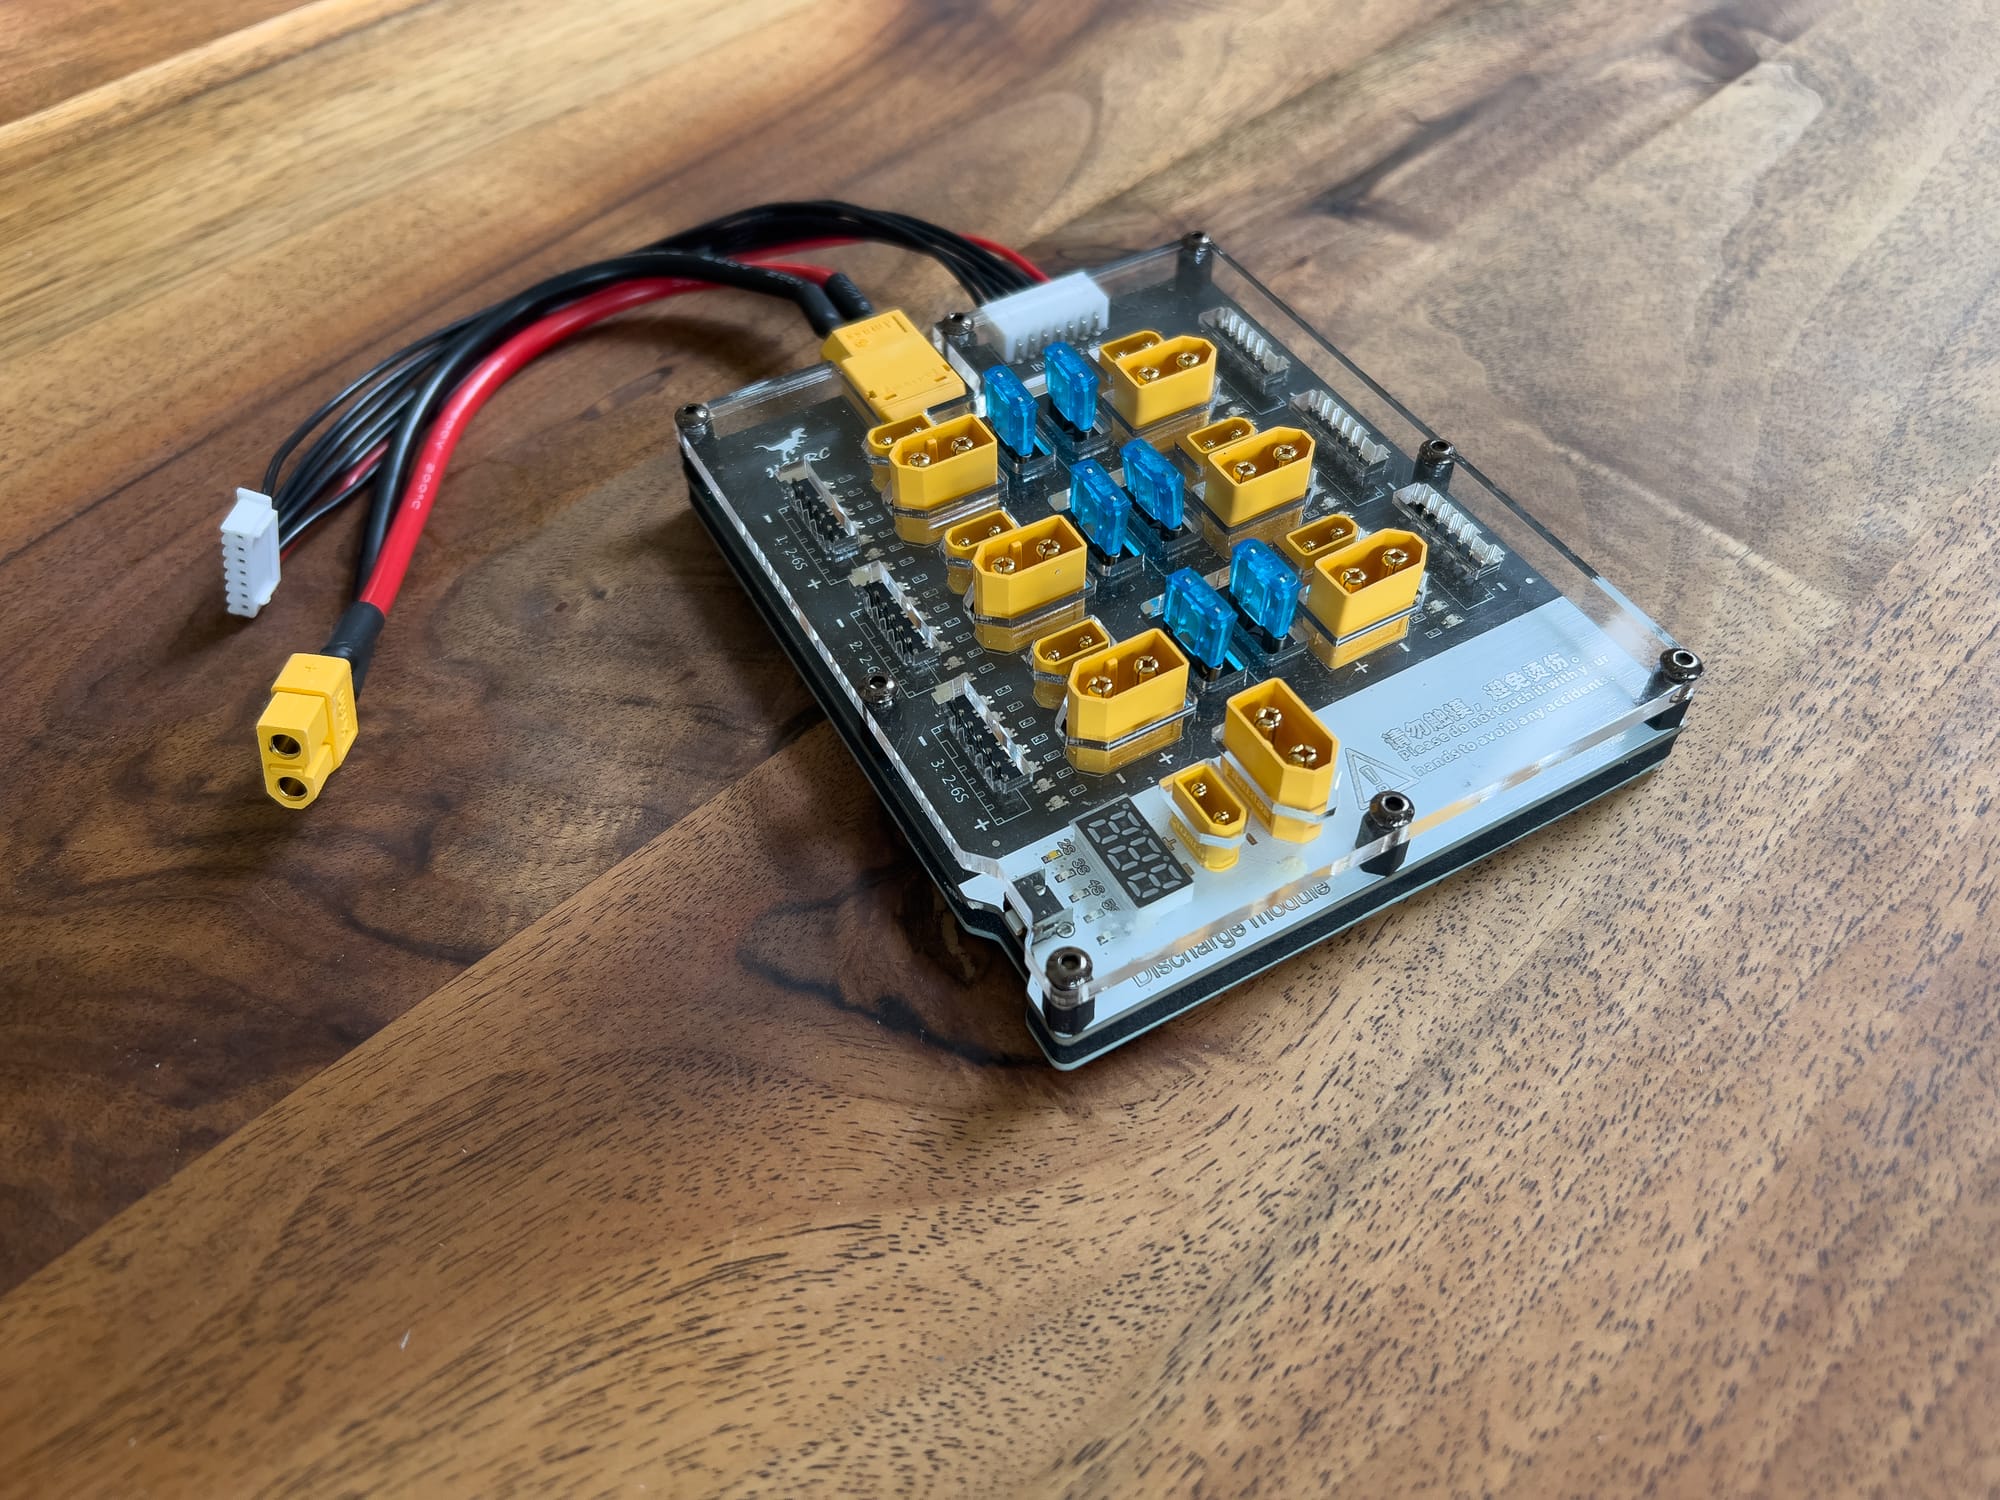
- Advanced Parallel Boards:
- Individual voltage displays
- Active current limiting
- Cell voltage monitoring
- Integrated safety systems
- Best for professional or high-volume users
I started with a basic board but quickly upgraded to a protected model after a close call with a short circuit. The individual fuses have saved me at least twice when batteries had issues during charging. I consider fused connections an absolute must-have feature.
Key Features to Look For
- Fused Connections: Individual fuses for each battery port
- Quality Connectors: Solid, high-current connectors (XT60, XT90, etc.)
- Balance Connections: Secure, properly wired balance ports
- Current Rating: Sufficient for your maximum charging needs
- Build Quality: Solid construction with quality soldering
- Wire Gauge: Appropriate thickness for the current requirements
I've examined several parallel boards over the years, and the difference in quality is striking. Cheap boards often use thin wires and poor soldering that can't handle the current demands of parallel charging. I once had a budget board's trace melt during a charging session—a problem I've never experienced with quality boards.
Popular Parallel Board Models
- ISDT PC-4860:
- 6 battery connections
- Individual fuses
- XT60 connectors
- Price range: $20-30
- HGLRC Tor 6:
- 6 battery connections
- Battery voltage checker
- Individual fuses
- Multiple connector options
- Price range: $30-40
- ToolkitRC M8S:
- 8 battery connections
- Integrated safety features
- High-quality construction
- Price range: $40-50
After trying numerous boards, I've settled on the HGLRC Tor 6 for most of my charging needs. The build quality is excellent, and the individual fuses have saved me from potential issues more than once.
Charger Requirements
Not all chargers are suitable for parallel charging. Specific capabilities are required:
Power Capacity
- Wattage Requirements:
- Minimum: 200W for 3-4 batteries
- Recommended: 300W+ for 4-6 batteries
- Professional: 500W+ for 6+ batteries
- Calculation Method:
- Required watts = (Number of batteries) × (Battery capacity in Ah) × (Charge rate) × (Battery voltage)
- Example: 4 × 1500mAh 4S batteries at 1C = 4 × 1.5Ah × 1C × 16.8V = 100.8W
I learned about power requirements through trial and error. My first charger was rated at 150W, which I thought would be plenty for charging 4 batteries at once. In reality, it could only deliver about 80W continuously, which meant significantly reduced charging rates. I now use a 400W charger that can easily handle 6 batteries at 1C.
Current Capability
- Maximum Output Current:
- Should exceed the sum of desired charging currents
- Typically 20A+ for serious parallel charging
- Higher is better for flexibility
- Current Adjustment:
- Fine control over output current
- Digital precision preferred
- Safety limits and monitoring
My charger is rated for 35A maximum output, but I rarely push it beyond 20A to ensure longevity and stability. I've found that most chargers can't sustain their maximum rated current for extended periods without overheating.
Balance Capability
- Balance Current:
- Higher balance current helps with multiple batteries
- Minimum 300mA, preferred 500mA+
- Dedicated balance circuit preferred
- Balance Accuracy:
- Precision to 0.01V or better
- Consistent performance under load
- Individual cell monitoring
Balance capability is often overlooked but critically important for parallel charging. I've used chargers with weak balance circuits that struggled to handle multiple batteries, resulting in longer charge times and potential imbalance issues. My current charger has a 500mA balance current, which handles up to 6 batteries efficiently.
Recommended Chargers for Parallel Charging
- ISDT Q8:
- 500W capacity
- 30A maximum output
- Excellent balance capability
- Price range: $80-100
- Hota D6 Pro:
- 650W capacity
- 26A maximum output
- Dual channel capability
- Price range: $100-130
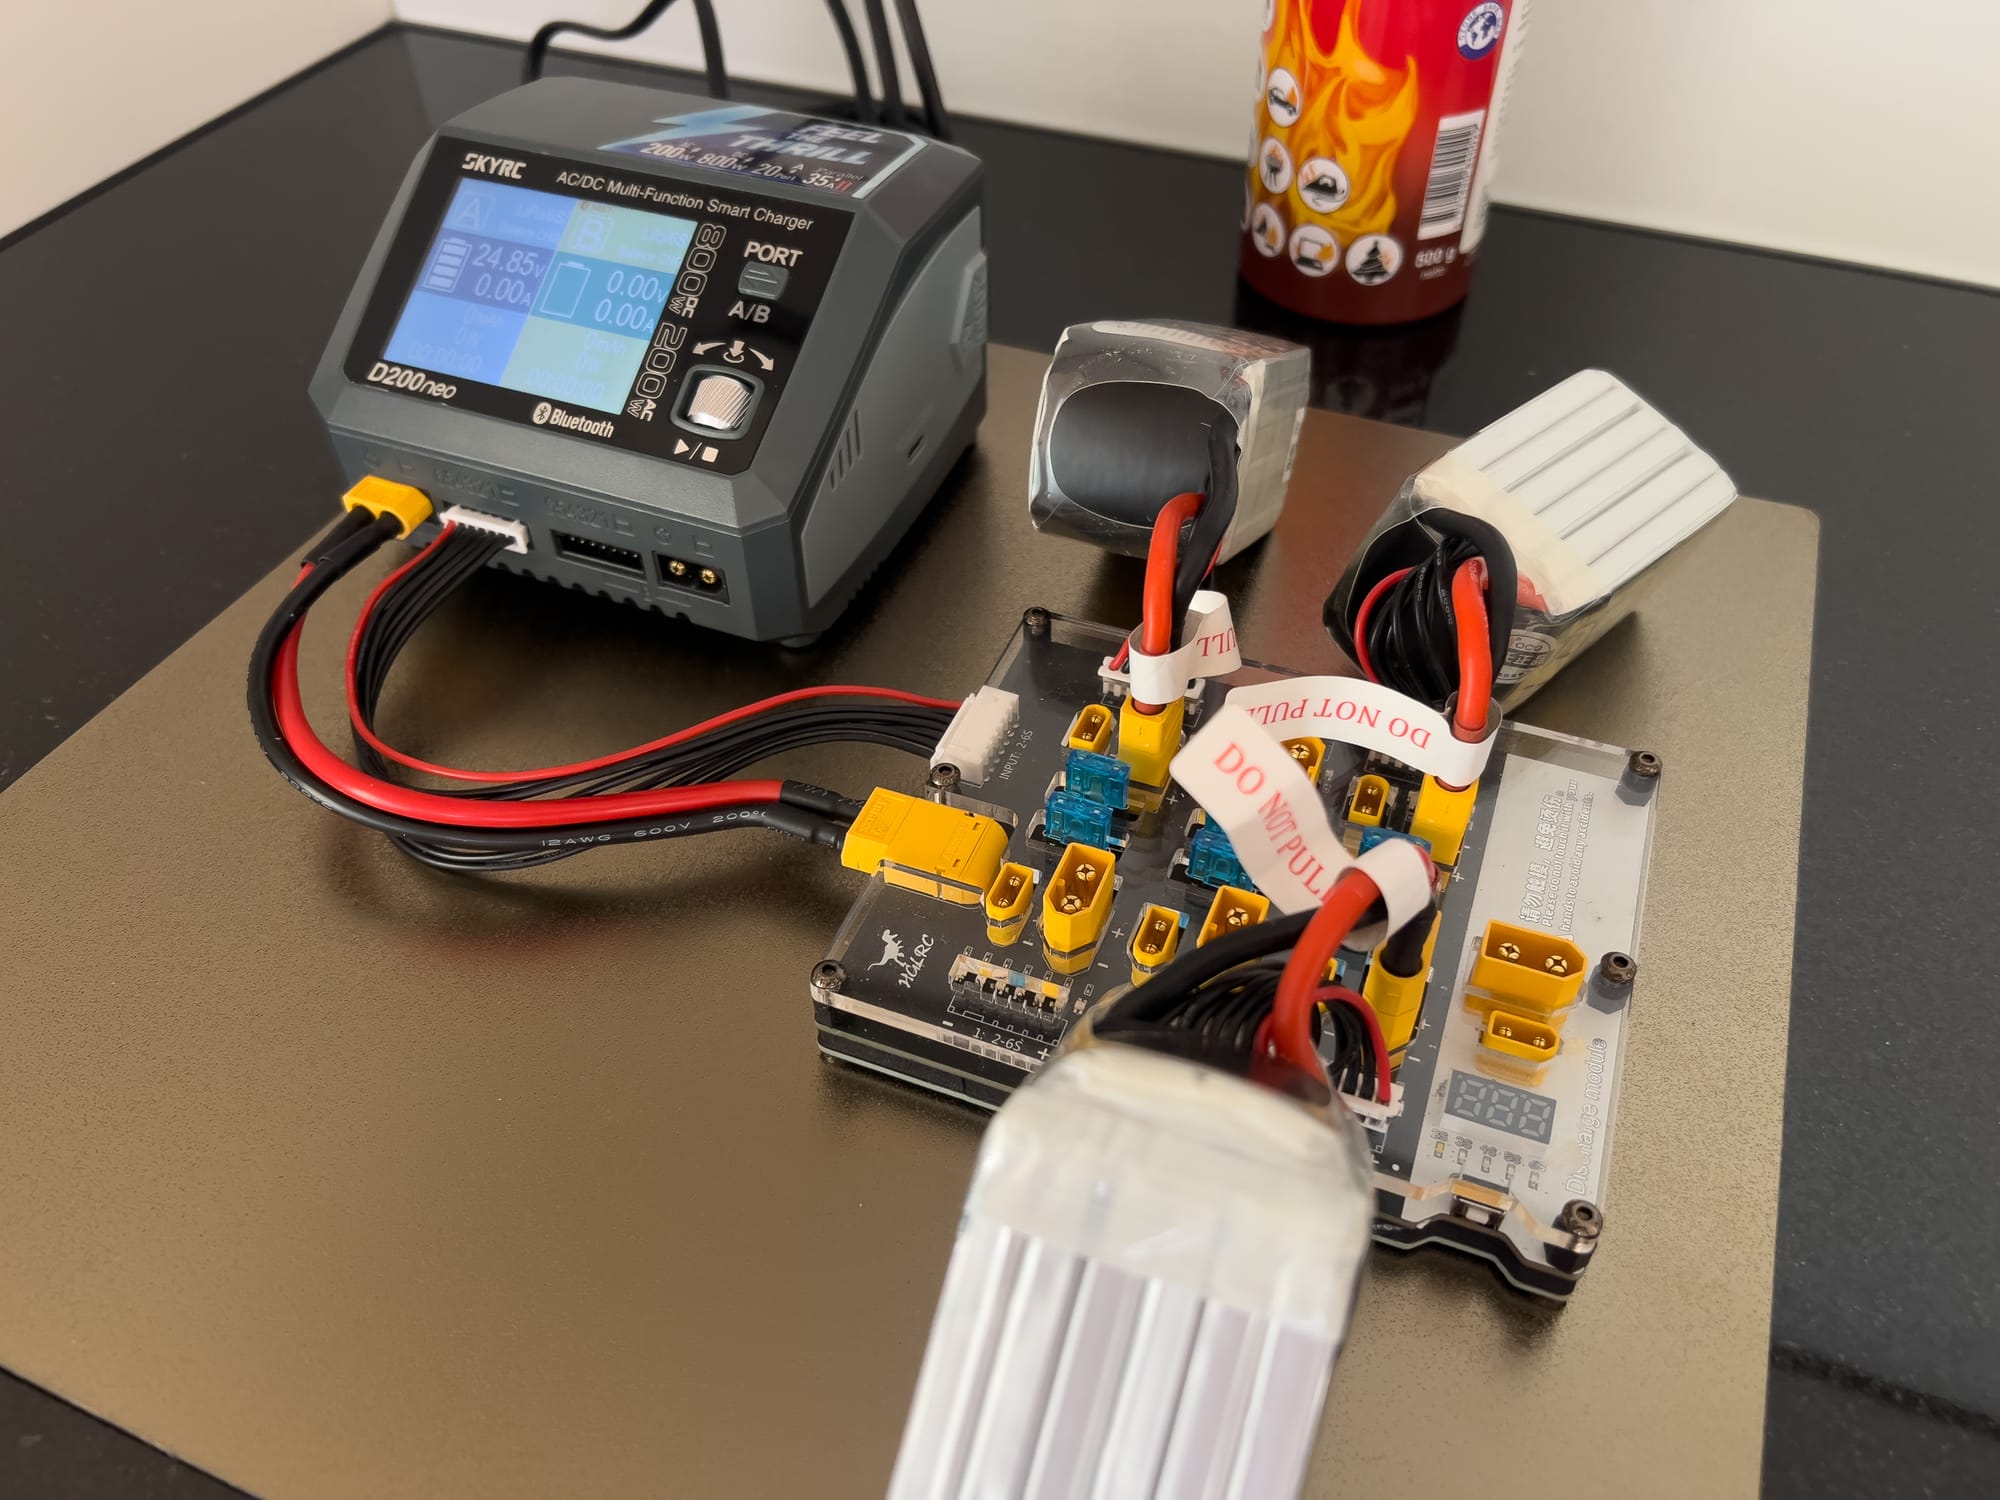
- SkyRC D200neo:
- 400W capacity
- Dual channel capability and integrated parallel charging
- Integrated balance boards
- Price range: $120-150
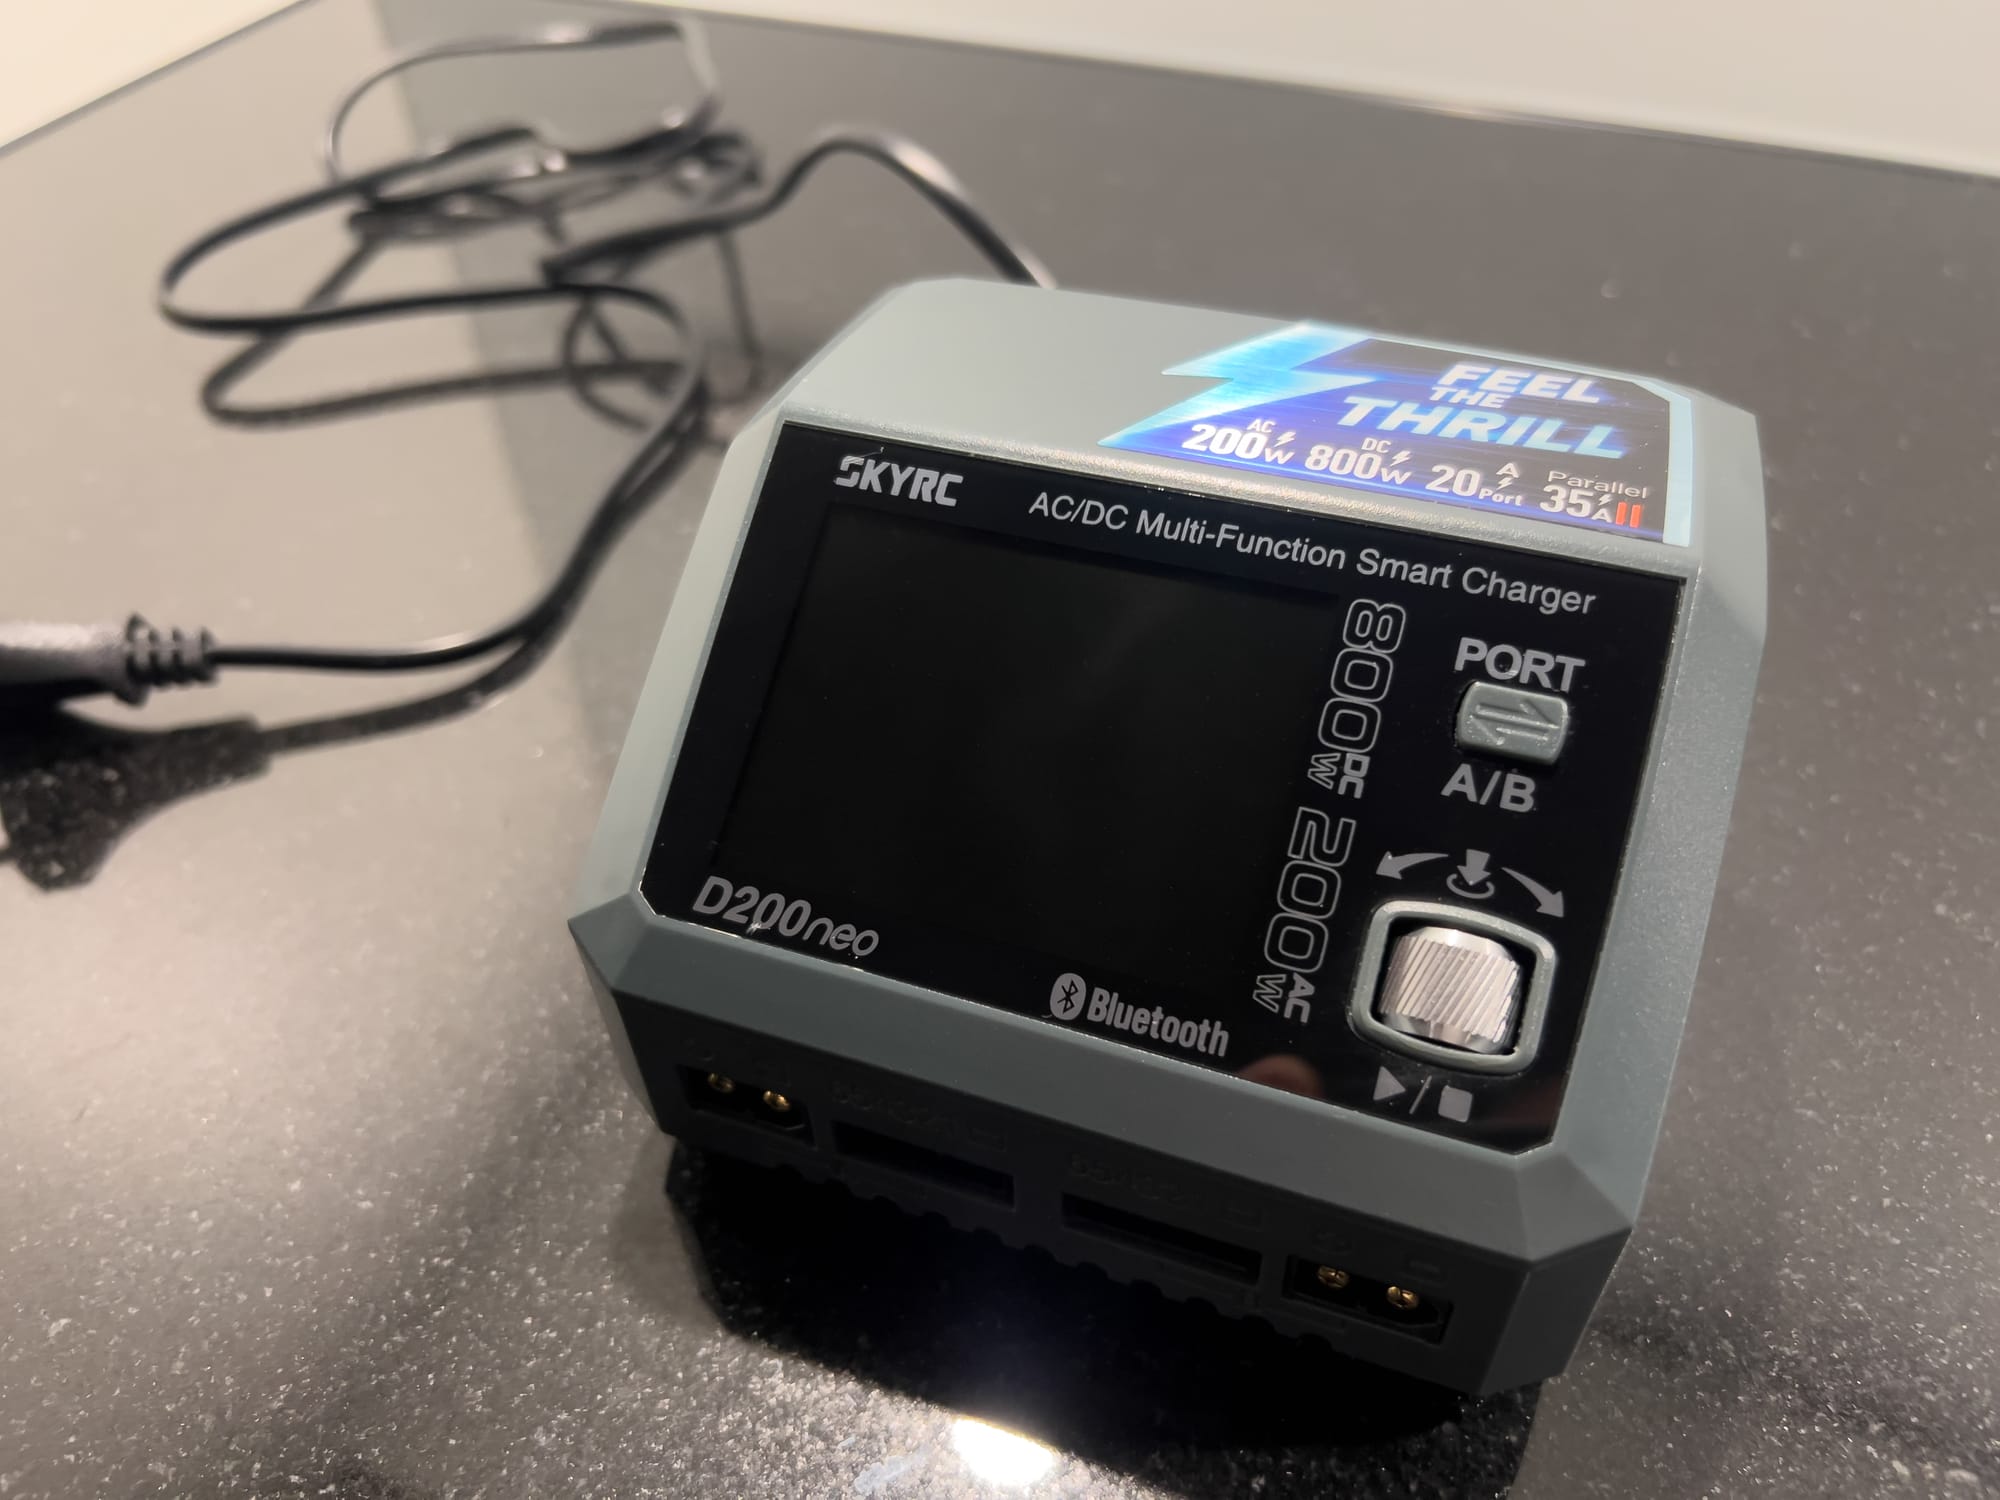
After trying numerous chargers, I've settled on the SkyRC D200neo for my home charging station. Its combination of power, balance capability, and reliability has made it my go-to charger for parallel charging sessions.
Additional Equipment
Several supporting components enhance safety and convenience:
Power Supplies
- AC to DC Converter:
- Minimum 24V output for most chargers
- Wattage matching or exceeding charger capability
- Quality construction with safety certifications
- Adequate cooling
- Recommended Specifications:
- 24-26V output
- 20A+ current capability
- 500W+ for serious parallel charging
- Short circuit and overload protection
For a long time a used a modified server power supply that delivered 24V at up to 25A (600W). It cost less than half the price of a purpose-built charger power supply but provided rock-solid performance. Just make sure any power supply you use has proper safety certifications—this isn't a place to cut corners.
Safety Equipment
- Temperature Monitoring:
- Infrared thermometer
- Temperature probes
- Thermal imaging (advanced)
- Fire Safety:
- LiPo safe charging bags
- Fire-resistant charging mat
- Appropriate fire extinguisher
- Smoke detector near charging area
- Chemical resistant gloves
- Laboratory glasses
After witnessing a battery fire at a flying field, I never parallel charge without at least a LiPo safe bag. For home charging, I use a modified ammo can with a ceramic tile lining and removed rubber seals to prevent pressure buildup in the event of fire. The investment in these safety measures is trivial compared to the potential cost of a fire.
Organizational Tools
- Battery Holders:
- Secure positioning during charging
- Prevents strain on connectors
- Improves heat dissipation
- Organizes workflow
- Cable Management:
- Secure routing of balance leads
- Main power cable organization
- Strain relief for connections
- Clear labeling system
I've built a simple wooden rack that holds batteries during charging, keeping them separated for better cooling and preventing strain on the connections. Good organization not only improves safety but also makes the charging process more efficient.
The Parallel Charging Process
Preparation and Battery Selection
Proper preparation is critical for safe parallel charging:
Battery Compatibility Requirements
- Same Chemistry: Only charge batteries of identical chemistry together
- LiPo with LiPo
- LiHV with LiHV
- Li-ion with Li-ion
- Same Cell Count: Only parallel charge batteries with identical cell counts
- 3S with 3S
- 4S with 4S
- Never mix different cell counts
- Similar Capacity: Ideally within 20% capacity difference
- Example: 1300mAh to 1800mAh can be charged together
- Larger differences possible but not ideal
- Similar Age/Condition: Batteries in comparable health
- Similar cycle count
- Similar internal resistance
- No damaged batteries
I once made the mistake of parallel charging batteries of different cell counts (a 4S and a 3S), thinking I could just leave one balance lead disconnected. This was a dangerous misconception—the 3S battery would have been severely overcharged. Now I double-check cell counts religiously before connecting anything.
Voltage Matching
- Maximum Voltage Difference: 0.1V per cell between batteries
- Example: For 4S, maximum 0.4V total difference
- Smaller difference is better (0.05V per cell ideal)
- Measurement Method:
- Check overall pack voltage with multimeter
- Use battery checker for individual cell voltages
- Some parallel boards have built-in voltage display
- Pre-Charging/Discharging:
- Adjust outlier batteries to match voltage
- Use storage mode to bring batteries closer together
- Consider individual charging for significantly different batteries
I use an integrated battery checker in my parallel board to check voltage before a charging session. This simple habit has prevented numerous potential issues. If I find batteries with voltage differences greater than 0.1V per cell, I'll either pre-charge the lower ones or use storage mode on the higher ones to bring them closer together.
Physical Inspection
- Visual Check:
- No physical damage
- No swelling or puffiness
- Clean, undamaged connectors
- Intact balance leads
- Connector Inspection:
- Tight, clean connections
- No oxidation or corrosion
- No melted plastic or damage
- Proper polarity markings
I once skipped this step in a rush and connected a battery with a damaged balance lead. The resulting short circuit could have been prevented with a 10-second inspection. Now I never skip this critical step, no matter how pressed for time I am.
Setting Up the Parallel Charging Board
Proper setup of the parallel charging board is essential for safety:
Physical Arrangement
- Board Positioning:
- Flat, stable, non-flammable surface
- Good ventilation around board
- Away from flammable materials
- Accessible for monitoring
- Battery Placement:
- Spaced for airflow
- Secure positioning
- Not stacked on each other
- Balance leads accessible
- Cable Management:
- Organized routing
- No tension on connections
- Clear visibility of all connections
- Strain relief where needed
I've set up a dedicated charging station in my garage on a metal workbench with a concrete floor. Even with this setup, I never charge when I'm not home. The peace of mind is worth the minor inconvenience of planning my charging sessions.
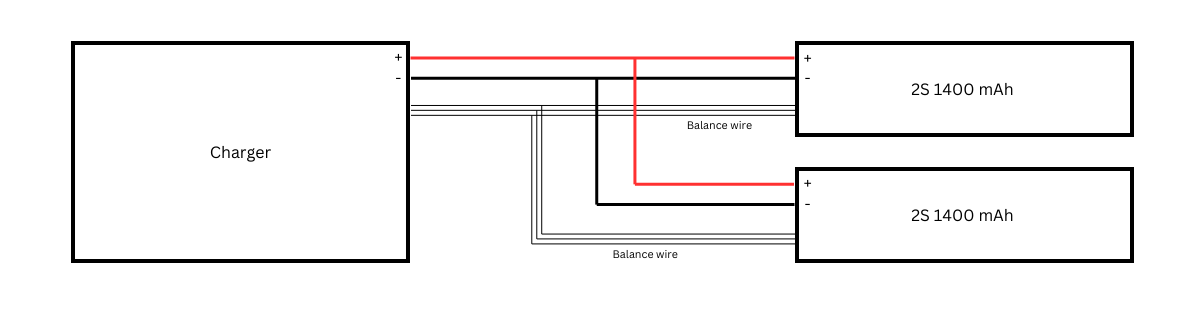
Connection Sequence
- Recommended Order:
- Connect parallel board to charger (main power lead only)
- Connect batteries to parallel board in voltage order (lowest first)
- Main power leads first
- Balance leads second
- Verify all connections before starting charger
- Voltage Equalization Period:
- Allow 5-10 minutes for voltage to equalize between batteries
- Monitor for excessive heat during equalization
- Verify voltages have stabilized before charging
The connection sequence is critical for safety. I always connect batteries in voltage order, starting with the lowest. This prevents a higher-voltage battery from dumping too much current into a lower-voltage one. I've found that allowing 5-10 minutes for voltage equalization before starting the charger results in more balanced charging and reduces stress on the batteries.
Connection Verification
- Main Power Verification:
- Correct polarity for all connections
- Secure insertion of all connectors
- No loose connections
- No crossed wires
- Balance Lead Verification:
- Correct orientation for all balance leads
- All pins properly seated
- No bent pins or damaged connectors
- Matching cell count for all connections
I triple-check all connections before starting the charger. It only takes one reversed connector or misaligned balance lead to cause serious problems. I've developed a systematic approach, checking each connection point by point to ensure nothing is missed.
Charger Configuration
Correct charger settings are crucial for safe parallel charging:
Battery Type Selection
- Chemistry Setting:
- LiPo (4.2V per cell)
- LiHV (4.35V per cell)
- Li-ion (4.2V per cell)
- Exact match to battery chemistry
- Cell Count Configuration:
- Set to match the cell count of connected batteries
- Verify auto-detection if used
- Double-check before starting
This might seem obvious, but I've seen experienced pilots accidentally set the wrong battery type. The consequences can be severe—charging LiHV batteries in LiPo mode leaves performance on the table, while charging LiPo batteries in LiHV mode can damage them or create a safety hazard.
Charge Current Calculation
- Basic Formula:
- Total charge current = (Number of batteries) × (Individual charge rate)
- Example: 4 batteries at 1C (1.5A each) = 6A total
- Conservative Approach:
- Reduce by 10-20% from theoretical maximum
- Example: 6A theoretical → 5A actual setting
- Provides safety margin for imbalances
- Capacity Considerations:
- Different capacity batteries: Base on smallest battery
- Example: 1300mAh, 1500mAh, 1800mAh batteries → Base on 1300mAh
I typically charge at 0.8-0.9C when parallel charging rather than the full 1C I might use for individual batteries. This conservative approach provides a safety margin and reduces stress on both the batteries and charging equipment. For my 1500mAh 4S race batteries, I'll set the charger to about 5A when charging 4 batteries (instead of the theoretical 6A).
Safety Parameters
- Temperature Cut-off:
- Set to 45°C (113°F) maximum
- Lower for conservative approach
- Enable temperature monitoring if available
- Time Limit:
- Set maximum duration based on capacity
- Typically 120-150% of theoretical charge time
- Example: 1 hour theoretical → 1.5 hour maximum
- Capacity Limit:
- Set to sum of all battery capacities plus 10%
- Example: 4 × 1500mAh = 6000mAh + 10% = 6600mAh
I always enable all available safety parameters on my charger. The temperature cut-off has saved batteries from damage when they started heating abnormally during charging. The time and capacity limits provide additional layers of protection against overcharging if something goes wrong with the normal termination detection.
Monitoring the Charging Process
Active monitoring is essential during parallel charging:
Key Parameters to Watch
- Charging Current:
- Should start at set value and gradually decrease
- Sudden drops may indicate problems
- Verify distribution across batteries if possible
- Battery Voltage:
- Steady increase during constant current phase
- Plateaus during constant voltage phase
- All batteries should progress similarly
- Temperature:
- Regular checks with infrared thermometer
- Maximum 45°C (113°F) for any battery
- Consistent across all batteries (within 5°C)
- Balance Activity:
- Balance current indicators on charger
- Cell voltage differences on display
- Balance lead temperature (should not be hot)
I make it a habit to check on charging batteries every 10-15 minutes. While modern chargers have numerous safety features, nothing replaces human monitoring. I've caught several potential issues early just by being attentive during the charging process.
Warning Signs
- Excessive Heat:
- Any battery too hot to touch comfortably
- Significant temperature difference between batteries
- Hot spots on parallel board or connections
- Unusual Sounds:
- Hissing or popping noises
- Crackling sounds from batteries
- Unusual charger fan behavior
- Physical Changes:
- Any swelling or puffing
- Discoloration of batteries or connectors
- Melting or softening of insulation
- Smoke or unusual odors
Heat during charging is a major warning sign. I immediately stop charging any battery that becomes more than slightly warm to the touch. A healthy battery should remain cool or only slightly warm during normal charging.
Intervention Procedures
- Minor Issues:
- Reduce charging current
- Improve cooling (add fan)
- Separate batteries further
- Serious Problems:
- Stop charging immediately
- Disconnect charger from power source
- Remove batteries if safe to do so
- Use fire safety equipment if necessary

I keep a suitable fire extinguisher within reach of my charging station and have practiced my response to a battery fire. Having a plan in place reduces panic and improves response if an incident occurs.
Completion and Disconnection
Proper procedures after charging are important for safety:
Verification of Charge Completion
- Charger Indicators:
- "Charge Complete" message
- Current dropped to zero or maintenance level
- All cells balanced within 0.01-0.03V
- Battery Verification:
- Check final voltage (4.2V per cell for LiPo/Li-ion, 4.35V for LiHV)
- Verify all batteries reached full charge
- Check for any abnormal temperature
I always verify full charge with a separate voltage checker, especially for critical flights. I've had chargers occasionally indicate completion when batteries weren't actually full, particularly with older batteries that have higher internal resistance.
Safe Disconnection Sequence
- Recommended Order:
- Stop charger and disconnect from power
- Disconnect balance leads from parallel board
- Disconnect main power leads from parallel board
- Disconnect parallel board from charger
- Handling Considerations:
- Allow batteries to cool before storage
- Check for any abnormalities before storing
- Handle by body, not by wires
- Avoid shorting terminals
The disconnection sequence is just as important as the connection sequence. I always disconnect in the order listed above to minimize the risk of shorts or other issues. I've seen pilots carelessly disconnect batteries by pulling on the wires, which can damage connectors and eventually lead to failures.
Post-Charging Inspection
- Visual Check:
- No swelling or physical changes
- No connector damage
- No wire insulation damage
- Performance Verification:
- Note any unusual behavior
- Document charging performance
- Flag any batteries with issues for further testing
After charging, I perform a quick inspection of each battery before putting it away. This final check has helped me catch issues like slight swelling or connector damage that might have been missed during the charging process.
FAQ: Common Questions About Parallel Charging
Is parallel charging safe?
Parallel charging can be safe when implemented correctly, but it does involve additional risks compared to charging single batteries:
Safety Factors:
- Equipment Quality: Using proper parallel boards with protection features
- Battery Condition: Only parallel charging healthy, compatible batteries
- Proper Procedures: Following correct setup and monitoring protocols
- Safety Measures: Implementing appropriate containment and monitoring
Risk Comparison:
- Single Battery Charging: Baseline risk level
- Parallel Charging (Proper Setup): Moderately increased risk
- Parallel Charging (Improper Setup): Significantly increased risk
Key Safety Elements:
- Voltage Matching: Batteries must be within 0.1V per cell
- Compatible Batteries: Same chemistry, cell count, and similar capacity
- Quality Equipment: Properly designed parallel board and adequate charger
- Active Monitoring: Regular checks during the charging process
- Containment Measures: Appropriate fire safety equipment
In my experience, when all safety protocols are followed, parallel charging is acceptably safe. I've been parallel charging for over 5 years without any serious incidents, thanks to rigorous adherence to proper procedures. However, I always maintain appropriate safety measures regardless of my experience level.
How many batteries can I charge at once?
The number of batteries you can safely charge in parallel depends on several factors:
Limiting Factors:
- Charger Power Capacity: The primary limitation for most setups
- Parallel Board Capability: Physical connections and current handling
- Monitoring Ability: Your ability to effectively monitor all batteries
- Safety Systems: Containment capacity for the total energy involved
Calculation Method:
- Determine Charger Wattage: Check your charger's maximum power output
- Calculate Battery Requirements:
- Watts per battery = Battery voltage (V) × Charge rate (A)
- Example: 4S (16.8V) at 1C (1.5A) = 25.2W per battery
- Divide Charger Capacity by Battery Requirement:
- Example: 300W charger ÷ 25.2W per battery = 11.9 batteries theoretical maximum
- Apply Safety Margin (reduce by 20-30%):
- Example: 11.9 × 0.7 = 8.3 batteries practical maximum
My Recommendations Based on Experience:
- Beginner: 2-3 batteries maximum
- Intermediate: 4-6 batteries maximum
- Advanced: 6-8 batteries maximum
- Professional: 8+ with specialized equipment and procedures
I personally never charge more than 6 batteries simultaneously, even though my equipment could theoretically handle more. This self-imposed limit ensures I can properly monitor each battery and maintain adequate safety margins. I've found that the sweet spot for efficiency versus safety is around 4-6 batteries per charging session.
Can I parallel charge different capacity batteries?
Yes, you can parallel charge batteries with different capacities, but with important limitations:
Capacity Difference Guidelines:
- Ideal: Within 10% capacity difference (e.g., 1500mAh and 1650mAh)
- Acceptable: Within 20% capacity difference (e.g., 1500mAh and 1800mAh)
- Maximum Recommended: Within 30% capacity difference (e.g., 1500mAh and 2000mAh)
- Not Recommended: Greater than 30% difference
Charging Current Considerations:
- Base charging current on the smallest battery's capacity
- Example: For 1500mAh and 2200mAh batteries:
- Calculate based on 1500mAh
- 1C would be 1.5A per battery
- Total current = number of batteries × 1.5A
Charging Dynamics:
- Smaller capacity batteries will reach full charge sooner
- Charger will reduce current as batteries reach full charge
- Balance system will manage individual cell voltages
- Charging efficiency may be slightly reduced
I regularly charge batteries of slightly different capacities (like 1500mAh and 1800mAh) without issues. The key is monitoring the smaller batteries more closely for overheating, as they'll reach full charge while the larger batteries are still charging. I've found that keeping the capacity difference under 20% results in the most efficient and balanced charging experience.
What's the difference between parallel and series charging?
Parallel and series charging are fundamentally different approaches with distinct characteristics:
Parallel Charging:
- Connection Method: Batteries connected positive-to-positive, negative-to-negative
- Voltage Relationship: All batteries receive the same voltage
- Current Distribution: Current divides among batteries based on state of charge
- Application: Charging multiple batteries of the same cell count simultaneously
- Equipment: Requires parallel charging board
- Safety Considerations: Batteries must be at similar voltage before connecting
Series Charging:
- Connection Method: Batteries connected in a chain (positive to negative)
- Voltage Relationship: Voltage is divided across batteries
- Current Relationship: Same current flows through all batteries
- Application: Charging higher voltage battery with lower voltage charger
- Equipment: Requires series charging adapter
- Safety Considerations: Extremely risky, not recommended for lithium batteries
I exclusively use parallel charging and avoid series charging entirely. Series charging lithium batteries is inherently dangerous because it's nearly impossible to ensure proper cell balancing across multiple packs. I've witnessed the aftermath of a series charging accident that resulted in a severe battery fire. For charging higher cell count batteries, I recommend investing in a charger with adequate voltage capability rather than attempting series charging.
How do I calculate the correct charging current?
Calculating the appropriate charging current for parallel charging requires understanding both individual battery requirements and total system capabilities:
Basic Formula:
- Total Charge Current = Number of Batteries × Individual Battery Charge Rate
Step-by-Step Calculation:
- Determine Individual Battery Charge Rate:
- Standard rate: 1C (1 × capacity in Ah)
- Example: 1500mAh battery at 1C = 1.5A
- Conservative rate: 0.5C-0.7C for longer battery life
- Maximum rate: Check manufacturer specifications (typically 2C-5C)
- Multiply by Number of Batteries:
- Example: 4 batteries at 1.5A each = 6A total
- Apply Safety Margin (recommended):
- Reduce by 10-20% from theoretical maximum
- Example: 6A × 0.8 = 4.8A actual setting
- Verify Charger Capability:
- Ensure charger can deliver calculated current
- Check power supply can support required wattage
- Confirm parallel board can handle current
For my 1500mAh 4S race batteries, I typically set the charger to 5A when charging 4 batteries in parallel (instead of the theoretical 6A). This conservative approach provides a safety margin and reduces stress on both the batteries and charging equipment. For my expensive long-range batteries, I'm even more conservative, charging at 0.7C to maximize their lifespan.
What should I do if batteries have different voltages?
Handling batteries with different voltages requires careful preparation before parallel charging:
Voltage Difference Guidelines:
- Maximum Safe Difference: 0.1V per cell (e.g., 0.4V total for 4S batteries)
- Ideal Difference: 0.05V per cell or less
- Unsafe Difference: Anything greater than 0.1V per cell
Equalization Options:
- Pre-Charging Method:
- Individually charge lower voltage batteries to match higher ones
- Use storage mode to bring higher voltage batteries down
- Goal is to bring all batteries within safe voltage range
- Natural Equalization Method:
- Connect batteries to parallel board (without charger)
- Allow 5-10 minutes for voltages to naturally equalize
- Monitor for excessive heat during equalization
- Only works for small voltage differences (less than 0.1V per cell)
- Staged Charging Method:
- Group batteries by similar voltage
- Charge similar groups together
- Combine groups as voltages converge
I've found that the natural equalization method works well for small voltage differences, but I'm extremely cautious about connecting batteries with larger differences. After witnessing a battery get uncomfortably hot during equalization, I now pre-charge or discharge outliers to bring them within 0.05V per cell before connecting to my parallel board. This extra step takes a few minutes but provides significant safety benefits.
Conclusion
Parallel charging is a powerful technique that can dramatically improve your drone battery workflow when implemented correctly. By understanding the principles, using appropriate equipment, following proper procedures, and maintaining a safety-first mindset, you can safely enjoy the benefits of charging multiple batteries simultaneously.
Remember that parallel charging introduces additional complexity and risk compared to charging single batteries. The time saved through parallel charging should never come at the expense of safety. Always follow best practices, invest in quality equipment, and maintain vigilant monitoring throughout the charging process.
As battery technology continues to evolve, staying informed about best practices remains essential. However, the fundamental principles of proper voltage matching, appropriate equipment selection, careful monitoring, and comprehensive safety measures will remain relevant regardless of advances in battery chemistry or charger technology.
By developing a systematic approach to parallel charging that includes proper preparation, careful setup, appropriate charger configuration, and active monitoring, you'll not only save time but also maintain the health and longevity of your valuable battery collection.


Comments ()