Drone Battery Charging: A Guide to Safety and Efficiency

Proper battery charging is one of the most critical aspects of drone ownership and maintenance. After years of experience and countless charging cycles, I can tell you that correct charging procedures not only maximize battery performance and lifespan but also ensure safety by preventing potential fire hazards. This comprehensive guide covers everything I've learned about charging various battery chemistries used in drones, from basic principles to advanced techniques.
Introduction to Drone Battery Charging
Charging drone batteries involves much more than simply plugging them in. I've learned through both research and hard experience that it requires understanding battery chemistry, charger functionality, and safety protocols to ensure optimal performance and longevity.
The Importance of Proper Charging
Proper charging practices are essential for several reasons:
- Safety: Incorrect charging can lead to battery damage, overheating, or even fires
- Battery Longevity: Optimal charging extends the useful life of expensive batteries
- Performance: Properly charged batteries deliver consistent power and flight times
- Reliability: Well-maintained batteries are less likely to fail during flight
- Cost Efficiency: Extending battery life reduces replacement costs
I've seen too many pilots lose expensive batteries—or worse, damage property—because they didn't take the time to understand proper charging procedures.
Trust me, developing good charging habits from the start is worth the effort. You may ignore this advice but that's just until your first battery catches fire.
Battery Chemistry Overview
Different battery chemistries require specific charging approaches. Through years of testing various types, I've found these characteristics to be consistent:
Lithium Polymer (LiPo)
- Most common in high-performance drones
- Nominal cell voltage: 3.7V
- Charging voltage: 4.2V per cell
- Requires constant current/constant voltage (CC/CV) charging
- Typically charged at 1C rate (1 times capacity)
I primarily use LiPo batteries for my freestyle and racing drones due to their excellent power delivery and relatively light weight. However, they require the most careful handling of all battery types.
Lithium High Voltage (LiHV)
- Enhanced version of LiPo with higher voltage tolerance
- Nominal cell voltage: 3.8V
- Charging voltage: 4.35V per cell
- Requires chargers specifically supporting LiHV
- Similar charging profile to LiPo but with higher voltage cutoff
I've been using LiHV batteries more frequently in my racing builds where that extra 0.15V per cell makes a noticeable difference in punch. Just remember that you must have a charger that specifically supports LiHV mode—charging these batteries in standard LiPo mode will leave performance on the table.
Lithium Ion (Li-ion)
- Higher energy density, lower discharge rates
- Nominal cell voltage: 3.6V
- Charging voltage: 4.2V per cell
- Slower charging rates (typically 0.5C)
- Longer cycle life than LiPo
For my long-range builds, I've switched almost entirely to Li-ion batteries. The energy density advantage is substantial—I get about 30-40% more flight time compared to LiPo batteries of the same weight. The trade-off is lower current capability, but for cruising-style flight, this isn't an issue.
Nickel-Metal Hydride (NiMH)
- Used in some entry-level drones
- Nominal cell voltage: 1.2V
- Charging detected by voltage drop or temperature rise
- More tolerant of overcharging than lithium batteries
- Lower energy density than lithium-based batteries
I rarely use NiMH batteries anymore (not at all in the last 2 years), but they're still found in some toy-grade drones and transmitters. They're much more forgiving than lithium batteries but offer significantly less performance.
For more detailed information on battery chemistry, see:
Overview of Drone Battery Types and Chemistry
This guide will primarily focus on lithium-based batteries (LiPo, LiHV, Li-ion) as they are most commonly used in modern drones and require the most careful charging procedures.
Charging Equipment
Battery Chargers
Types of Chargers
- Basic Chargers: Simple, often included with entry-level drones
- Limited features
- Usually single battery only
- Fixed charging rates
- Minimal safety features
- Advanced Chargers: Standalone units for enthusiasts and professionals
- Multiple battery chemistry support
- Adjustable charging rates
- Comprehensive safety features
- Detailed battery information display
- Balance charging capability
- Field Chargers: Portable options for on-location charging
- DC input for vehicle power or battery power
- Compact design
- Reduced feature set compared to bench chargers
- Often lower maximum charging power
- Charging Stations: Professional-grade multi-battery systems
- Simultaneous charging of multiple batteries
- Individual monitoring and control
- High power output
- Advanced safety features
- Often include storage and transport features
I started with a basic charger that I got on Aliexpress without knowing much about drones and I was lucky to make a good choice. I upgraded in a few years to an advanced model only when my experience enabled me to fully understand its limitations.
The investment in a quality charger pays for itself many times over through extended battery life and improved safety.
Key Charger Specifications
- Maximum Charging Power: Measured in watts, determines charging speed capability
- Input Voltage Range: AC (mains power) and/or DC (battery/vehicle power)
- Supported Battery Types: Which chemistries the charger can handle
- Maximum Cell Count: Highest number of cells in series the charger supports
- Balance Current: Rate at which the charger can balance individual cells
- Interface: Display type and user controls
- Connectivity: USB, Bluetooth, or WiFi for monitoring and updates
- Safety Features: Temperature monitoring, timeout protection, etc.
When I'm selecting a charger, I always look for at least 50W more capacity than I think I'll need. This gives me room to grow my battery collection and ensures the charger isn't constantly running at its limits, which can shorten its lifespan.
Popular Charger Brands and Models
- ISDT:
- Q6 Nano, Q6 Pro, Q8
- Known for compact size and user-friendly interface
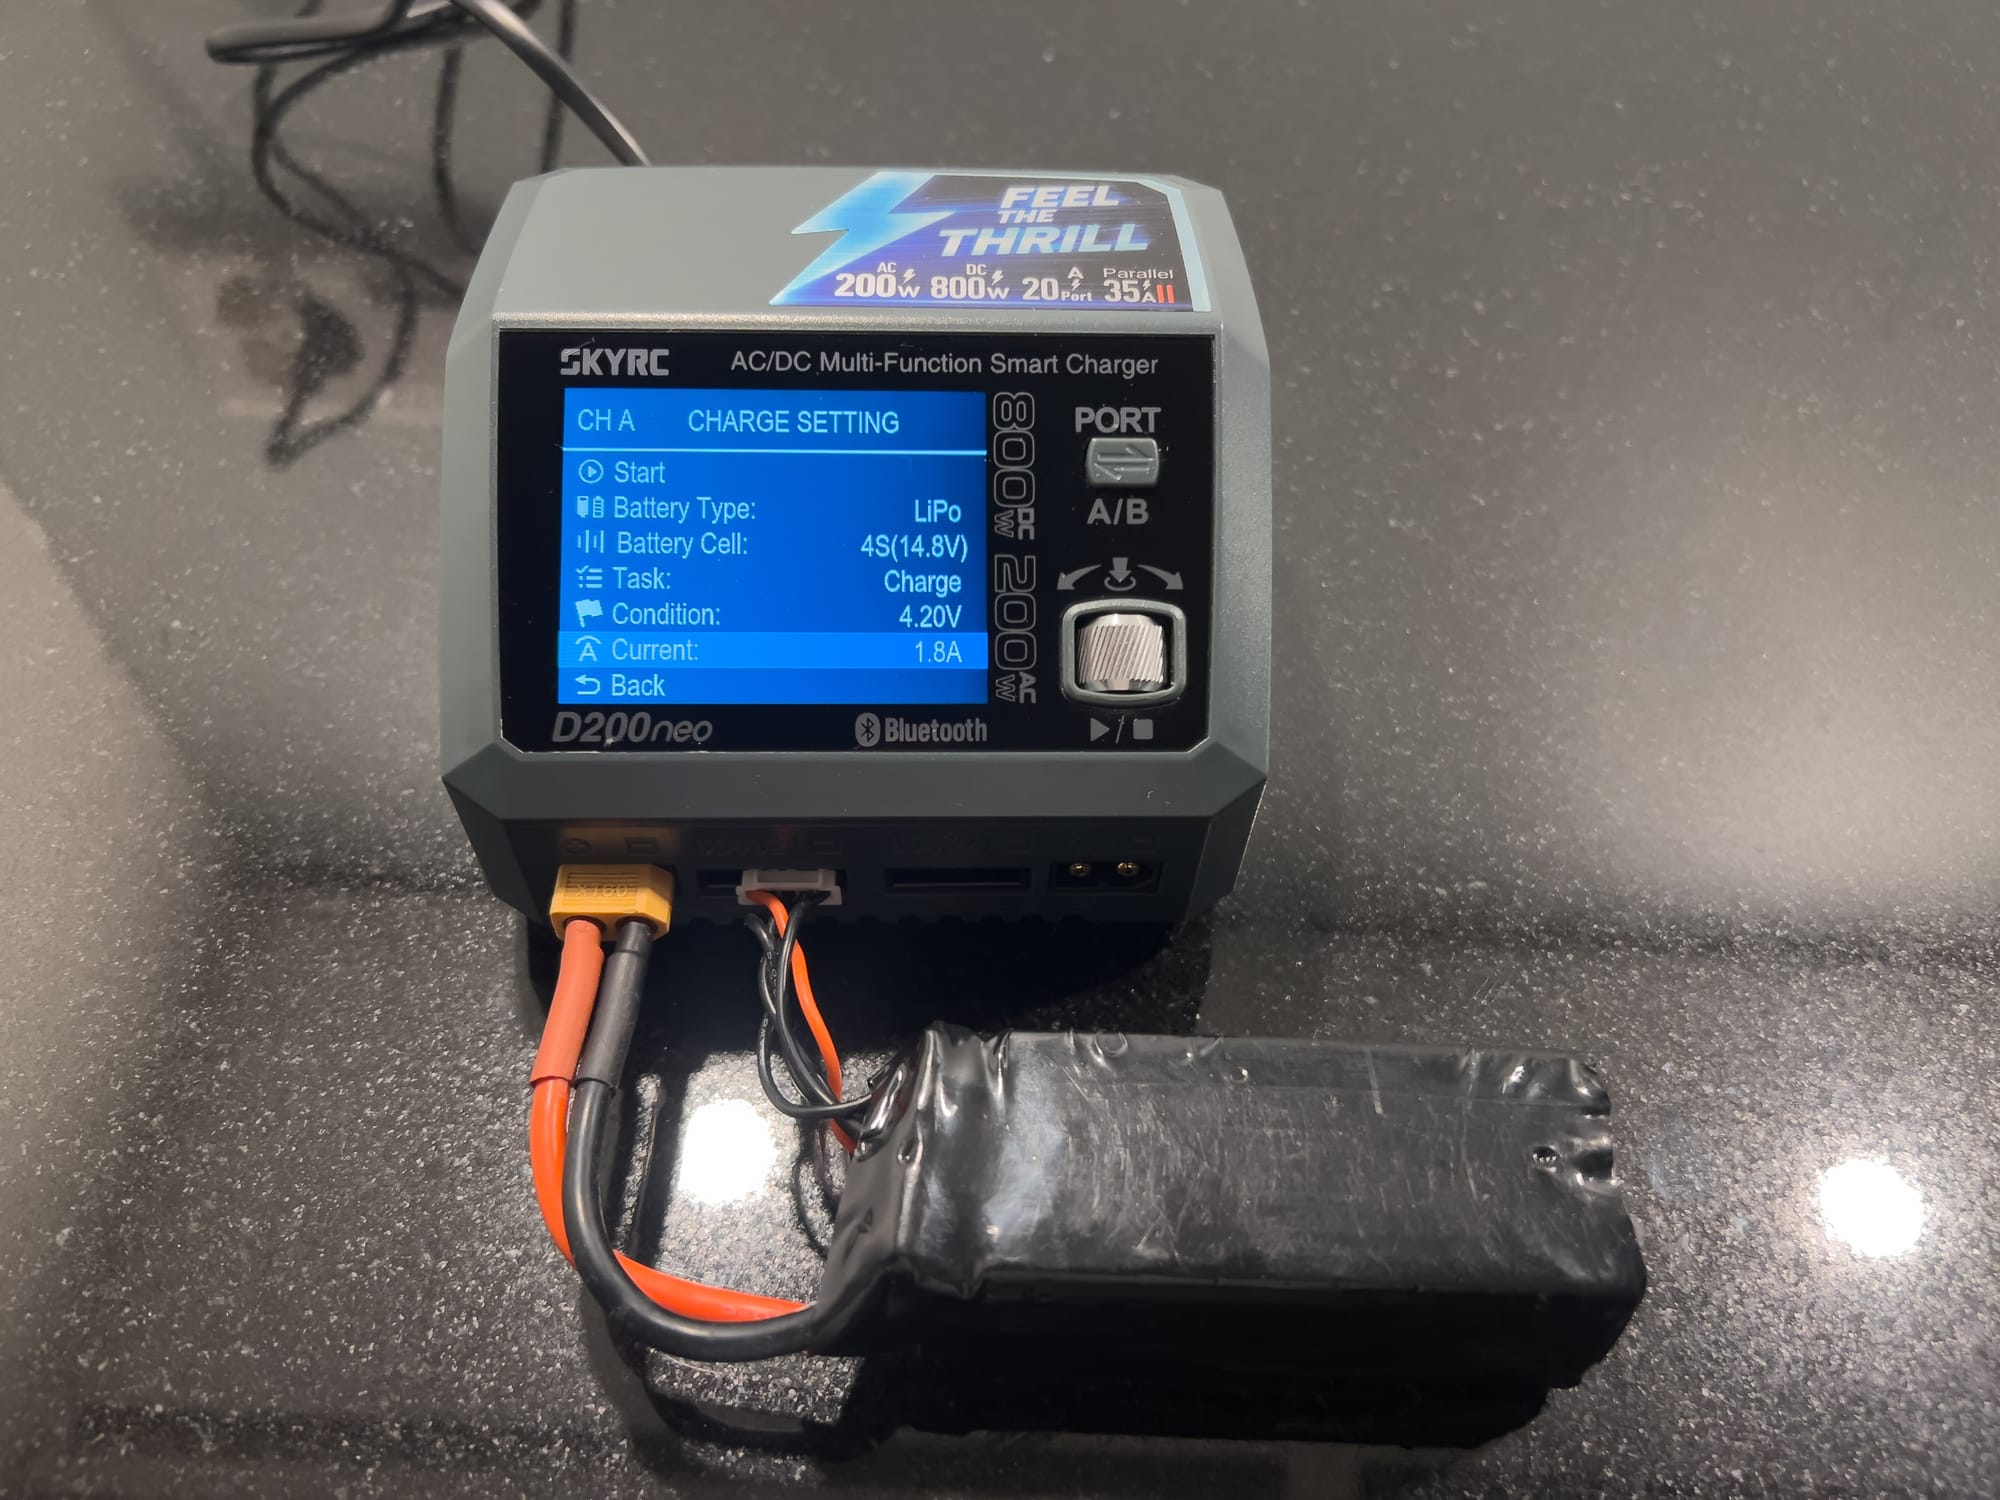
- SkyRC:
- B6 Nano, iMax B6, D200neo
- Wide range from entry-level to professional
- Hota:
- D6 Pro, D6 Duo
- High power output and reliability
- ToolkitRC:
- M6, M8
- Feature-rich with good value
- HTRC:
- C240, T240
- Budget-friendly options with good performance
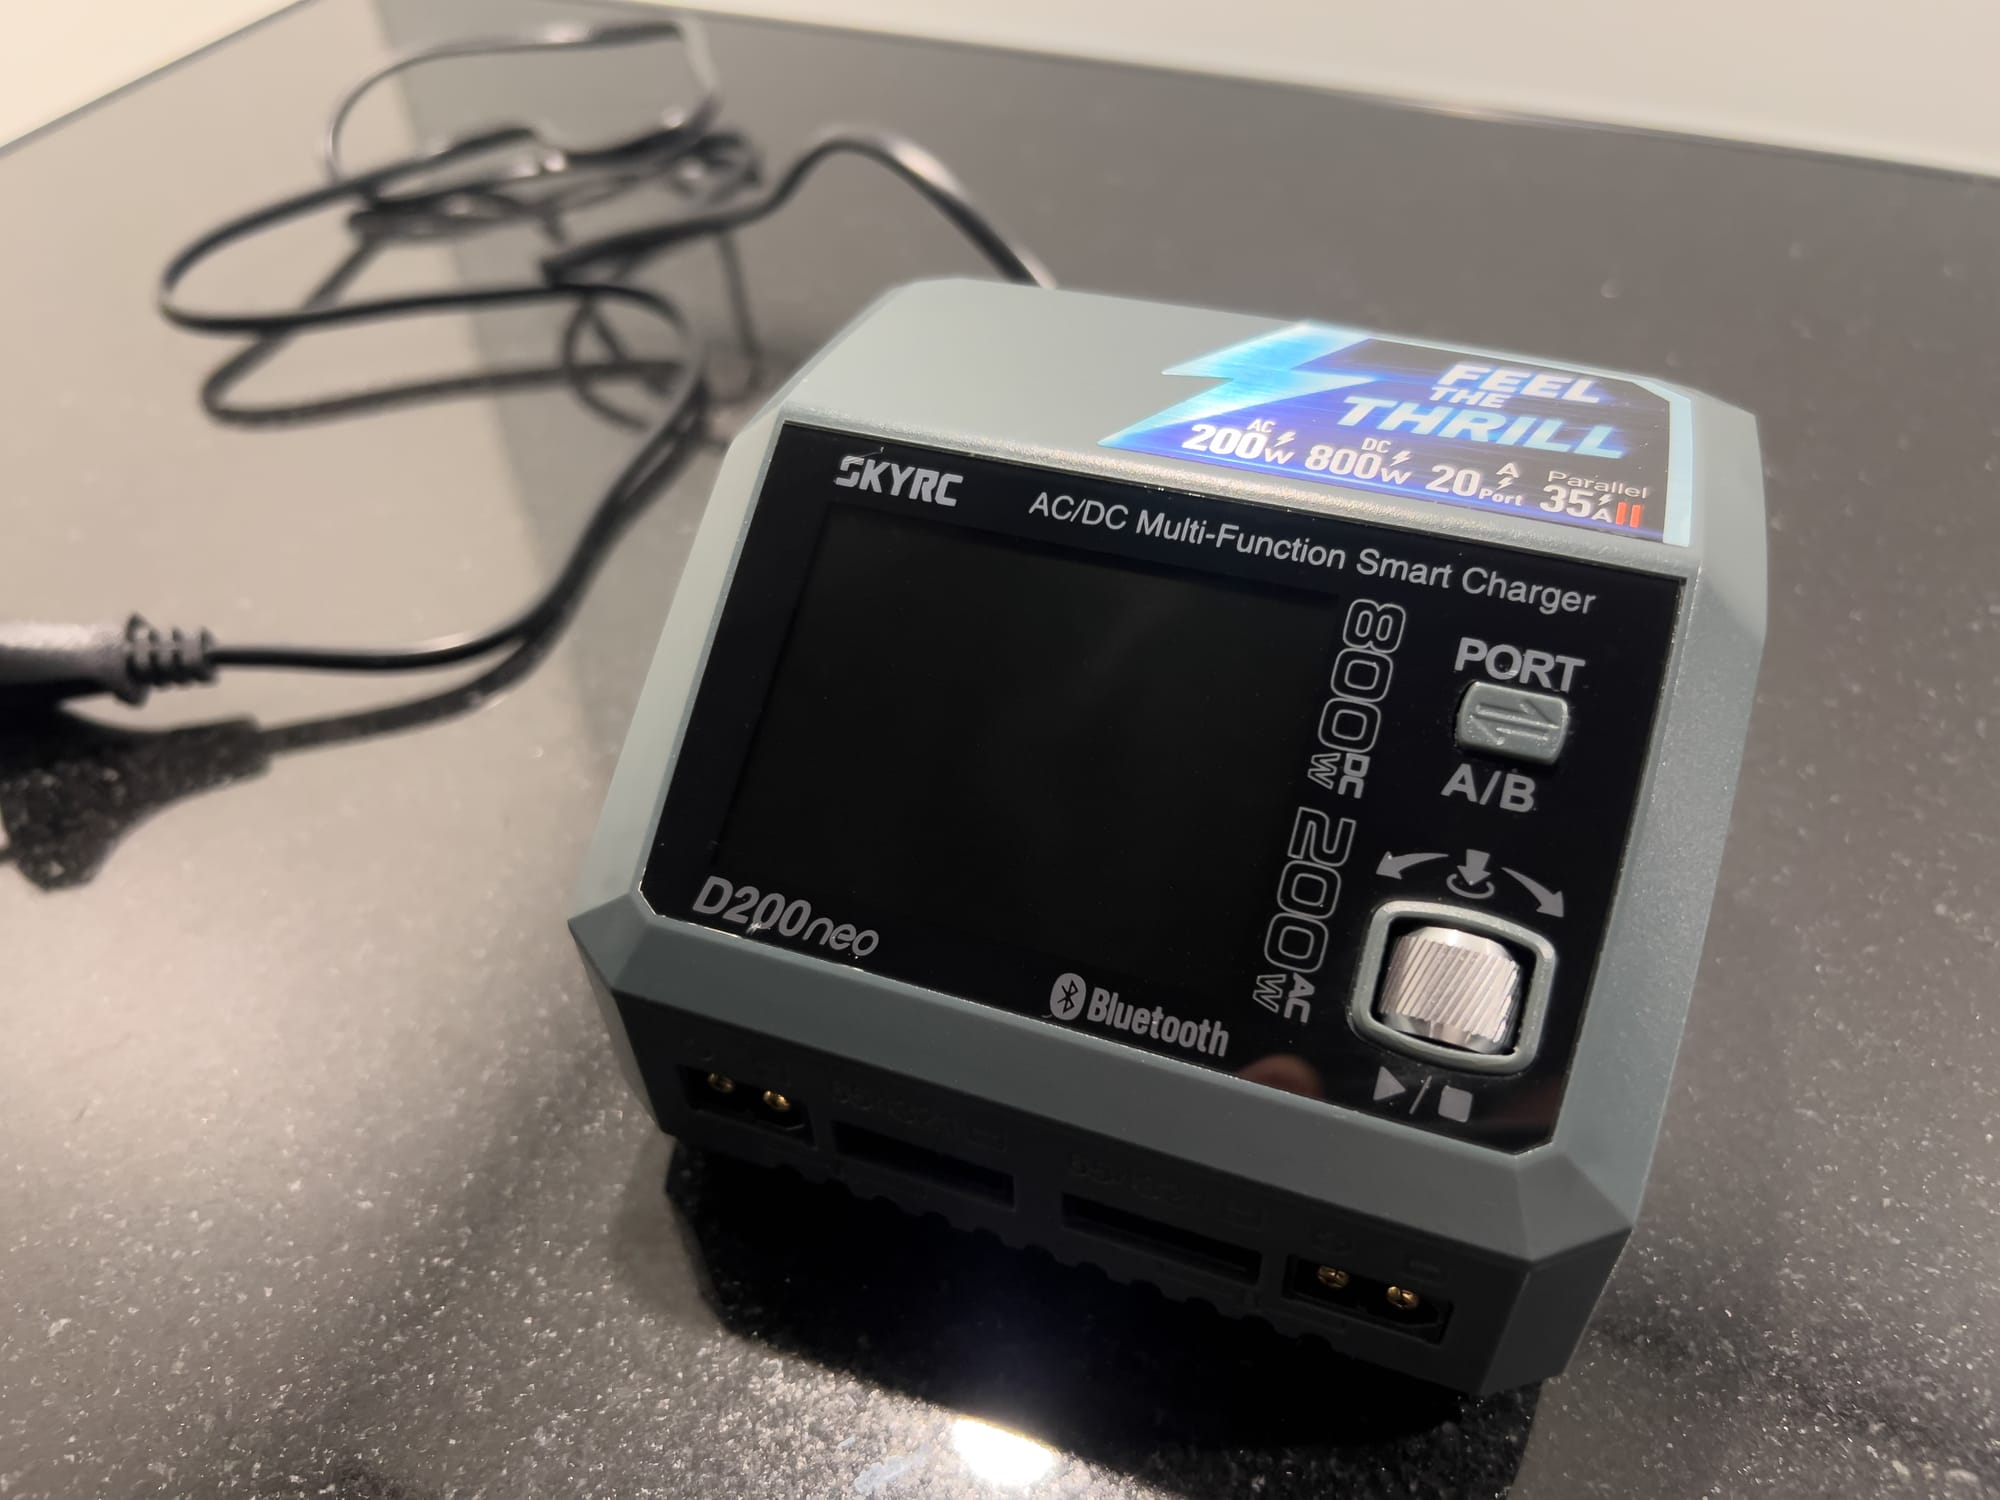
After trying most major brands, I've settled on D200neo for my personal use. The interface is intuitive, and I've found their power ratings to be honest—some cheaper chargers claim 200W but struggle to deliver even 150W consistently.
Essential Accessories
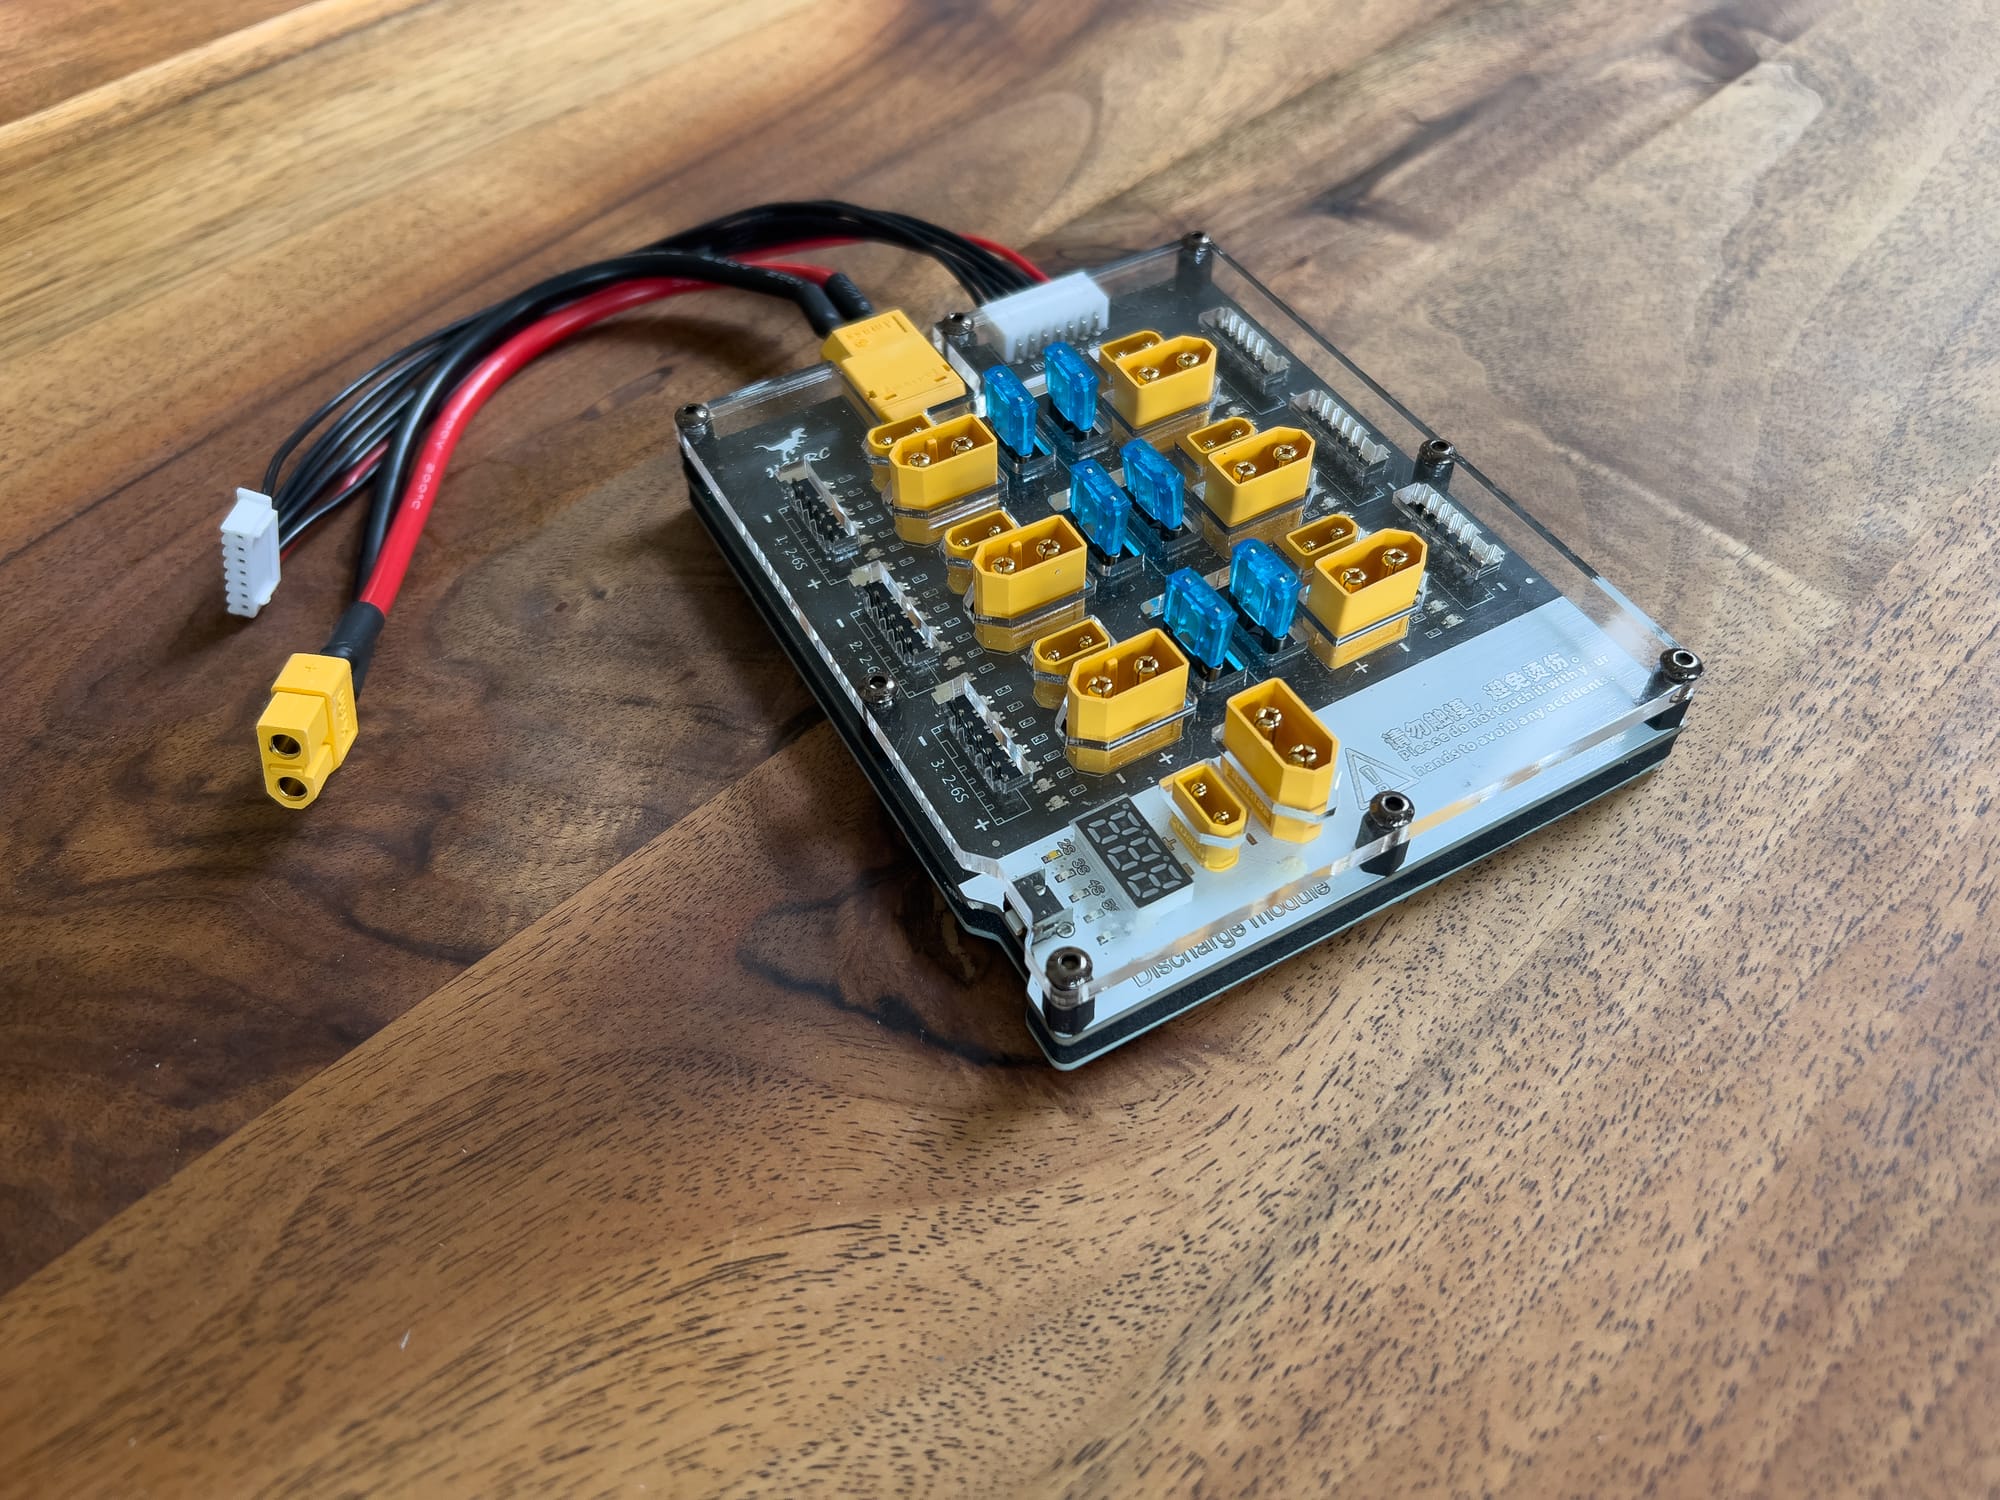
Balance Boards
- Purpose: Connect multiple batteries to a single charger for balance charging
- Types:
- Series boards: For charging higher voltage from lower voltage chargers
- Parallel boards: For charging multiple batteries simultaneously
- Combination boards: Offering both options
- Features to Look For:
- Individual cell voltage monitoring
- Fused connections
- Quality XT60/XT30 connectors
- Clean soldering and construction

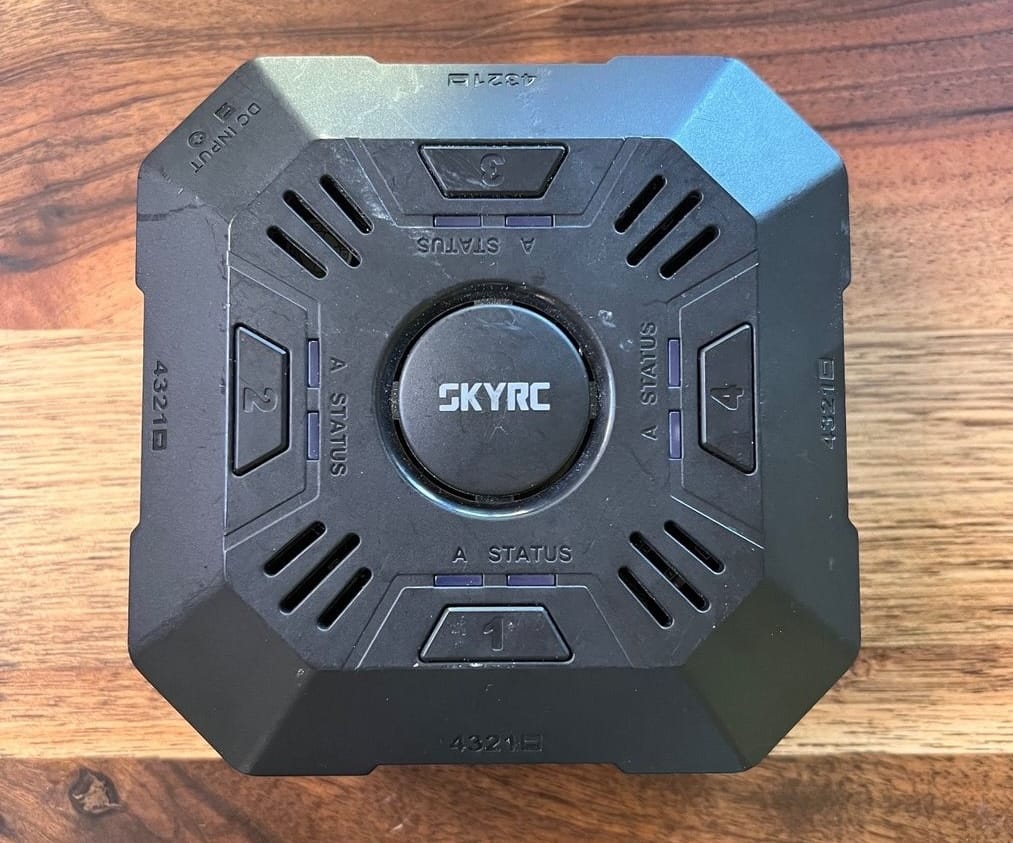
I learned the hard way about the importance of quality balance boards. A cheap board with poor soldering caused a short circuit that damaged two expensive batteries. Now I only use boards with individual fuses for each battery port—it's saved me more than once when a battery had issues.
Charging Cables and Adapters
- Common Connector Types:
- XT60/XT30: Standard power connections
- JST-XH: Balance lead connections
- JST, PH2.0, BT2.0: Smaller drone connections
- XT90, EC5, Deans: Higher current applications
- Adapter Sets: Collections of various connectors for versatility
- Quality Considerations: Wire gauge, connector quality, soldering
For more detailed information on charging connectors, see:
Overview of Battery Charging Connectors
I keep a complete set of adapters in my charging case. You never know when you'll need to charge a battery with a different connector. As much as try to simplify things, I still ended up with JST, JR / Futaba and XT60 being necessary. Just be careful with adapters that have very thin wires—I've seen some that use 22AWG wire for XT60 connections, which is dangerously undersized.
Safety Equipment
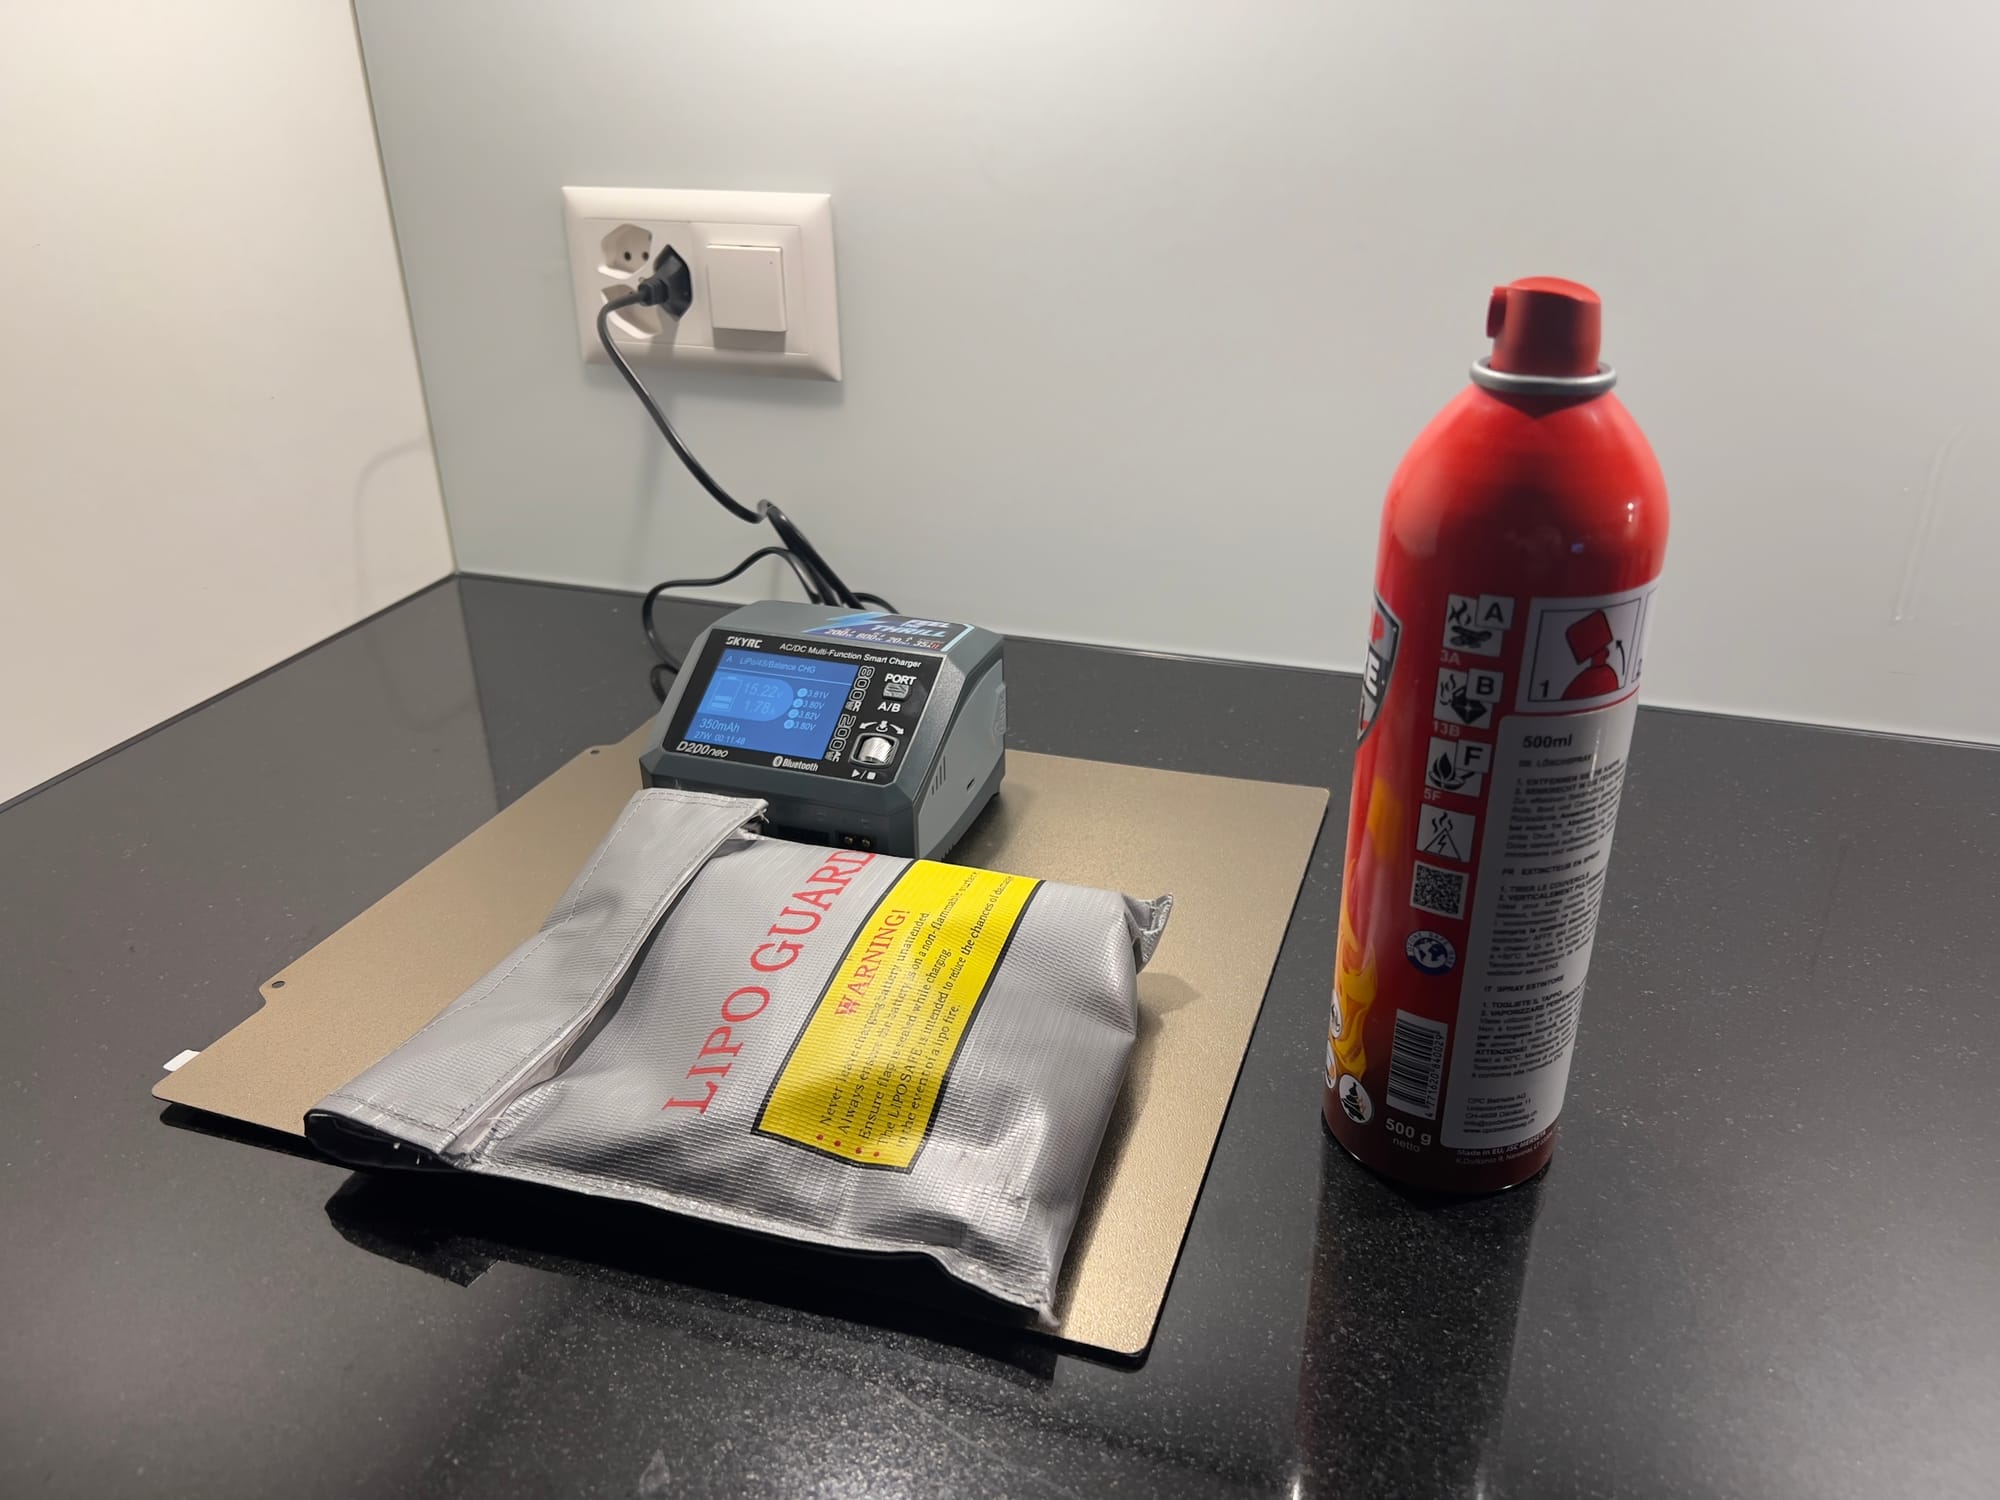
- LiPo Safe Bags: Fire-resistant pouches for charging and storage
- Charging Bunkers: Metal or ceramic enclosures for maximum protection
- Fire Extinguishers: Appropriate types for electrical/chemical fires
- Smoke Detectors: Early warning systems for charging areas
- Temperature Monitors: External probes for battery temperature monitoring

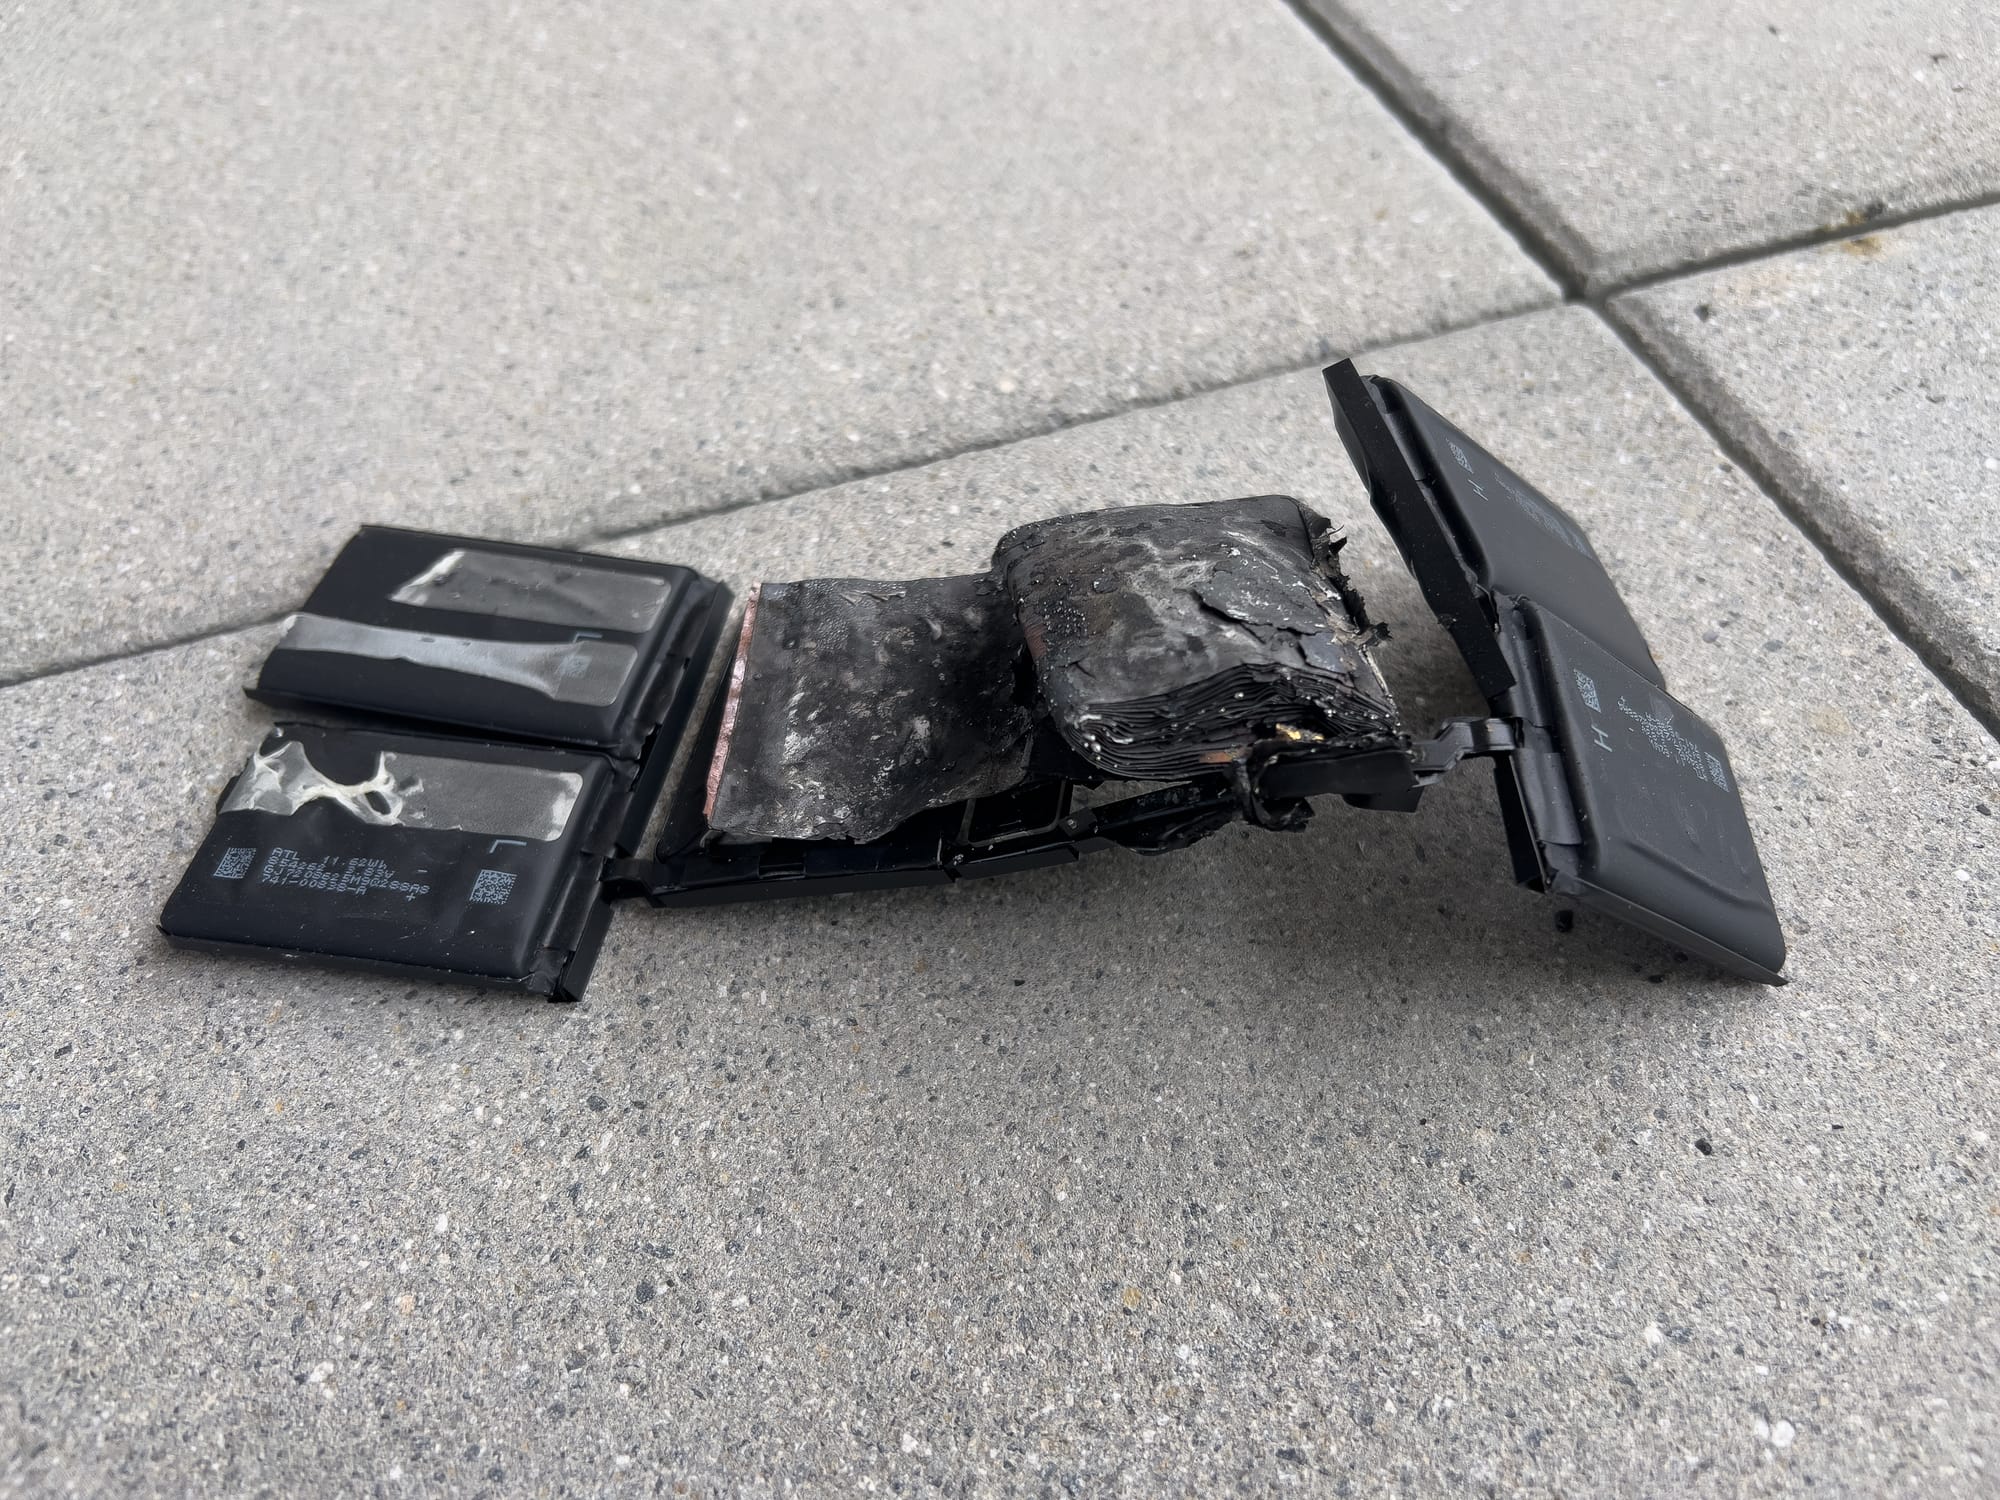
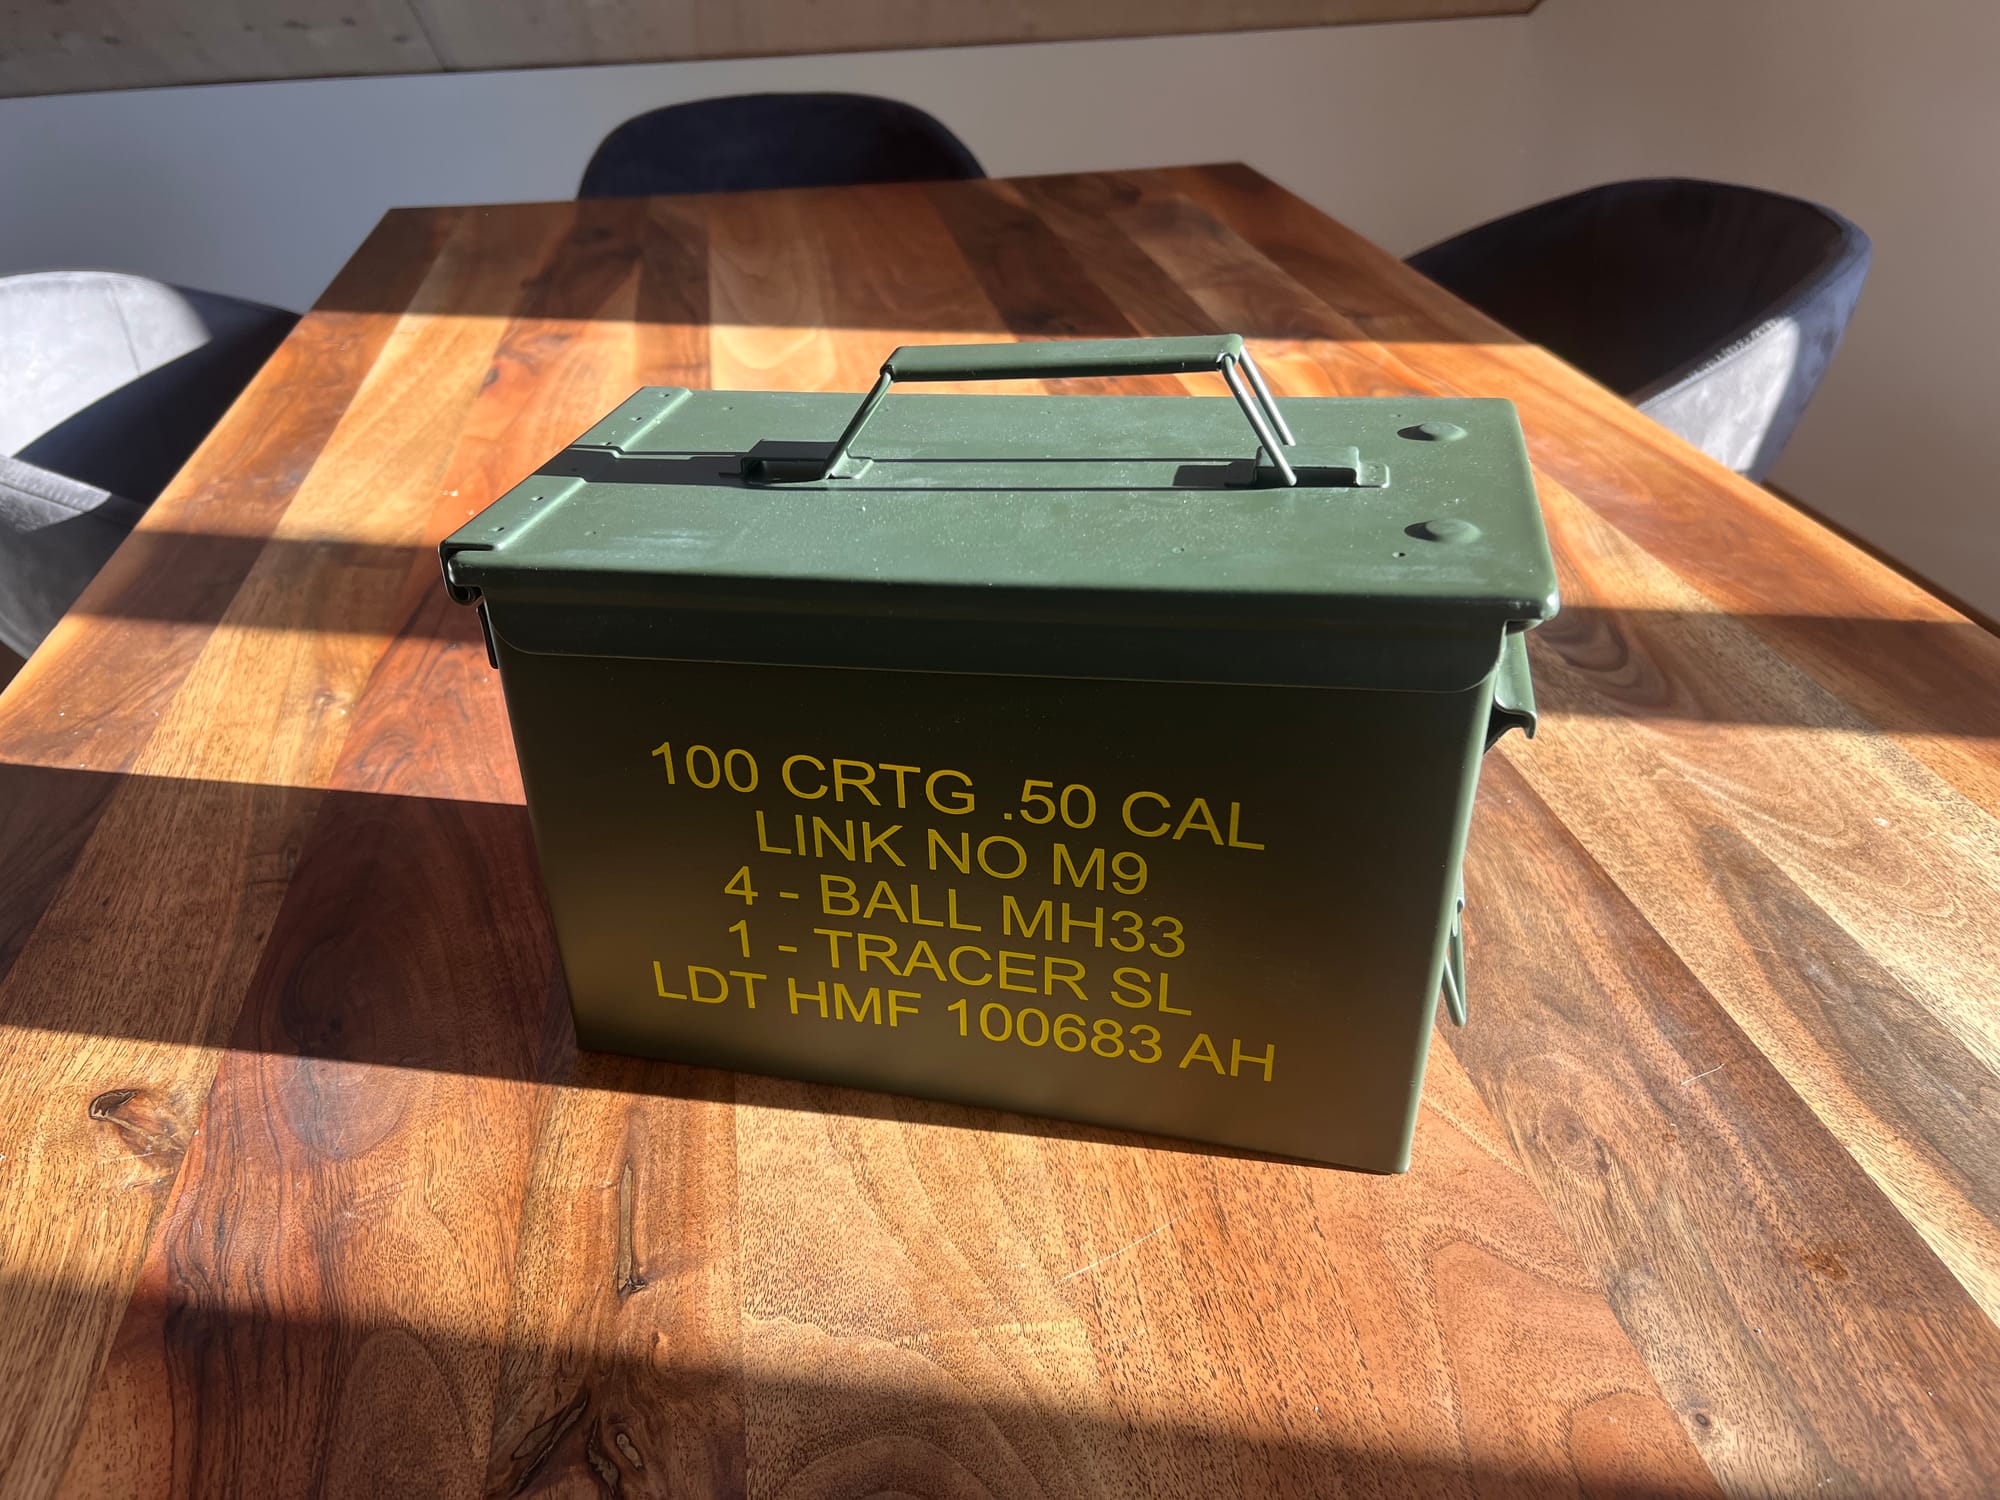
After witnessing a battery fire at a flying field, I never charge without at least a LiPo safe bag. For home charging, I use a modified ammo can with a ceramic tile lining.
It's not just about protecting your batteries—it's about protecting your home and family.
Power Supplies
- AC to DC Converters: Convert mains power to DC for chargers
- Requirements:
- Sufficient wattage (typically 200W+)
- Stable output voltage
- Quality construction with safety certifications
- Adequate cooling
- Recommended Features:
- Adjustable voltage output
- Digital display
- Short circuit protection
- Over-temperature protection
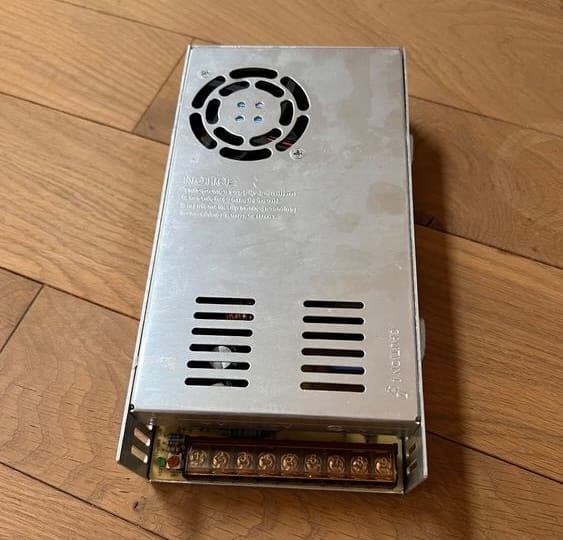
For my old SkyRC charger I used a 24V 400W PC power supply that I modified for my charging setup. It cost less than half the price of a purpose-built charger power supply but delivers rock-solid performance. Just make sure any power supply you use has proper safety certifications—this isn't a place to cut corners.
The Charging Process
Pre-Charging Inspection
Before connecting any battery to a charger, I always perform a thorough inspection:
Visual Inspection
- Physical Damage: Check for punctures, tears, or deformation
- Swelling: Any puffiness indicates internal damage
- Connector Condition: Look for melted plastic, corrosion, or loose pins
- Balance Lead: Ensure all wires are intact and the connector is undamaged
- Wire Insulation: Check for cuts, abrasions, or exposed conductors
I once skipped this step in a rush and connected a battery with a damaged balance lead. The resulting short circuit could have been prevented with a 10-second inspection. Now I never skip this critical step, no matter how pressed for time I am.
Voltage Check
- Overall Pack Voltage: Should be within safe range for chemistry
- LiPo/Li-ion: Minimum 3.0V per cell
- LiHV: Minimum 3.0V per cell
- NiMH: Minimum 1.0V per cell
- Cell Balance: Individual cells should be within 0.1V of each other
- Procedure:
- Use charger's battery meter function
- Use dedicated battery checker
- Use multimeter for manual checking
I have a battery checker built into my parallel charging board and check every battery before connecting it to my charger. I believe this simple habit has saved several batteries that had dropped below safe voltage levels and would have been damaged by standard charging.
Temperature Assessment
- Battery should be at room temperature before charging
- Allow cooling after flight: Typically 15-30 minutes
- Never charge hot batteries: Increases fire risk and reduces lifespan
After an aggressive flying session, my batteries can get quite warm. I've found that placing them on a cool surface (like a metal table or concrete) with some space between them speeds up the cooling process. I never start charging until they're cool to the touch.
Charger Setup
Proper configuration of your charger is critical for safe and effective charging:
Battery Type Selection
- Choose correct chemistry (LiPo, LiHV, Li-ion, NiMH)
- Incorrect selection can lead to dangerous overcharging
This might seem obvious, but I sometimes accidentally started charging a LiPo battery in Li-Ion mode. The 0.15V difference per cell doesn't sound like much, but it significantly reduces battery life and can create a safety hazard.
For more detailed information on battery chemistry, see:
Overview of Drone Battery Types and Chemistry
Cell Count Configuration
- Manually verify and set the correct number of cells
- Many modern chargers auto-detect, but always confirm
Even with auto-detection, I always double-check the cell count. I once had a charger misdetect a partially discharged 4S battery as 3S, which would have resulted in severe overcharging if I hadn't caught it.
Charge Rate Setting
- Standard Rate: 1C (1 × capacity in Ah)
- Example: 1500mAh battery = 1.5A charge rate
- Conservative Rate: 0.5C for longer battery life
- Maximum Rate: Check battery specifications (typically 2C-5C)
- Considerations:
- Lower rates extend battery life
- Higher rates save time but generate more heat
- Never exceed manufacturer's maximum rate
For my race day packs that I replace regularly, I charge at 1C for convenience. For my expensive long-range and cinematic batteries that I want to last for years, I charge at 0.5C. The extra time is worth it for batteries I want to keep for hundreds of cycles.
Balance Charging Setup
- Always use balance charging for lithium batteries
- Connect both main power lead and balance connector
- Verify charger recognizes all cells correctly
I never skip balance charging, even when in a hurry. The few extra minutes it takes can prevent cell drift that eventually ruins batteries. I've seen too many pilots (including myself in the past) try to save time by skipping balancing, only to end up with expensive paperweights a few months later.
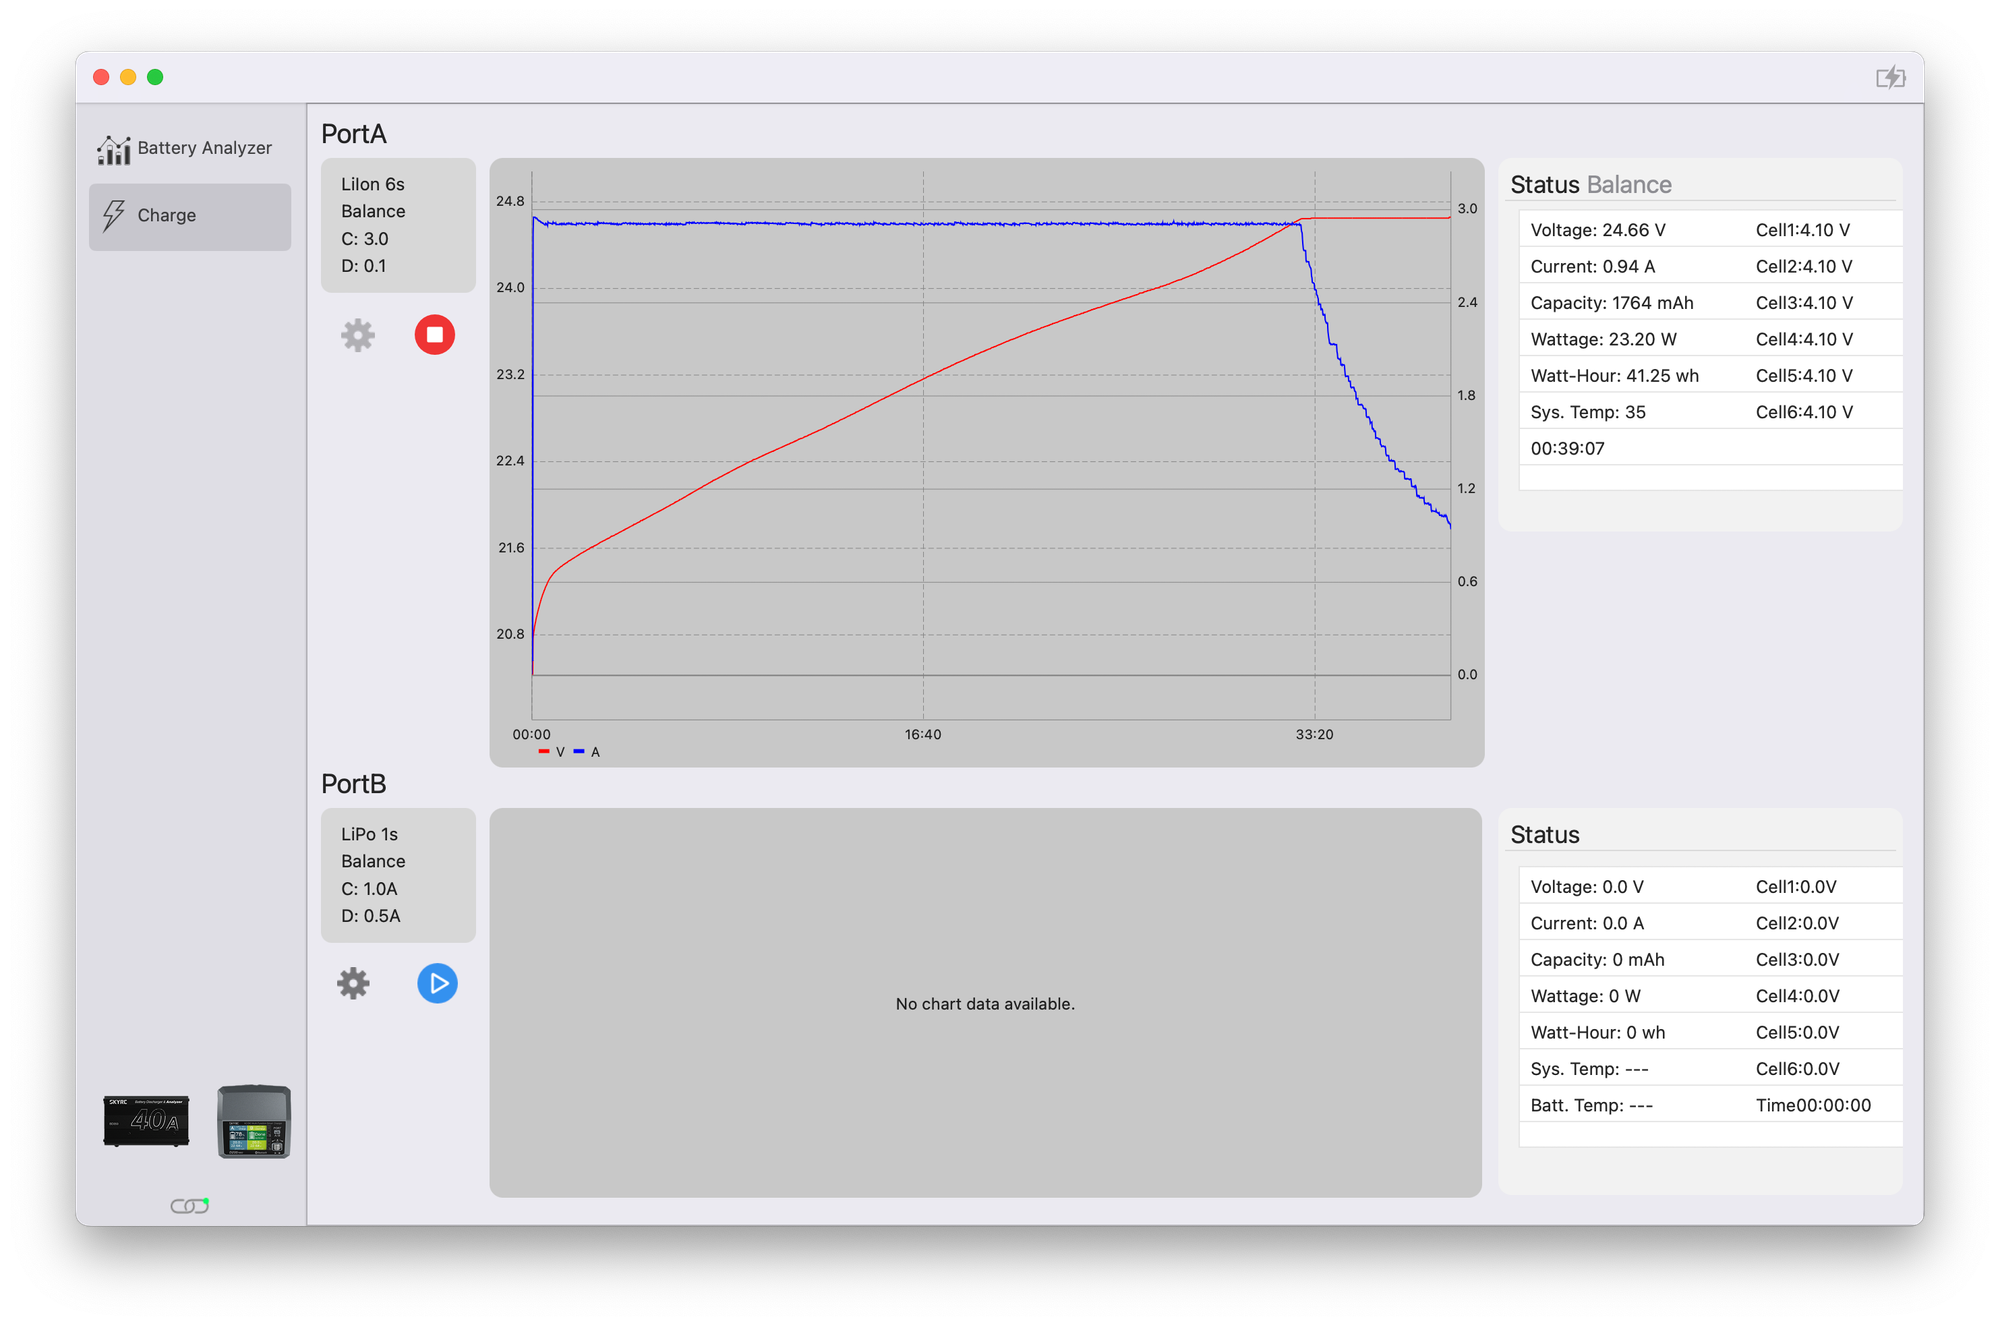
The Charging Cycle
Understanding the stages of charging helps monitor the process effectively:
Lithium Battery Charging Phases
- Pre-charge Phase (for depleted batteries):
- Very low current if battery is below minimum voltage
- Brings battery up to minimum safe level
- Constant Current (CC) Phase:
- Charger delivers set current rate
- Battery voltage steadily increases
- Typically 70-80% of charging happens in this phase
- Constant Voltage (CV) Phase:
- Charger maintains maximum cell voltage (4.2V for LiPo/Li-ion, 4.35V for LiHV)
- Current gradually decreases
- Final 20-30% of charging occurs here
- Termination:
- Charging stops when current drops to approximately 10% of set charge rate
- Charger indicates completion
- Some chargers offer storage charge option after full charge
Understanding these phases has helped me diagnose charging problems. For example, if a battery rushes through the CC phase too quickly, it's often a sign of reduced capacity due to aging.
For more detailed information on battery performance testing, see:
Battery Health Analysis
Balance Charging Process
- Purpose: Ensures all cells reach identical voltage
- Operation:
- Charger monitors individual cell voltages
- Selectively discharges higher voltage cells
- Continues until all cells are within tolerance (typically 0.01-0.03V)
- Importance:
- Prevents overcharging of individual cells
- Maximizes battery capacity
- Extends battery lifespan
- Reduces fire risk
I've noticed that new batteries typically balance quickly, while older batteries take progressively longer to balance. When a battery starts taking an unusually long time to balance, it's often a warning sign that it's approaching the end of its useful life.
Monitoring During Charging
- Regular Visual Checks:
- Watch for swelling or deformation
- Check for excessive heating
- Ensure connections remain secure
- Charger Information:
- Current charge level
- Individual cell voltages
- Charging current
- Battery internal resistance (if supported)
- Temperature (if supported)
- Warning Signs:
- Battery becoming warm (beyond slight warmth)
- Swelling during charging
- Unusual odors
- Inconsistent cell voltage readings
- Charger displaying errors
I make it a habit to check on charging batteries every 10-15 minutes. While modern chargers have numerous safety features, nothing replaces human monitoring. I've caught several potential issues early just by being attentive during the charging process.
Charging Best Practices
Safety Protocols
Location Considerations
- Charge on Non-Flammable Surfaces:
- Concrete, stone, ceramic tile
- Metal workbenches
- LiPo-safe mats
- Away from Flammable Materials:
- No paper, fabric, or wood in immediate vicinity
- Clear area of solvents, fuels, or other chemicals
- Minimum 1 meter clearance around charging station
- Ventilation:
- Well-ventilated area to dissipate heat and potential gases
- Avoid enclosed spaces without airflow
- Supervision:
- Never leave charging batteries unattended
- Remain within hearing distance of smoke alarms
- Consider remote monitoring systems if necessary
I've set up a dedicated charging and storage location in our cellar with a concrete floor. Even with this setup, I never charge when I'm not home. The peace of mind is worth the minor inconvenience of planning my charging sessions.
Containment Systems
- LiPo Safe Bags:
- Contain small fires and limit spread
- Not completely fireproof but delay fire propagation
- Suitable for smaller batteries (up to 3000mAh)
- Charging Bunkers/Safes:
- Metal or ceramic construction
- Designed to fully contain battery fires
- Often include fire-resistant lining
- Recommended for larger batteries or multiple batteries
- DIY Solutions:
- Ammunition cans (with modified lid seal)
- Ceramic flower pots
- Concrete blocks
- Always test and verify containment capability
The investment in these safety measures is trivial compared to the potential cost of a fire.
For more detailed information on battery storage, see:
Drone Battery Storage, Transport, and Discharge
Emergency Procedures
- Fire Response Plan:
- A fire extinguisher suitable for batteries and electronic devices accessible
- Clear evacuation route established
- Emergency contacts readily available
- If a Battery Ignites:
- Disconnect power if safe to do so
- Use appropriate fire extinguisher from safe distance
- If unsafe to approach, evacuate and call emergency services
- Warn others about toxic fumes
- After a Battery Incident:
- Dispose of damaged batteries properly
- Investigate cause to prevent recurrence
- Review and update safety procedures
I keep a suitable fire extinguisher within reach of my charging station and have practiced my response to a battery fire. Having a plan in place reduces panic and improves response if an incident occurs.
Optimizing Battery Life
Charging Frequency
- Ideal Approach:
- Charge shortly before use
- Avoid leaving fully charged for extended periods
- Place in storage charge if not using within 48 hours
- Usage Patterns:
- Regular flyers: Charge before flying sessions
- Occasional flyers: Maintain at storage voltage
- Professional users: Consider rotation system for batteries
I used to charge all my batteries at once, but I've learned that this just leaves most of them sitting at full charge, which reduces their lifespan. Now I only charge what I plan to use in the next day or two and keep the rest at storage voltage.
Temperature Considerations
- Optimal Charging Temperature: 15-25°C
- Cold Weather Charging:
- Allow batteries to reach room temperature first
- Reduce charge rate in colder environments
- Consider battery warmers for field charging
- Hot Weather Precautions:
- Provide additional cooling during charging
- Reduce charge rate
- Allow extra cooling time after flights
I've found that temperature has a dramatic effect on battery performance and safety. When flying in winter, I keep batteries in an insulated bag with a hand warmer (not directly touching the batteries) to maintain optimal temperature.
Charge Rates and Battery Health
- Impact of Charge Rate on Longevity:
- Lower rates (0.5C) maximize cycle life
- Standard rates (1C) balance convenience and longevity
- Higher rates (2C+) prioritize convenience over lifespan
- Recommendations by Usage Type:
- Casual flying: 0.5-1C for maximum battery life
- Regular use: 1C as standard practice
- Competition/Professional: Up to manufacturer's maximum when necessary
- Signs of Aging from Charging Practices:
- Increased internal resistance
- Reduced capacity
- Longer charging time
- Higher temperature during charging
Through years of testing, I've found that batteries charged consistently at 0.5C often last 50-100% longer than identical batteries charged at 1C or higher. For my expensive long-range batteries, this slower charging approach has been well worth the extra time.
Charging New Batteries
New batteries require special attention during their first few charging cycles:
Break-in Procedures
- First Charge:
- Use reduced rate (0.5C) for first 2-3 cycles
- Perform full balance charge
- Monitor closely for any abnormalities
- Initial Cycles:
- Avoid deep discharges
- Moderate flying with conservative throttle use
- Full balance charge after each use
- Capacity Building:
- Some batteries reach full performance after 5-10 cycles
- Gradually increase discharge rates over first few flights
- Monitor performance improvements
I've found that taking the time to properly break in new batteries pays dividends in performance and longevity. I typically dedicate the first weekend with new batteries to this process, using gentle flying and careful charging to condition them properly.
Initial Inspection
- Verify Specifications:
- Confirm cell count matches label
- Check actual capacity against rated capacity
- Measure internal resistance if charger supports it
- Document Baseline Performance:
- Initial internal resistance readings
- Charging time
- Temperature during first charge
- Actual capacity
- Manufacturer Variations:
- Some brands ship at storage voltage
- Others may be partially charged
- Check manufacturer recommendations

I keep tables with baseline measurements for all my batteries. This makes it easy to track degradation over time and make informed decisions about when to retire batteries before they become safety risks.
Troubleshooting Charging Issues
Common Charging Problems
Charger Won't Start Charging
- Possible Causes:
- Battery voltage too low for charger to recognize
- Incorrect battery type selected
- Damaged balance lead or main connector
- Charger power supply issue
- Safety cutoff engaged
- Solutions:
- Try recovery mode if available
- Check all connections
- Verify power supply output
- Reset charger to factory settings
I once spent an hour troubleshooting a charger that wouldn't start, only to discover that the power supply was outputting 9V instead of 12V due to a failing capacitor. Now I keep a multimeter handy to check power supply voltage when issues arise.
Unbalanced Cells
- Possible Causes:
- Aging battery
- Manufacturing defects
- Cell damage from over-discharge
- Previous charging without balancing
- Solutions:
- Extended balance charging
- Repeated balance cycles
- Cell voltage matching (advanced)
- Consider retirement if severe
When I find a battery with cells that won't balance, I first try an extended balance charge at a reduced rate (0.3C). If the imbalance persists after 2-3 attempts, I usually retire the battery rather than risk further issues.
Premature Charging Completion
- Possible Causes:
- False termination detection
- High internal resistance
- Poor connections
- Charger calibration issues
- Solutions:
- Clean all connections
- Check for oxidation on terminals
- Try different charge rate
- Verify charger functionality with known good battery
I've found that oxidized connectors are often the culprit when a charger indicates completion too early. A quick cleaning with contact cleaner usually resolves the issue.
Excessive Heating During Charging
- Possible Causes:
- Charge rate too high
- Battery damage
- High ambient temperature
- Poor ventilation
- Solutions:
- Reduce charge rate
- Improve cooling
- Check for physical damage
- Measure internal resistance
Heat during charging is a major warning sign. I immediately stop charging any battery that becomes more than slightly warm to the touch. A healthy battery should remain cool or only slightly warm during normal charging.
When to Retire a Battery
Recognizing when a battery has reached the end of its useful life:
Safety Indicators
- Physical Damage: Any punctures, tears, or deformation
- Persistent Swelling: Puffiness that doesn't subside
- Overheating: Becoming hot during normal charging
- Burning Smell: Any unusual odors during use or charging
- Leaking: Any visible electrolyte or moisture

I have a zero-tolerance policy for these safety indicators. If a battery shows any of these signs, it goes straight to my disposal bucket, regardless of how new it is or how well it's performing.
Performance Indicators
- Capacity Reduction: Below 80% of original capacity
- Voltage Instability: Rapid voltage sag under load
- Balance Issues: Cells that won't stay balanced
- Internal Resistance: Significant increase (typically >2x original)
- Charging Efficiency: Takes much longer to charge than when new
For my freestyle and racing batteries, I typically retire them when capacity drops below 80% or when voltage sag becomes pronounced. For my camera drones, I'm even more conservative, retiring batteries at around 85-90% capacity to ensure consistent performance during professional work.
Retirement Process
- Discharge to Storage Level: 3.8V per cell for lithium batteries
- Label Clearly: Mark as retired to prevent accidental use
- Proper Disposal: Follow local regulations for battery recycling
- Documentation: Record retirement reason for future reference
I keep a small container specifically for batteries awaiting disposal. Each is discharged to storage voltage, has its leads insulated, and is clearly marked as retired to prevent accidental use.
Advanced Charging Topics
Charging Multiple Batteries
Series Charging
- Definition: Connecting batteries end-to-end to increase voltage
- Applications: Charging higher cell count batteries with lower cell count charger
- Requirements:
- Batteries must be identical (same cell count, capacity, and state)
- Special series charging board
- Careful monitoring of all batteries
- Risks:
- Higher voltage increases danger
- Difficult to ensure proper balance
- Not recommended for most users
I personally avoid series charging due to the increased risks and complexity. The potential savings in charging time aren't worth the additional safety concerns in my opinion.
Parallel Charging
- Definition: Connecting batteries side-by-side to combine capacity
- Applications: Charging multiple batteries simultaneously
- Requirements:
- Batteries should be similar voltage (within 0.1V per cell)
- Similar capacity and cell count
- Dedicated parallel charging board
- Understanding of current distribution
- Process:
- Pre-check all battery voltages
- Connect to parallel board in voltage order (lowest first)
- Set charger to battery type × number of cells
- Set current to sum of desired charging rates
- Safety Considerations:
- Increased energy in case of failure
- Higher demands on charger
- Need for quality connectors and wiring
I use parallel charging regularly, but only with batteries of the same type, age, and capacity. The time savings are substantial, but I'm extra vigilant with safety precautions when charging multiple batteries simultaneously.
For more detailed information on parallel charging, see:
Parallel Battery Charging: Basic Principles and Advanced Techniques
Charging from Field Power Sources
Vehicle Power
- Requirements:
- DC charger with vehicle input capability
- Adequate vehicle electrical system
- Engine running to prevent battery drain
- Considerations:
- Vehicle battery capacity
- Alternator output rating
- Cable length and gauge
- Engine idling fuel consumption
When charging from my vehicle, I always keep the engine running to prevent draining the car battery. I also recommend a dedicated 12V outlet with heavier gauge wiring directly from the battery for more efficient charging.
Portable Power Stations
- Options:
- Lithium-based power stations
- Lead-acid deep cycle batteries
- Solar generator systems
- Selection Factors:
- Capacity (Wh or Ah)
- Output ports (12V DC, AC inverter)
- Weight and portability
- Recharging options

If your budget permits you can invest in a lithium power station that can charge multiple batteries during a full day of flying.
Solar Charging
- Components:
- Solar panels (100W+ recommended)
- Charge controller
- Battery charger
- Power storage (optional)
- Considerations:
- Weather dependency
- Setup time
- Panel efficiency
- System weight
- Best Practices:
- Oversize solar capacity for consistent charging
- Use direct DC charging when possible
- Position panels for maximum sun exposure
- Consider portable folding panels for field use
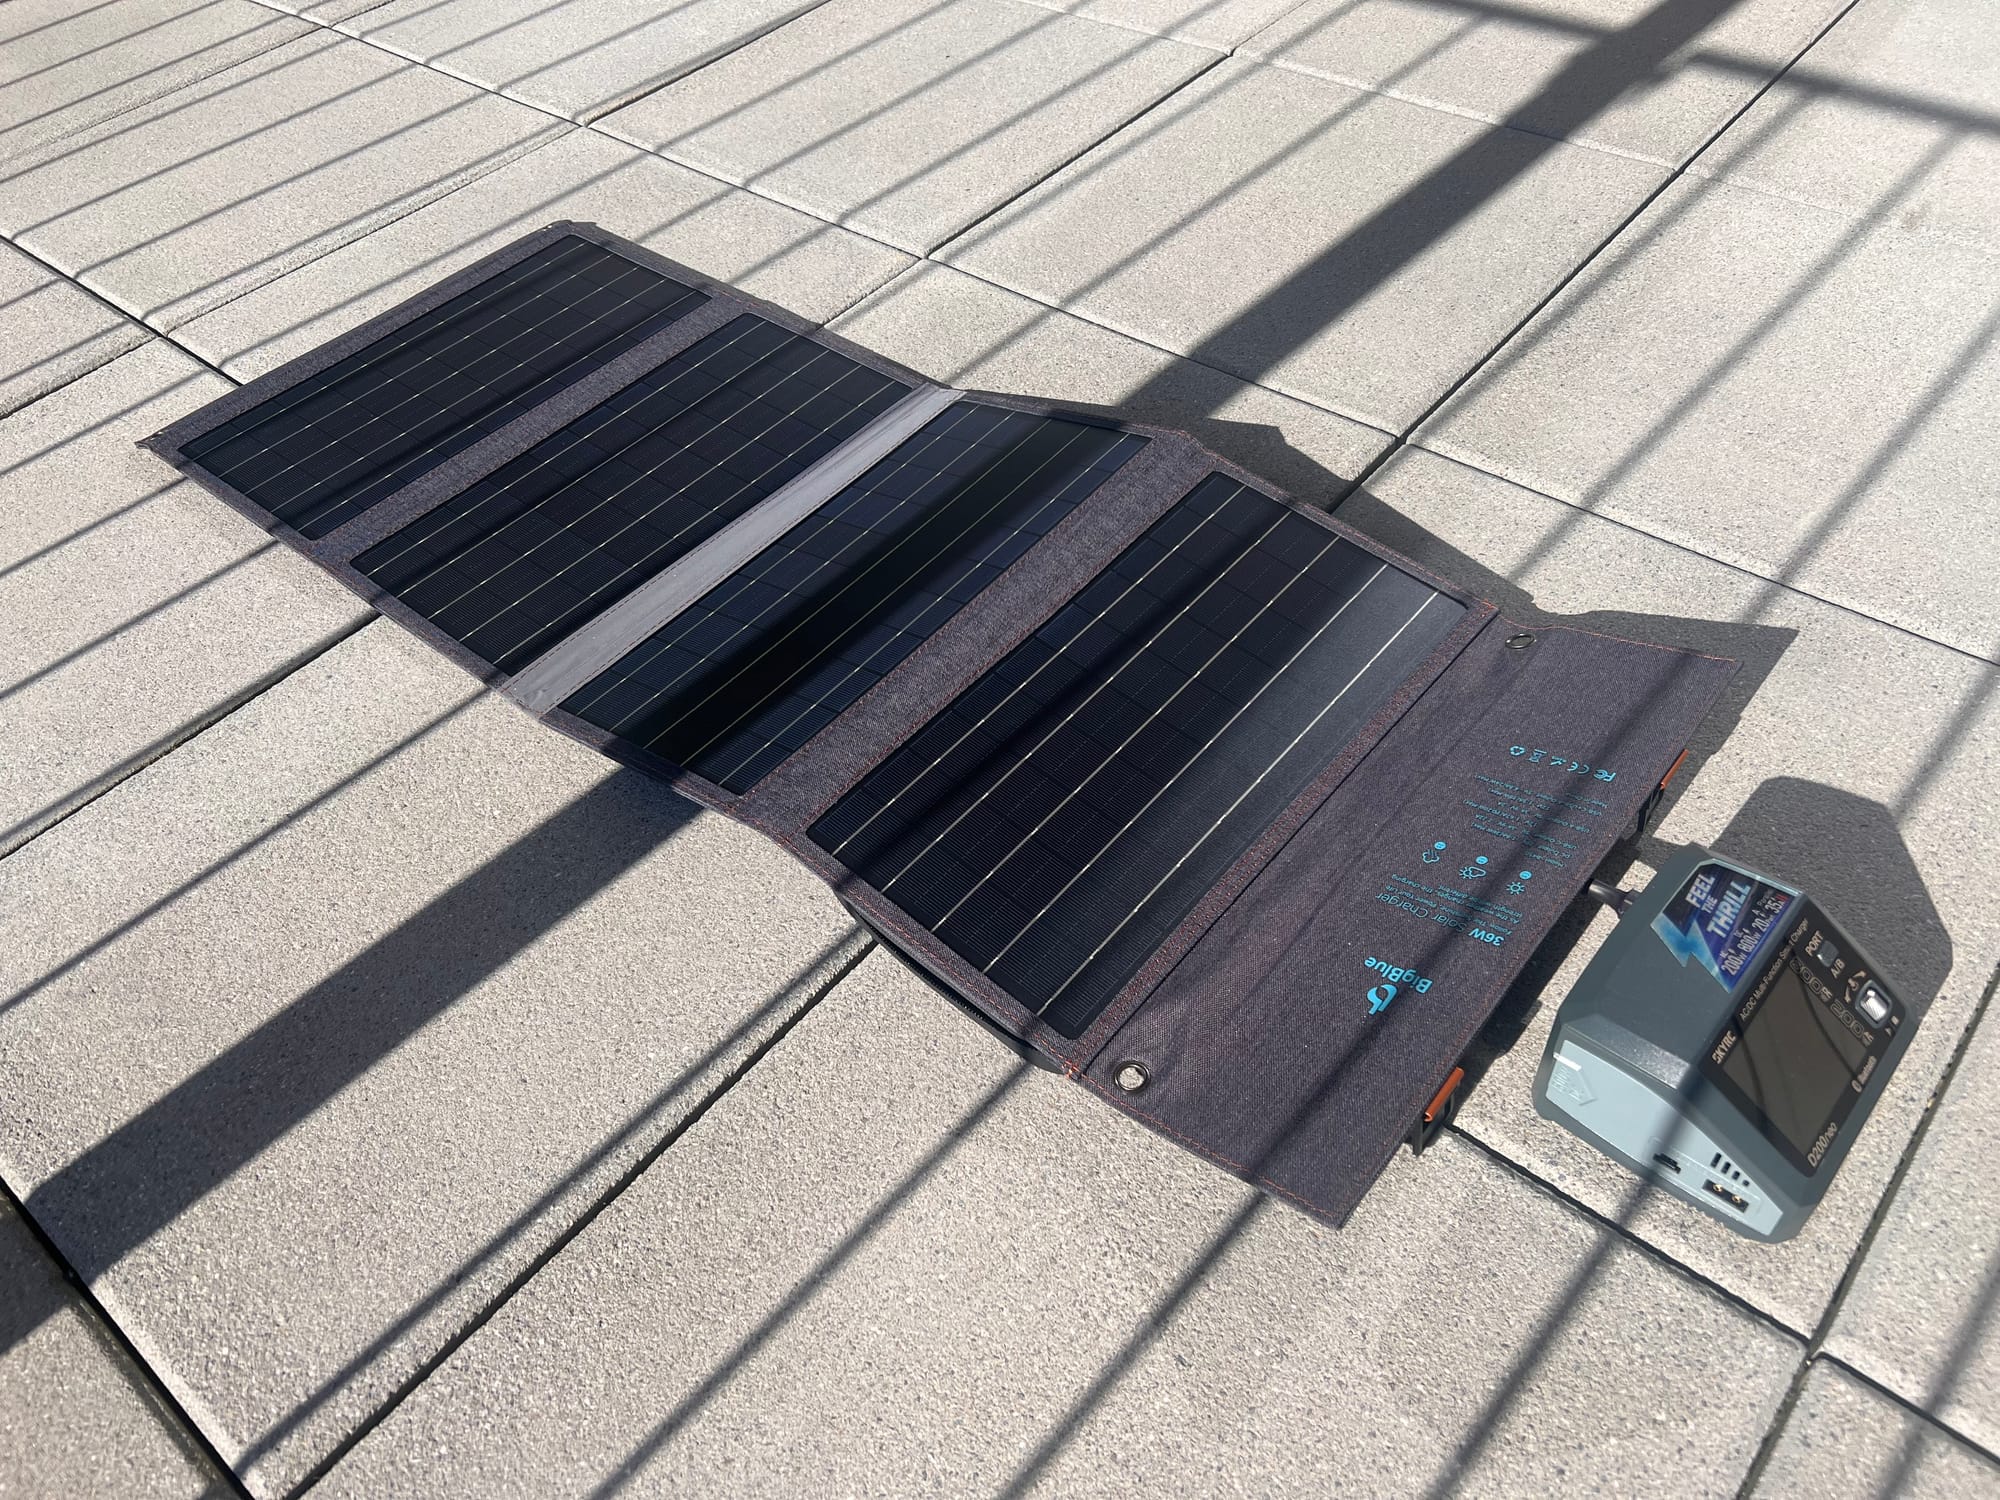
For extended field operations, I use a 120W folding solar panel connected to my power station. In good sunlight, it can provide enough power to charge batteries continuously throughout the day, essentially giving unlimited flight time.
Smart Charging Systems
App-Connected Chargers
- Features:
- Remote monitoring and control
- Charging history and statistics
- Firmware updates
- Custom charging profiles
- Popular Systems:
- ISDT Q8 with smartphone app
- SkyRC with PC/Mac software
- Hota D6 Pro with Bluetooth connectivity
- Benefits:
- Detailed battery health tracking
- Alerts and notifications
- Data-driven battery management
- Convenience of remote monitoring
I've found app-connected chargers particularly useful for tracking battery health over time. Being able to see the gradual increase in internal resistance helps me make informed decisions about when to retire batteries.
Automated Charging Stations
- Commercial Options:
- Multi-battery charging docks
- Robotic battery swapping systems
- Integrated storage and charging units
- Features:
- Sequential or simultaneous charging
- Individual battery monitoring
- Temperature-controlled storage
- Data logging and analysis
- Applications:
- Commercial drone operations
- Search and rescue teams
- Film production crews
- Drone racing teams
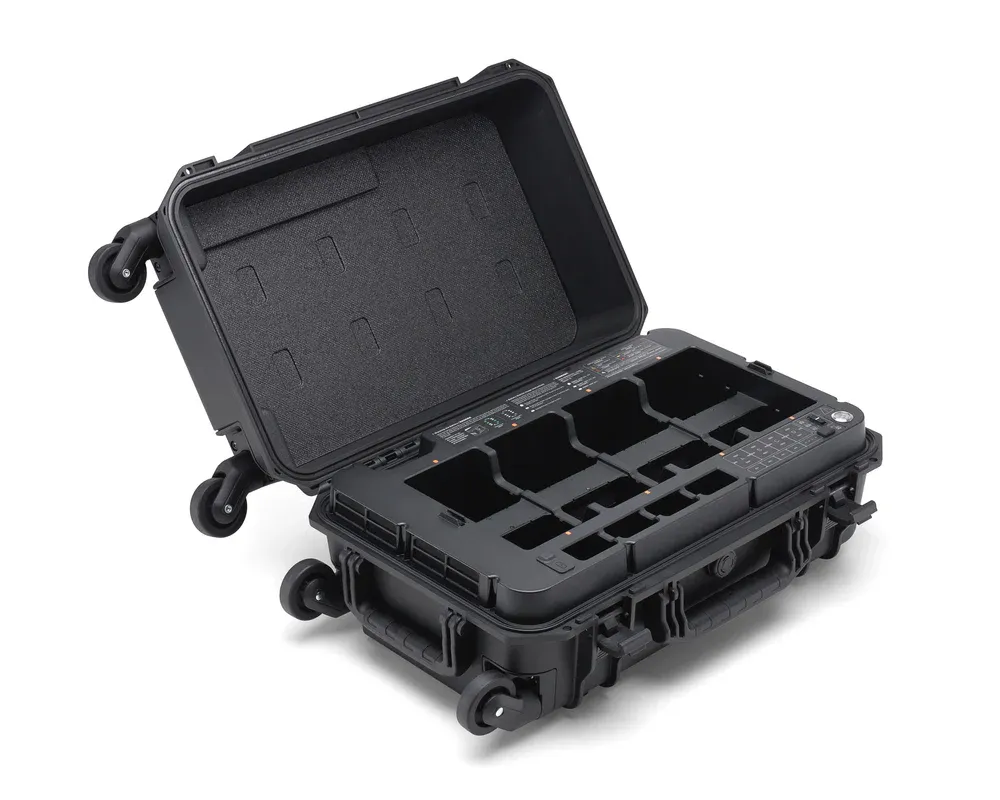
For commercial work, there are automated charging systems that sequentially charge batteries and then maintain them at storage voltage if not used.
Battery Chemistry-Specific Charging Guidelines
LiPo Battery Charging
- Standard Voltage: 4.2V per cell when fully charged
- Recommended Charge Rate: 1C standard, up to manufacturer's maximum
- Balance Charging: Required for every charge cycle
- Temperature Range: 15-25°C (59-77°F) optimal
- Special Considerations:
- Most sensitive to overcharging
- Requires strict adherence to safety protocols
- Higher energy density but shorter lifespan than Li-ion
LiPo batteries make up the majority of my collection due to their excellent power delivery. I'm particularly careful with these batteries as they're the most prone to issues if mishandled.
LiHV Battery Charging
- Standard Voltage: 4.35V per cell when fully charged
- Recommended Charge Rate: 1C standard, up to manufacturer's maximum
- Balance Charging: Required for every charge cycle
- Temperature Range: 15-25°C (59-77°F) optimal
- Special Considerations:
- Requires charger with specific LiHV setting
- Higher voltage provides more power/capacity
- Slightly shorter cycle life than standard LiPo
- All safety precautions for LiPo apply
I've been using LiHV batteries more frequently for racing, where that extra edge in power makes a difference. The most common mistake I see is pilots charging them in standard LiPo mode, which leaves performance on the table. Always double-check that your charger is in LiHV mode before connecting these batteries.
Li-ion Battery Charging
- Standard Voltage: 4.2V per cell when fully charged
- Recommended Charge Rate: 0.5-1C (typically lower than LiPo)
- Balance Charging: Required for every charge cycle
- Temperature Range: 10-30°C (50-86°F) optimal
- Special Considerations:
- Longer cycle life than LiPo
- Lower discharge rates but higher energy density
- Better long-term storage characteristics
- Slightly more tolerant of charging variations
For my long-range builds, I've switched almost entirely to Li-ion batteries. I charge them at a conservative 0.5C rate to maximize their already impressive cycle life. With proper care, I've had Li-ion packs last for over 300 cycles while maintaining more than 85% of their original capacity.
NiMH Battery Charging
- Full Charge Detection: Negative delta V or temperature rise
- Recommended Charge Rate: 1C standard
- Balance Charging: Not applicable (single cell or series only)
- Temperature Range: 10-30°C (50-86°F) optimal
- Special Considerations:
- More tolerant of overcharging than lithium
- No balance charging required
- Lower energy density than lithium batteries
- Different charger settings required
While I rarely use NiMH batteries for drones anymore, I still have some in older transmitters. The main advantage is their forgiving nature—they're much less likely to cause safety issues if charging parameters aren't perfect. Just remember to use the correct charger setting, as the charging profile is completely different from lithium batteries.
For more detailed information on battery chemistry, see:
Overview of Drone Battery Types and Chemistry
Safety Best Practices
Risk Mitigation Strategies
Comprehensive safety measures are essential for charging:
Physical Safety Measures
- Charging Location:
- Non-flammable surface (concrete, metal, ceramic)
- Away from flammable materials (minimum 1 meter)
- Well-ventilated area
- Away from high-traffic areas
- Accessible for monitoring
- Containment Systems:
- LiPo-safe bags
- Fire-resistant charging containers
- Ceramic or metal barriers
- Fire-resistant charging mat
- Monitoring Systems:
- Smoke detectors near charging area
- Temperature monitoring
- Visual line of sight during charging
- Consider camera monitoring for unattended areas
After witnessing a battery fire at a flying field, I take no chances with safety. My charging station is set up on a metal workbench with a concrete floor, and I use multiple layers of protection including LiPo-safe bags and a modified ammo can for containment.
Procedural Safety Measures
- Pre-Charging Checklist:
- Battery physical inspection
- Voltage verification
- Connector inspection
- Equipment verification
- Safety equipment check
- During-Charging Protocol:
- Regular visual checks
- Temperature monitoring
- Parameter verification
- Documentation of abnormalities
- Emergency Procedures:
- Written emergency plan
- Fire extinguisher location
- Battery isolation method
- Evacuation route
I've developed a simple checklist that I follow for every charging session. This systematic approach ensures I don't miss any critical safety steps, even when I'm in a hurry or distracted.
Equipment Maintenance
- Regular Inspection:
- Check equipment for damage
- Inspect all connectors
- Verify fuse functionality
- Test balance ports
- Cleaning Procedures:
- Remove dust and debris
- Clean connection surfaces
- Check for corrosion
- Verify insulation integrity
- Replacement Schedule:
- Replace damaged components immediately
- Periodic replacement of high-wear items
- Upgrade safety features when available
- Document maintenance activities
I perform monthly maintenance on all my charging equipment, including cleaning connectors, checking for wear or damage, and testing safety features. This preventative approach has helped me avoid many potential issues.
Emergency Response
Despite precautions, emergencies can occur and require proper response:
Fire Response
- Early Signs of Battery Fire:
- Swelling or puffing
- Smoke or vapor
- Hissing sounds
- Excessive heat
- Immediate Actions:
- Disconnect power if safe to do so
- Use appropriate fire extinguisher (Class D preferred)
- Do not use water on lithium battery fires
- If unsafe to approach, evacuate and call emergency services
- Warn others about toxic fumes
- Post-Fire Procedures:
- Ventilate area thoroughly
- Monitor for reignition (24+ hours)
- Document incident
- Review and improve safety measures

I keep a suitable fire extinguisher within reach of my charging station and have practiced my response to a battery fire. Having a plan in place reduces panic and improves response if an incident occurs.
After witnessing a battery fire that reignited hours later, I now know that continued monitoring is essential—lithium battery fires can restart even when they appear to be extinguished.
Chemical Exposure
- Potential Exposures:
- Electrolyte leakage
- Venting gases
- Smoke inhalation
- Skin/eye contact
- First Aid Measures:
- Skin contact: Flush with water for 15+ minutes
- Eye contact: Flush with water, seek medical attention
- Inhalation: Move to fresh air, seek medical attention
- Ingestion: Do not induce vomiting, seek immediate medical attention
- Protective Equipment:
- Safety glasses
- Chemical-resistant gloves
- Respiratory protection for emergencies
- Protective clothing if handling damaged batteries


After a minor incident where I got electrolyte on my hands from a damaged battery (that was long before my drone hobby), I now keep nitrile gloves and eye protection in my charging area. The burning sensation from battery electrolyte is not something you want to experience—it took hours of flushing with water to fully relieve the irritation.
Long-Term Safety Culture
Developing a safety mindset ensures consistent risk management:
Knowledge Development
- Continuous Learning:
- Stay updated on battery technology
- Follow manufacturer recommendations
- Participate in community discussions
- Review incident reports and lessons learned
- Technical Understanding:
- Battery chemistry fundamentals
- Electrical principles
- Charging dynamics
- Failure modes
I make it a point to stay current with battery technology developments and safety practices. I'm active in several online forums where pilots share experiences and lessons learned, which has helped me avoid many potential issues before they occurred in my own charging setup.
Equipment Evolution
- Regular Upgrades:
- Adopt improved safety features
- Replace aging equipment
- Incorporate new technologies
- Standardize on quality components
- Testing and Validation:
- Periodically test safety systems
- Validate emergency procedures
- Verify equipment performance
- Document testing results
I've gradually upgraded my parallel charging equipment over the years as better options have become available. What started as a basic setup has evolved into a comprehensive system with multiple safety features. Each upgrade has improved both efficiency and safety.
Community Responsibility
- Knowledge Sharing:
- Educate new users
- Share safety information
- Report equipment issues
- Contribute to best practices
- Incident Reporting:
- Document near-misses
- Share lessons learned
- Propose safety improvements
- Support industry standards
I make it a point to help new pilots understand safe parallel charging practices. By sharing what I've learned—sometimes the hard way—I hope to prevent others from making the same mistakes. The drone community benefits when we all prioritize safety and share our knowledge.
FAQ: Common Questions About Battery Charging
How long should it take to charge my drone battery?
Charging time depends on several factors, primarily battery capacity and charging rate:
Calculation Formula:
- Charging time (hours) = Battery capacity (Ah) ÷ Charging rate (A) × 1.2
The 1.2 multiplier accounts for charging inefficiency and the slower CV phase.
Examples:
- 1500mAh (1.5Ah) battery at 1.5A (1C): 1.5 ÷ 1.5 × 1.2 = 1.2 hours (72 minutes)
- 3000mAh (3Ah) battery at 3A (1C): 3 ÷ 3 × 1.2 = 1.2 hours (72 minutes)
- 5000mAh (5Ah) battery at 2.5A (0.5C): 5 ÷ 2.5 × 1.2 = 2.4 hours (144 minutes)
Factors Affecting Charging Time:
- Battery's initial state of charge
- Battery age and condition
- Temperature (colder batteries charge slower)
- Charger efficiency
- Balance state (badly unbalanced cells take longer)
In my experience, if your charging time is significantly different from the calculated time, it could indicate battery aging, damage, or charger issues. I've found that as batteries age, charging time often increases by 20-30% compared to when they were new, even if the capacity hasn't dropped significantly.
Is it better to charge at 1C or slower?
The optimal charging rate involves balancing convenience against battery longevity:
Charging at 0.5C (Slower):
- Advantages:
- Maximizes battery cycle life
- Reduces stress on battery cells
- Generates less heat during charging
- Improves long-term capacity retention
- Disadvantages:
- Takes twice as long as 1C charging
- Less practical for field use or time constraints
Charging at 1C (Standard):
- Advantages:
- Widely accepted standard rate
- Good balance between speed and battery life
- Supported by virtually all chargers and batteries
- Practical for most usage scenarios
- Disadvantages:
- Some reduction in maximum cycle life compared to slower charging
- Generates moderate heat
Charging Above 1C (Faster):
- Advantages:
- Significantly reduced charging time
- Convenient for field use and quick turnaround
- Disadvantages:
- Reduces overall battery lifespan
- Generates more heat
- May require active cooling
- Not supported by all batteries
I've conducted long-term tests with identical batteries charged at different rates. The results were clear: batteries charged at 0.5C consistently lasted 30-50% longer than those charged at 1C, and more than twice as long as those charged at 2C. For my everyday flying, I use 1C as a compromise, but for my expensive long-range and professional batteries, I always charge at 0.5C to maximize their lifespan.
Should I fully charge batteries before storage?
No, storing fully charged lithium batteries significantly reduces their lifespan and poses safety risks:
Optimal Storage Voltage:
- LiPo/Li-ion: 3.8-3.85V per cell (approximately 50% charged)
- LiHV: 3.85-3.9V per cell (approximately 50% charged)
- NiMH: 40-60% charged
Why Storage Charge is Important:
- Chemical Stability: Storage voltage minimizes chemical reactions inside the battery
- Reduced Stress: Prevents cell degradation from sustained high voltage
- Safety: Lower energy content reduces fire risk during storage
- Longevity: Can extend battery life by 2-3 times compared to storing fully charged
Achieving Storage Voltage:
- Most modern chargers have a "Storage" function
- Set to appropriate battery type and cell count
- Charger will either charge or discharge to reach storage voltage
- Verify with voltage checker after process completes
Storage Duration Guidelines:
- Short-term (1-2 weeks): Storage charge recommended but not critical
- Medium-term (1-6 months): Storage charge essential, check voltage monthly
- Long-term (6+ months): Storage charge essential, check voltage every 2-3 months
I learned this lesson the hard way. Early in my drone journey, I stored fully charged batteries for several months over winter. When spring came, most had significantly reduced capacity, and a few were completely ruined with severe cell imbalance. Now I religiously storage charge any battery I won't use within 48 hours.
Can I use any charger for my drone batteries?
No, using the wrong charger can damage batteries or create safety hazards:
Minimum Charger Requirements:
- Must support the specific battery chemistry (LiPo, LiHV, Li-ion, NiMH)
- Must handle the battery's cell count (1S, 2S, 3S, etc.)
- Must have balance charging capability for multi-cell lithium batteries
- Must provide appropriate charging current for the battery capacity
Compatibility Factors:
- Connector Types: Charger must have compatible connectors or adapters
- Balance Port: Must match battery's balance connector (JST-XH most common)
- Power Output: Sufficient watts to charge at appropriate rate
- Voltage Range: Must support battery's voltage requirements
Risks of Using Incorrect Chargers:
- Overcharging: Using NiMH charger for lithium batteries can cause fire
- Undercharging: Using wrong settings may result in incomplete charging
- Cell Damage: Charging without balancing can damage individual cells
- Connector Damage: Forcing incompatible connectors can cause shorts
I've invested in quality chargers that support all battery types I use. For proprietary batteries like those from DJI, I always use the original chargers. The small savings from using a generic charger aren't worth the risk to expensive batteries or, more importantly, safety.
How do I know when my battery is fully charged?
A properly charged battery will show several indicators of completion:
Charger Indicators:
- Display Message: "Charge Complete" or similar notification
- Status LED: Usually changes from red to green
- Audible Alert: Beep or tone sequence on many chargers
- Current Reading: Drops to zero or minimal maintenance current
Battery Verification:
- Voltage Check:
- LiPo/Li-ion: 4.2V per cell (±0.05V)
- LiHV: 4.35V per cell (±0.05V)
- NiMH: 1.4-1.45V per cell (drops after disconnection)
- Balance Status: All cells within 0.01-0.03V of each other
- Temperature: Slightly warm but never hot
- Physical State: No swelling or deformation
Common Charging Completion Issues:
- False Termination: Charger indicates complete but battery not fully charged
- Verify with voltage checker
- Check for poor connections
- Try different charge rate
- Never Completes: Charger runs indefinitely
- Check for damaged cells
- Verify charger functionality
- Ensure proper settings
- Inconsistent Cell Voltages:
- Extended balance charging may help
- Could indicate aging or damaged battery
- Monitor for worsening over time
I always verify full charge with a separate voltage checker, especially for critical flights. I've had chargers occasionally indicate completion when batteries weren't actually full, particularly with older batteries that have higher internal resistance.
Is it safe to leave batteries charging overnight?
No, unattended charging is one of the most dangerous practices in battery management:
Risks of Unattended Charging:
- Fire Hazard: Battery failures can lead to fires without warning
- Delayed Response: No one present to address problems immediately
- Overcharging: Charger malfunction could lead to dangerous overcharging
- Environmental Changes: Temperature fluctuations overnight can affect charging
Why Even Good Equipment Isn't Enough:
- All batteries have failure potential, even with low probability
- Chargers can malfunction despite safety features
- Connections can become loose or develop high resistance
- Power fluctuations can affect charger operation
Safer Alternatives:
- Schedule Charging: Charge when you can be present and attentive
- Timer Switches: Use external timers to limit charging duration
- Remote Monitoring: If absolutely necessary, use cameras and smart plugs
- Charging Stations: Professional solutions with comprehensive safety features
If You Must Charge Unattended (Not Recommended):
- Use multiple layers of protection (LiPo safe + metal container)
- Place in area with minimal fire spread potential
- Ensure smoke detectors nearby
- Consider temperature-activated fire suppression
- Use lowest practical charge rate
I never leave charging batteries unattended, period. I've witnessed the aftermath of a battery fire that occurred while the owner was sleeping, and the damage was substantial. No amount of convenience is worth that risk.
Conclusion
Proper battery charging is a fundamental skill for drone operators that directly impacts safety, performance, and operating costs. By understanding the principles and best practices outlined in this guide, you can maximize your batteries' lifespan while minimizing risks.
Remember that battery charging is not just about getting energy into your batteries—it's about doing so safely and efficiently. The time invested in learning proper charging techniques pays dividends through extended battery life, improved performance, and most importantly, enhanced safety.
As battery technology continues to evolve, staying informed about best practices remains essential. However, the fundamental principles of proper inspection, appropriate charger selection, correct settings, and vigilant monitoring will remain relevant regardless of advances in battery chemistry or charger technology.
By implementing the practices outlined in this guide, you'll not only get the most from your drone batteries but also develop habits that contribute to the overall safety and sustainability of the hobby and profession.


Comments ()